crwdns2933423:0crwdne2933423:0

Motorola V557 Motherboard Replacement

crwdns2942213:0crwdne2942213:0

  1. Motorola V557 Motherboard Replacement, Battery: crwdns2935265:01crwdnd2935265:01crwdnd2935265:03crwdne2935265:0 Motorola V557 Motherboard Replacement, Battery: crwdns2935265:01crwdnd2935265:02crwdnd2935265:03crwdne2935265:0 Motorola V557 Motherboard Replacement, Battery: crwdns2935265:01crwdnd2935265:03crwdnd2935265:03crwdne2935265:0
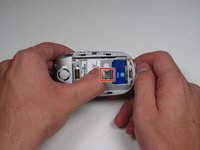
    • First, on the back of the phone find the silver button on the top left corner of the phone.

    • Simultaneously push down the button and slide the back plate down to reveal the battery.

  2. Motorola V557 Motherboard Replacement: crwdns2935265:02crwdnd2935265:01crwdnd2935265:02crwdne2935265:0 Motorola V557 Motherboard Replacement: crwdns2935265:02crwdnd2935265:02crwdnd2935265:02crwdne2935265:0
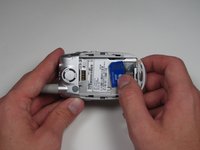
    • Grab the lower edge of the battery at the two bottom corners.

    • Pull upward on the edges to remove the battery.

  3. Motorola V557 Motherboard Replacement, SIM Card: crwdns2935265:03crwdnd2935265:01crwdnd2935265:03crwdne2935265:0 Motorola V557 Motherboard Replacement, SIM Card: crwdns2935265:03crwdnd2935265:02crwdnd2935265:03crwdne2935265:0 Motorola V557 Motherboard Replacement, SIM Card: crwdns2935265:03crwdnd2935265:03crwdnd2935265:03crwdne2935265:0
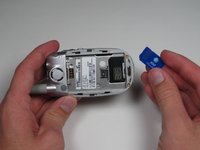
    • Push the metal slider towards the top of the phone until it clicks out of the original position.

    • Gently slide out and remove the SIM card.

  4. Motorola V557 Motherboard Replacement, Antenna: crwdns2935265:04crwdnd2935265:01crwdnd2935265:02crwdne2935265:0 Motorola V557 Motherboard Replacement, Antenna: crwdns2935265:04crwdnd2935265:02crwdnd2935265:02crwdne2935265:0
    • Grip the antenna and twist it counterclockwise to loosen it.

    • When it has been loosened all the way, pull gently to remove the antenna piece.

  5. Motorola V557 Motherboard Replacement, Rear Casing: crwdns2935265:05crwdnd2935265:01crwdnd2935265:03crwdne2935265:0 Motorola V557 Motherboard Replacement, Rear Casing: crwdns2935265:05crwdnd2935265:02crwdnd2935265:03crwdne2935265:0 Motorola V557 Motherboard Replacement, Rear Casing: crwdns2935265:05crwdnd2935265:03crwdnd2935265:03crwdne2935265:0
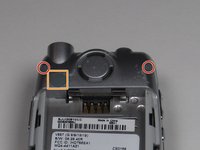
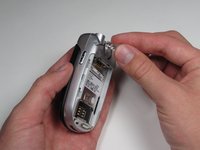
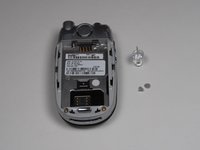
    • Using the push pin, gently pry the top two screws of the cover off.

    • The cover in the upper left of the back plate does not need to be removed.

  6. Motorola V557 Motherboard Replacement: crwdns2935265:06crwdnd2935265:01crwdnd2935265:03crwdne2935265:0 Motorola V557 Motherboard Replacement: crwdns2935265:06crwdnd2935265:02crwdnd2935265:03crwdne2935265:0 Motorola V557 Motherboard Replacement: crwdns2935265:06crwdnd2935265:03crwdnd2935265:03crwdne2935265:0
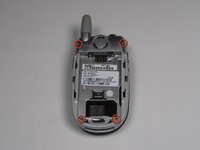
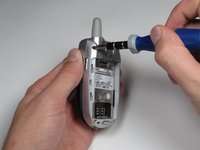
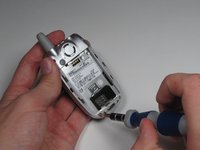
    • At the corners of the phone, remove all four 6.0 mm Torx screws, using your screwdriver.

  7. Motorola V557 Motherboard Replacement: crwdns2935265:07crwdnd2935265:01crwdnd2935265:03crwdne2935265:0 Motorola V557 Motherboard Replacement: crwdns2935265:07crwdnd2935265:02crwdnd2935265:03crwdne2935265:0 Motorola V557 Motherboard Replacement: crwdns2935265:07crwdnd2935265:03crwdnd2935265:03crwdne2935265:0
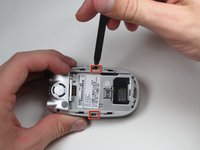
    • Next, insert a spudger into the marked holes. One at a time pry away from the phone to release the internal tabs.

    • Then, separate and detach the rear casing.

  8. Motorola V557 Motherboard Replacement, Motherboard: crwdns2935265:08crwdnd2935265:01crwdnd2935265:03crwdne2935265:0 Motorola V557 Motherboard Replacement, Motherboard: crwdns2935265:08crwdnd2935265:02crwdnd2935265:03crwdne2935265:0 Motorola V557 Motherboard Replacement, Motherboard: crwdns2935265:08crwdnd2935265:03crwdnd2935265:03crwdne2935265:0
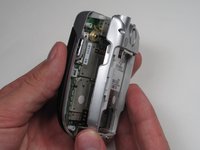
    • Separate the front ribbon cable from the board with a plastic opening tool.

  9. Motorola V557 Motherboard Replacement: crwdns2935265:09crwdnd2935265:01crwdnd2935265:03crwdne2935265:0 Motorola V557 Motherboard Replacement: crwdns2935265:09crwdnd2935265:02crwdnd2935265:03crwdne2935265:0 Motorola V557 Motherboard Replacement: crwdns2935265:09crwdnd2935265:03crwdnd2935265:03crwdne2935265:0
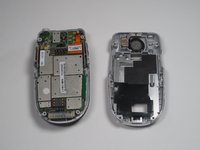
    • Make sure you don’t break the ribbon cables that attach to the side buttons when removing the motherboard.

    • Lift out the motherboard only after all cables have been disconnected. Try to touch it only from the sides.

crwdns2915888:0crwdne2915888:0

To reassemble your device, follow these instructions in reverse order.

crwdns2935229:02crwdne2935229:0

Chad Brantley

crwdns2935283:010/06/10crwdne2935283:0

32 crwdns2915208:0crwdne2915208:0

crwdns2935297:02crwdne2935297:0

crwdns2915084:0crwdne2915084:0

Cal Poly, Team 7-50, Amido Fall 2010 crwdns2935289:0Cal Poly, Team 7-50, Amido Fall 2010crwdne2935289:0
CPSU-AMIDO-F10S7G50

crwdns2931471:04crwdne2931471:0
crwdns2935297:024crwdne2935297:0

crwdns2944067:00crwdne2944067:0

crwdns2917038:0crwdne2917038:0

crwdns2936625:0crwdne2936625:0:

crwdns2936751:024crwdne2936751:0 0

crwdns2936753:07crwdne2936753:0 0

crwdns2936753:030crwdne2936753:0 1

crwdns2942667:0crwdne2942667:0 1,848