crwdns2915892:0crwdne2915892:0
Use this guide to replace the motherboard in your Motorola Moto X.
crwdns2942213:0crwdne2942213:0
-
-
Insert the SIM card eject tool into the hole in the side of the SIM card tray and push to eject the tray.
-
Remove the SIM card tray.
-
-
-
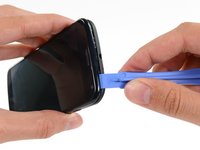
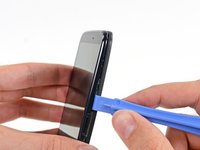
Insert a plastic opening tool into the seam between the front and rear covers near the SIM card slot.
-
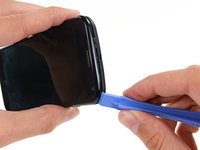
Slide the plastic opening tool along the seam toward the upper corner.
-
-
-
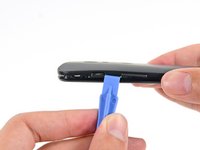
Carefully slide the plastic opening tool around the corner, freeing it from clips.
-
-
-
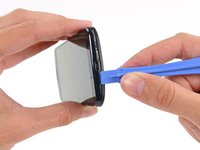
Pry around the top right corner of the phone between the two covers.
-
-
-
Run the opening tool along the seam around all four sides, separating the remaining clips holding the cover on.
Be *very* careful not to push the opening tool too deep when you go around the buttons! I accidentally broke the volume rocker ribbon by doing so, and didn't even realize it until I had completely removed the cover.
When i removed the volume rocker i cant get it back in correctly seems to be in right but the volume up is not clicking and only works if i push it really hard any ideas?
-
-
-
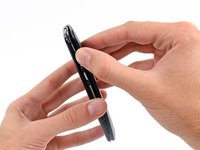
Heat an iOpener and lay it over the phone for approximately 90 seconds to loosen the adhesive securing the back cover.
There is NO GLUE holding on the back of a Moto X with a wood back! That little fact just made the extra $50 I spent on the phone totally worthwhile.
Lucky for you, I have the bamboo, and plenty of adhesive.
Kelly F -
-
-
-
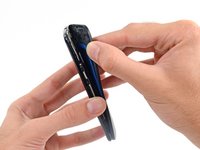
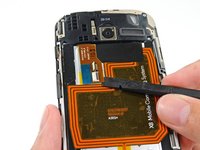
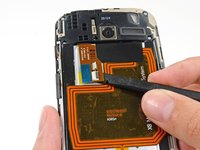
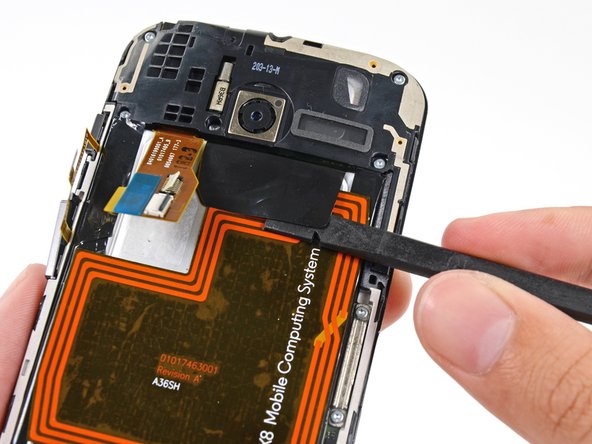
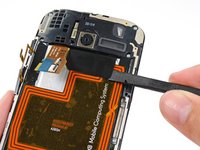
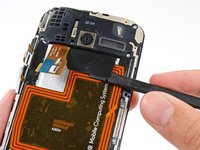
Starting from the SIM slot side, carefully peel the back cover off of the phone.
Step 15 seemed to be the hardest part for me. (step 25, the battery was also difficult). I am now not a fan of sticky stuff, "Mild adhesive" is definitely an understatement, IMHO, just saying I don't like sticky stuff, maybe I didn't do it right. The iOpener seemed to help a little, but not much.
CAUTION
BE CAREFUL with the NFC antenna, it says "X8 Mobile Computing System" on it. The adhesive seemed stick to the the blue stuff on the back cover more and loosen up on the bottom of the antenna, the part that sticks to the battery. So in the process of peeling the back cover the antenna started to come up and was torn at the connector strip before I realized what was happening, step 19 has a good picture of the connector strip that I'm talking about. I like using NFC once in awhile, so now my next FIX will be the antenna.
Overall instructions were GREAT, I now have a camera again. Thank you.
So you are saying that there is no problem if I don't connect the NFC antenna? I'm asking this because I bought a replacement battery that don't include the NFC antenna. I would really appreciate your help with this :)
The adhesive was crazy hard on mine as well and I ended up with two small cracks on the edges of my back cover. The blue rubber piece actually separated from the back and removed it from the battery after it was open. The battery itself was also very difficult to remove (pull tab did nothing) and bent/pried the old battery out. I see no reason for all that adhesive! Other than getting the dang thing open the rest was easy. Great guide!
The adhesive holding the back very strong! In the process of removing the back, I cracked the edges of the back cover and ripped part of the NFC connector. Luckily the friend I was doing the repair for did not even know what NFC was, so she was ok with this. Take your time removing the back cover! Also, the adhesive holding the battery in place was not what I would call mild. The black tab was next to useless in removing the battery
So you are saying that there is no problem if I don't connect the NFC antenna? I'm asking this because I bought a replacement battery that don't include the NFC antenna.
Thank you for the guide !!! comments were really useful too. Read them.
-
-
-
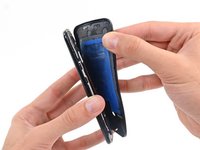
Gently set the back cover down in a way that exposes the camera flash cable connector, but does not put strain on it.
As I had seen in another video, my Moto X with a custom back did not have the blue sticky pad. But the back was still well-adhered in the top corners and with a strip of adhesive along the bottom. In the photo in this step you can see the only adhesive I had to deal with, which was on either side of the lens (two dark areas on the phone back) and along the bottom of the phone (dark area at the bottom of the phone back).
-
-
-
Use the tip of a spudger to flip up the retaining flap on the flash cable ZIF connector.
-
Pull the flash cable straight out of its socket.
-
-
-
Separate the back cover from the phone.
-
-
-
-
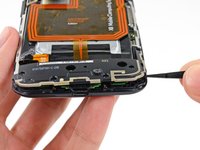
Remove the four 3 mm T3 Torx screws securing the lower antenna assembly to the phone.
It turns out to be the hardest step at the moment. I ordered iOpener set, and it is almost useless. It doesn't have t3, only t5, the actual iOpener is useless. I would happily order t3 on ifixit.com, but there is no t3 in Germany, so I ordered on amazon, and it turned out to be a complete $@$*, I was not able to take a single screw out. The guide is really good, I never thought I would have an issue with a screwdriver ....
These screws were definitely incompatible with my T3 bit - it was too small. T4 worked fine. Not sure if I should attribute this to an error in the guide or inconsistency in the size of my bit set; in any case it might be handy to have a T4 handy if you're not buying the iFixit screwdriver.
Stripped two of four T3 screws almost instantly and with very little force. Be careful! If I can't carve a flat slot into the screw heads I guess I'll have to abort the project or deliberately crack the antenna assembly plastic or try to drill the screw heads to proceed.
Drilled out the heads. A bit scary, yes. I agree with another commenter here that my T3 isn't the best fit in these screws. My T3 was a pretty cheap eBay acquisition, so who knows where the blame should go. I wouldn't do this repair again. Phones should be easier to break open than this one. Too much adhesive (and as I mentioned above, mine didn't even have the blue adhesive pad) and T3 heads are super small and asking to be stripped and the two screws I did get out were way too tight. Oh, and also the potential butchering of the cover when prying loose the clips. Mine bent a bit around the headphone jack, but it smoothed back down and is not noticeable. Phone powered up and is charging now. Let's hope it was worth it.
On my phone, the screws were DEFINITELY T4. My advise? Try T4 first. If it's too big, nothing lost.
I nearly stripped the head on one of mine with my T3 bit because it was too small to get traction.
Where to buy battery...and price of battery?
I use chinese version of T3 screwdriver shipped with screen and T3/T4/T5 version of MATRIX tool set - both didnt fit for Moto X 1st gen screws. Only Bernstain T3 6-658 screwdriver fits ideally! Spent 2 days to find this tool. Be aware.
I was able to do this step by grinding down a cheap T3 that I had laying around from another repair. Like others, I found that these screws seem larger than a T3 - stripped one and had to drill it out. Since the T3 screwdriver I had was tapered, I ground it down until the end was large enough to grip the remaining screws. Success!
-
-
-
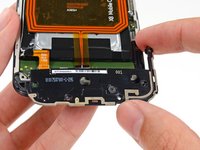
Use the flat end of a spudger to pry up the lower antenna assembly and free it from the phone.
-
Remove the antenna assembly.
See that little circular rubber near the bottom right screw? This funnels the background noise to one of the noise canceling microphones. It will be destroyed when you take it off. Freaked me out when I first opened up mine.
This foam "funnel" required re-forming of the center hole (also check hole in back cover foam gasket). If this sound channel gets blocked, the noise canceling will not function properly. Before re-installing the lower antenna assembly, check the oblong 2-hole gasket on the back side of the antenna assembly which covers a sound channel to the offset microphone input hole. If deformed, gently reshape it with tweezers to assure both holes are not plugged.
my antenna going away after change battery
found networks but not registered , factory reset ,
please help me
-
-
-
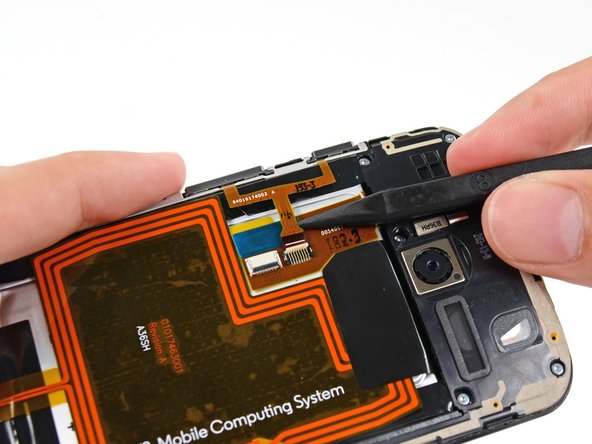
Insert the tip of a spudger under the battery cable near the connector to lift it straight up from its socket.
-
Use the flat end of a spudger to disconnect the NFC antenna cable connector.
-
-
-
Use the tip of a spudger to flip up the ZIF retaining flap from the button assembly cable connector.
-
Slide the tip of the spudger under the button assembly cable near the connector to pull the cable straight out of its socket.
-
-
-
Insert the flat end of a spudger under the interconnect cable to free it from the adhesive holding it to the battery.
-
-
-
Use the flat end of a spudger to peel the adhesive pull-tab off the top of battery.
-
-
crwdns2935267:0crwdne2935267:0Tesa 61395 Tape$5.99
-
Use the adhesive pull-tab to lift the battery from its recess.
-
Remove the battery from the phone.
-
-
-
Remove the five 3 mm T3 Torx screws from the headphone jack/speaker assembly.
These screws appear to have some yellow locktite on them. I rounded 2 of them, so take caution and make sure your screw driver fits correctly. Otherwise you will need to find a drill press to extract them.
Is the glass glued to the LCD like the iPhone 5? Is it possible to repair a broken front glass without changing the whole assembly?
Yes and Yes. Just fixed mine.
Buy a Glass+Frame from ebay. Do steps 1-18 and 37. Then just open the bottom two torx screws, no more. They are the only ones connected to the front frame. Then heat&remove the glass, tear off the frame with pliers. Then you just need to clean the screen from residue and apply LOCA and the Glass+Frame.
Yep, I rounded the bottom-left and bottom-center screws as well as my Torx driver, then slipped with the drill bit and went right through the mobo.
All screws appear to be Torx T4.
-
-
-
Insert a spudger under the panhandle of the headphone jack/speaker assembly and pry it up from its recess.
-
Remove the headphone jack/speaker assembly.
The microphone assembly has foam tape adhesive on it and will want to separate with the headphone jack / speaker assembly.
-
-
-
Push the tip of a spudger under the microphone assembly clip to free it from the earpiece speaker.
-
-
crwdns2935267:0crwdne2935267:0Tweezers$4.99
-
Use the flat end of a spudger to free the microphone assembly cable connector.
-
Use tweezers to remove the microphone assembly.
-
-
-
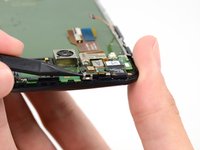
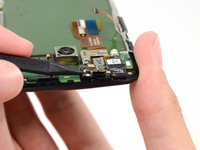
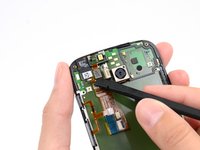
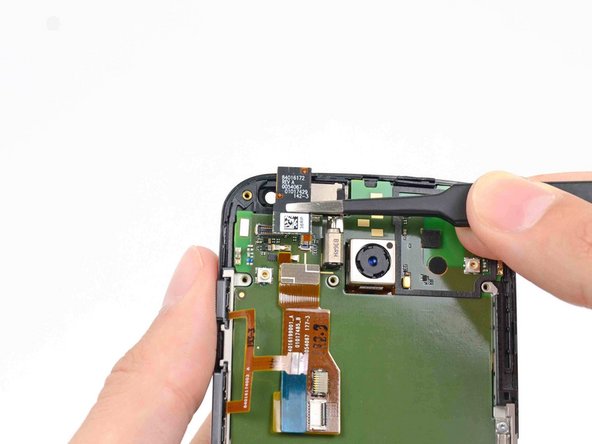
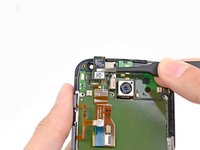
Disconnect the front-facing camera cable connector.
-
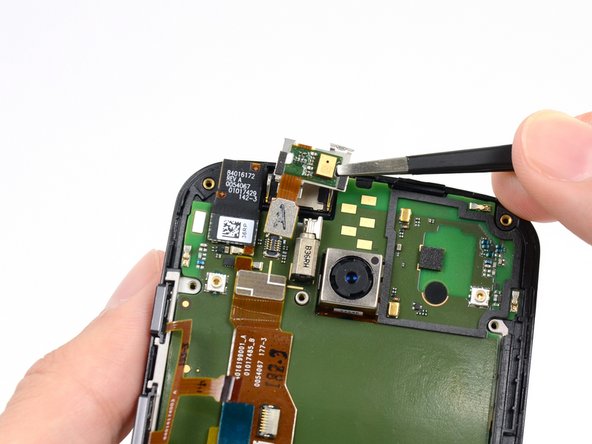
Remove the front-facing camera from its recess with a pair of tweezers.
There is a thin black foam gasket (like a small washer) that is stuck to the front of this camera lens housing. On mine, the gasket was stuck off-center with the inner edge in the field of view of the lens. Using tweezers, I removed it and re-attached it on center. The image is now much sharper!
-
-
-
Remove the final two 3 mm T3 Torx screws from the SIM slot bracket.
On my XT1053 Developer Edition, the Torx screws on the sim slot bracket were not T3 like all the others, they were T4. Trying to use a T3 screwdriver resulted in twisting off the tip of the screwdriver. A T4 screwdriver removed them just fine.
-
-
-
Remove the SIM slot bracket from the motherboard.
-
-
-
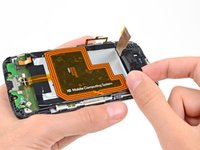
Insert the flat end of a spudger under the motherboard above the button assembly cable, and pry it out of the phone.
-
-
-
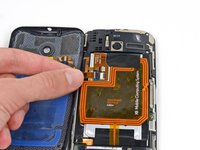
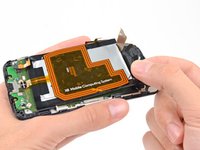
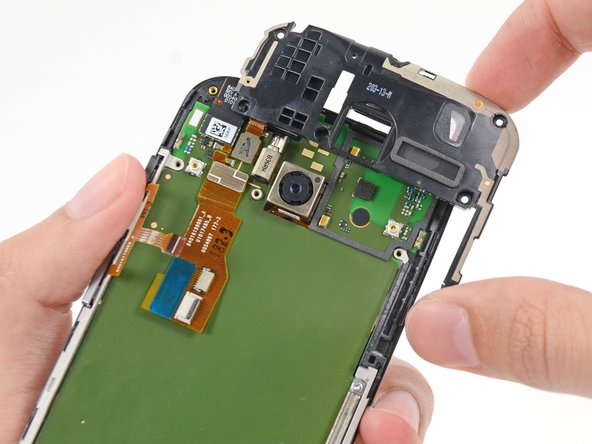
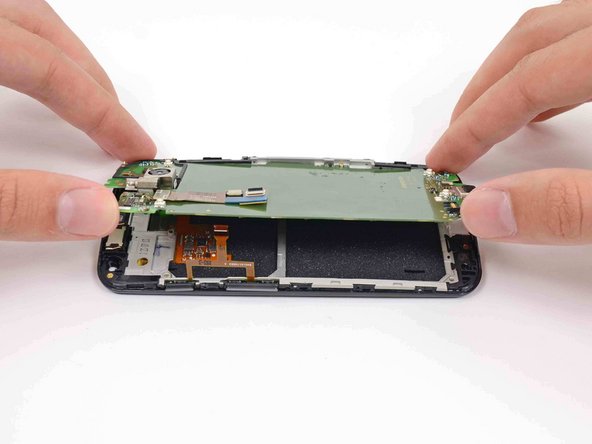
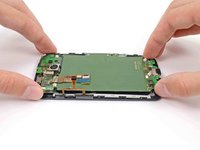
Gently lift the motherboard out of the phone, rotating it from the SIM slot edge of the phone.
-
-
-
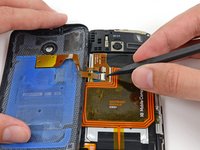
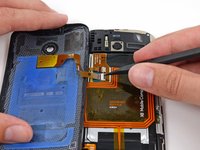
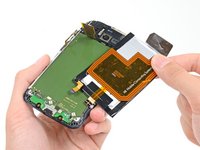
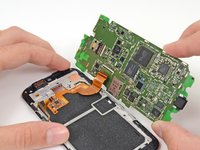
Use the flat end of a spudger to flip the retaining tab on the display cable ZIF connector.
-
Carefully pull the display cable out of its connector as you remove the motherboard from the display assembly.
When trying to put the motherboard connection back together I cannot get the flap to hold down. Anyone have a trick to help me get this connection to hold?
I also struggled getting this cable back in, I actually assembled it thinking it was "in enough", only to find out I had to take it back apart and push it in further.
I found that you can lay the screen face down, with the cable upright at a 90 degree angle, then push the motherboard down onto the cable. When it goes in enough, it snaps in fairly well. If it's not in enough, it will be impossible to close the clamp.
There is a small black plastic piece which goes over the proximity sensor which can easily fall off. If it does, the sensor will malfunction and think that you are always close, which means you will not be able to hang up or do anything else with your phone while you are on a call and will just have to wait for the other person to hang up. I had to do more or less the whole job over again to reinsert this piece (I couldn't tell where it had fallen from and just hoped my phone would be alright with out it).
This is discussed in the thread here:
Can you disable the proximity sensor, Moto X?
You can see the black plastic over the proximity sensor in these two photos:
https://d3nevzfk7ii3be.cloudfront.net/ig...
https://d3nevzfk7ii3be.cloudfront.net/ig...
Whereas it is missing in this photo:
https://d3nevzfk7ii3be.cloudfront.net/ig...
(The sensor is on the lower left in this last photo).
When lifting the motherboard, note that there will be some resistance near the USB port due to an adhered foam gasket/funnel which channels sound from the tiny hole in the glass to the voice mic on the back side of the motherboard. Before re-installation of the motherboard, inspect the shape and hole in this foam gasket. It should look like cylindrical standoff about 0.1 inch tall. If it is not a clear sight to the tiny hole in the motherboard, sound will not reach the voice mic. I used the point of a spudger to re-form the hole.
I connect the cable, but the screen doesn't give me an image. What could it be? The screen is new.
-
-
-
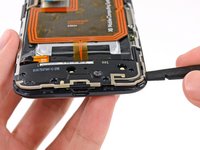
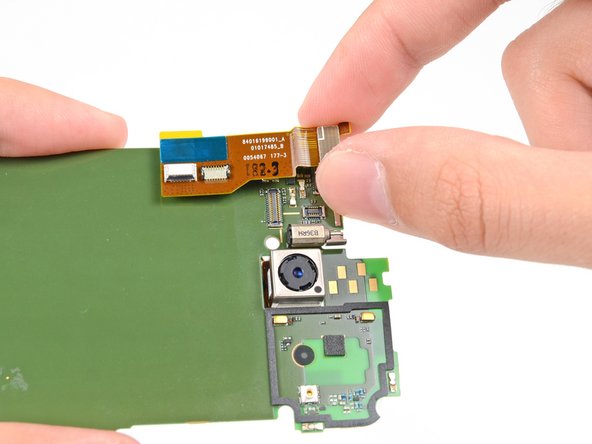
Use the flat end of a spudger to free the interconnect cable connector.
-
Remove the interconnect cable from the motherboard.
-
-
-
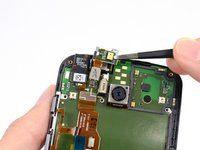
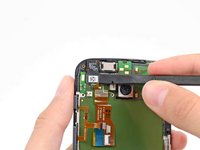
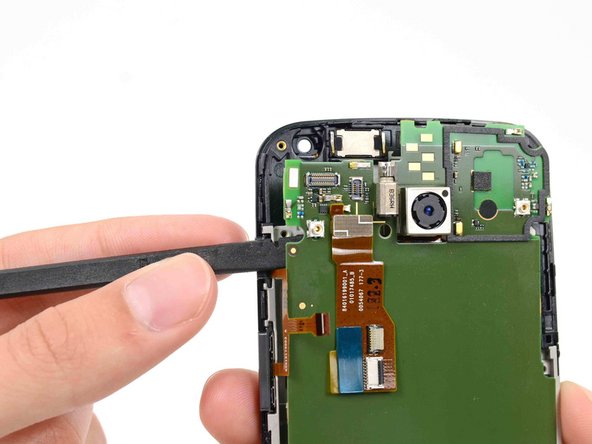
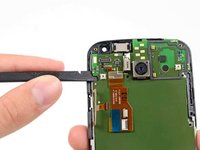
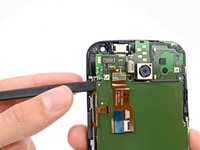
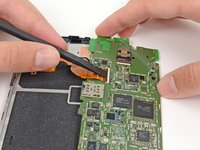
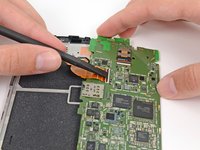
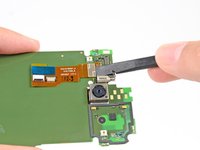
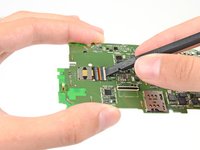
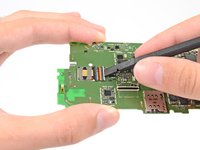
Use the flat end of a spudger to flip up the retaining tab on the front-facing camera ZIF cable connector.
-
Remove the front-facing camera from the motherboard.
-


To reassemble your device, follow these instructions in reverse order.
To reassemble your device, follow these instructions in reverse order.
crwdns2935221:0crwdne2935221:0
crwdns2935229:08crwdne2935229:0


crwdns2947412:03crwdne2947412:0
Where i can find motherboard scheme?
Where is the Bluetooth/WiFi filter?
Mine doesn't work, I need to replace it. I'm from India.
What are the other alternatives for the filter? I mean, other filters that can be used (Replacement for the original one, ofcourse).
I've been using my Moto X (1st Gen) as an Mp3 player/Camera/Video Player. I don't want to continue using it this way. This smartphone is one of the best mankind has ever manufactured. Any help is much appreciated.
Thank you.
Email: amleakhilesh@gmail.com
Where can I buy this motherboard?
Also where can I buy another back facing camera?
Sim not work
Radhey Kashyap - crwdns2934203:0crwdne2934203:0