crwdns2915892:0crwdne2915892:0
The Motorola Moto G7 has a glass LCD display with a Gorilla Glass screen. Like most glass screen phones it is prone to cracks and other screen malfunctions when dropped or damaged in other ways. Damage to the screen or display may cause internal damage as well.
Before you begin, download the Rescue and Smart Assistant app to backup your device and diagnose whether your problem is software or hardware related.
This guide outlines the steps to take to properly and safely remove the screen for replacement. The specific device model used in this guide is Motorola Moto G7.
See the troubleshooting page if you may not be confident in a primary assessment of the device. Always be careful handling the damaged screen as shattered glass can cause injury.
crwdns2942213:0crwdne2942213:0
-
-
Use the iFixit opening tools to gently wedge the front screen from the rest of the device.
-
-
-
Excessive glass and adhesive around the edges should be removed with the spudger.
-
-
-
-
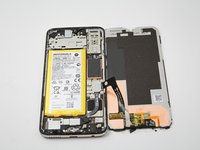
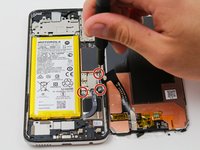
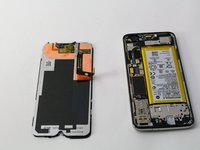
Remove three 2.7mm T3 Torx screws from the metal piece to the right of the battery.
-
-
-
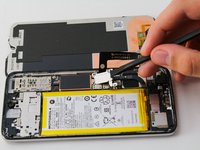
Use a spudger to gently take off the metal piece that was held down by the screws.
-
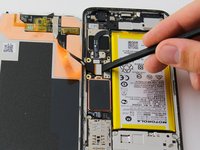
A second metal piece is held under the first. This can also be popped off by using the spudger and nudging it under the metal piece connected to the band.
-


To reassemble your device, follow these instructions in reverse order.
crwdns2935221:0crwdne2935221:0
crwdns2935229:016crwdne2935229:0
crwdns2935287:0crwdne2935287:0

Cal Poly, Team S19-G6, White Winter 2020 crwdns2935289:0Cal Poly, Team S19-G6, White Winter 2020crwdne2935289:0
CPSU-WHITE-W20S19G6
crwdns2931471:04crwdne2931471:0
crwdns2935297:020crwdne2935297:0
crwdns2947412:04crwdne2947412:0
The replacement part listed here on iFixit indicates installation adhesive is not included. Can you reuse the adhesive on the old part? If not, what adhesive is recommended for this type of repair?
You can’t. I used the 1 mil tape and it worked.
How much would it cost to send this in for someone else to put in a new screen?
Muito bom,mas tem que botar um tradutor , porque estar tudo em inglês.