crwdns2915892:0crwdne2915892:0
The motherboard is one of the most important components of a cell phone. It contains the processor, graphics card, RAM, and other necessary components for the phone’s functionality. Replacing the Motorola Moto G7 motherboard is only necessary if there has been major damage to the phone. To replace the motherboard, other components must be removed first, including the screen, speaker, and camera assemblies. When replacing the motherboard, be careful to not puncture the battery.
Before you begin, download the Rescue and Smart Assistant app to backup your device and diagnose whether your problem is software or hardware related.
crwdns2942213:0crwdne2942213:0
-
-
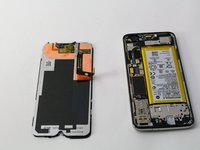
Use the iFixit opening tools to gently wedge the front screen from the rest of the device.
-
-
-
Excessive glass and adhesive around the edges should be removed with the spudger.
-
-
-
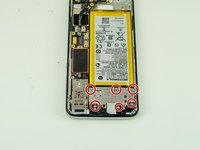
Remove three 2.7mm T3 Torx screws from the metal piece to the right of the battery.
-
-
-
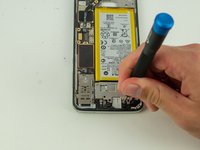
Use a spudger to gently take off the metal piece that was held down by the screws.
-
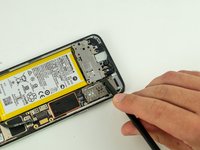
A second metal piece is held under the first. This can also be popped off by using the spudger and nudging it under the metal piece connected to the band.
This would also be a good place to disconnect the battery connector, which is right under the display connector.
At this point, one could remove the battery. I don't see why the remaining steps are necessary.
there is one more piece to remove here. 3 black screws (T3 but longer) and the part visible above the battery on the last image above. Empty space on the top of the image in step 5.
-
-
-
-
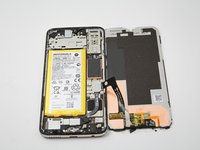
Remove by the six 2.7mm T3 Torx screws from the metal panel above the battery.
-
Wedge a spudger between the SD card tray and the metal plate, and use a medium amount of force to pry up the plate.
-
-
-
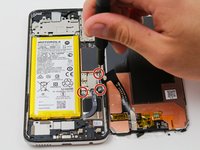
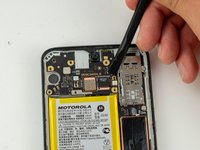
Use a spudger beneath the right side of the connector to detach it.
-
-
-
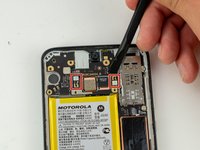
Detach the two small black and white connectors on either side of the camera using a spudger.
-
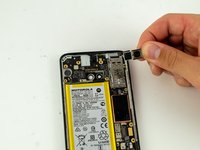
Remove the camera from the smartphone.
-
-
-
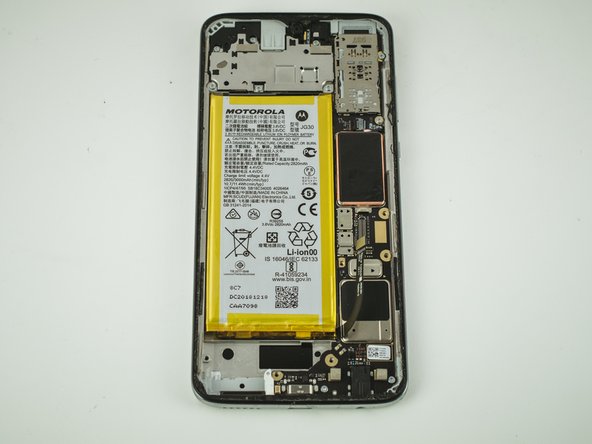
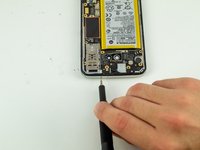
Remove three 3.7mm T3 Torx screws from the bottom of the phone.
-
Use the spudger to gently lift the speaker out of the phone.
Super, und womit klebe ich das jetzt wieder zusammen??
-
-
-
Use the SIM card removal bit to remove the SIM card tray.
-
-
-
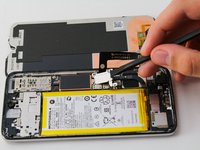
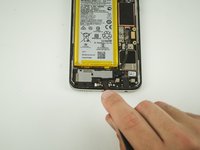
Remove the fingerprint scanner connector from the motherboard by levering the spudger underneath the connector corner.
The circled part is not the connector, it’s the cable. The connector is just above what the picture shows.
-
-
-
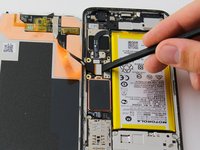
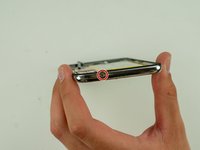
Use a T3 Torx screwdriver to remove the four 2.3mm screws from the bottom and right sides of the phone.
Don’t forget to disconnect the ribbon cable above the screw second from the right!
-
-
-
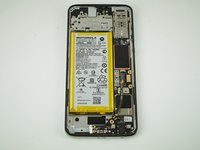
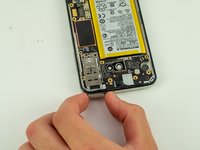
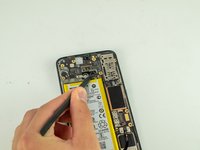
Lever the spudger underneath the motherboard above the battery.
-
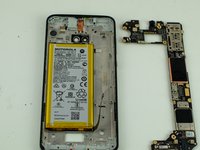
Use a medium amount of force to remove the motherboard from the rest of the phone assembly.
The microphone/speaker holds the motherboard in. There are no directions here to remove it. It’s still attached in Step 4 but gone in Step 5.
1. In the lower left corner of the phone, there are three black T5 screws that need to be removed.
2. Use your spudger to lift it out of the phone. There are no cables to detach. It has two contacts that press against the motherboard.
3. There is a small white piece of plastic that sits at the edge of the motherboard. The part we just removed holds it in so there should be nothing attaching it to the phone now. Remove it.
(Note: Step 8 of the guide for replacing the motherboard in this phone explains this step.)
-


To reassemble your device, follow these instructions in reverse order.
To reassemble your device, follow these instructions in reverse order.
crwdns2935221:0crwdne2935221:0
crwdns2935229:06crwdne2935229:0
crwdns2915084:0crwdne2915084:0

Cal Poly, Team S19-G6, White Winter 2020 crwdns2935289:0Cal Poly, Team S19-G6, White Winter 2020crwdne2935289:0
CPSU-WHITE-W20S19G6
crwdns2931471:04crwdne2931471:0
crwdns2935297:020crwdne2935297:0
crwdns2947410:01crwdne2947410:0
You forgot about removing the little cable on the right side of the motherboard. About 1/4 down the board up against the outside of the case. It's one of those Zero Force cables.
Right below the SIM card holder.
Above the highest black chip.
And to the left of the second screw hole
(from the top).
You can see it in the picture
I just destroyed my screen by dividing it in two parts. You have to be extra careful to dig deep enough in the first step, so you lift the entire screen unit!
Michael - crwdns2934203:0crwdne2934203:0
Thanks... I almost did just that!
Carlisle “Mike” Wick - crwdns2934203:0crwdne2934203:0
I didn't have a problem seperating the screen on my moto G7 or moto Gplay (2021) because the battery "expanded" after 2 years and caused a partial clean separation of the screen and main unit.
The expansion is due to excessive charging mot claims on their support website.
jeff lee - crwdns2934203:0crwdne2934203:0