crwdns2915892:0crwdne2915892:0
In this guide, we will be walking through how to remove the front camera of the Motorola Moto G3.
Before you begin, download the Software Fix app to backup your device and diagnose whether your problem is software or hardware related.
crwdns2942213:0crwdne2942213:0
-
-
Use your fingernail to pry under the notch on the bottom of the phone and remove the back cover.
-
-
-
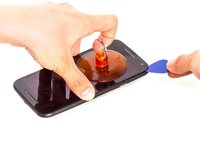
Evenly apply heat to the edges of the touchscreen to loosen the adhesive. Continue to Step 3 once the edge of the screen is warm to the touch.
-
-
-
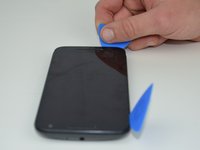
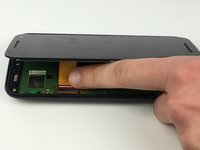
As the adhesive loosens, pry up an edge of the screen with a plastic opening tool or an opening pick. A suction cup may also be useful here.
-
Use an opening pick to hold that edge in place and continue this process around the entire screen, applying more heat as necessary.
-
-
crwdns2935267:0crwdne2935267:0Tesa 61395 Tape$5.99
-
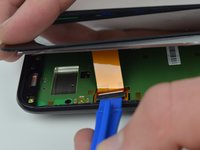
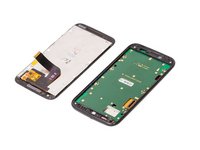
Use a plastic opening tool to flip up the lock on the display cable ZIF connector.
-
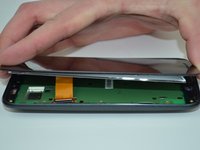
Pull the display cable from its socket on the motherboard.
-
-
-
-
Remove the ten 2.4 mm T4 screws from the sides of the motherboard.
-
Remove the four 4.5 mm T4 screws from the top and bottom of the motherboard.
-
-
-
If adhesive residue is holding the motherboard in place, use a Jimmy to cut the adhesive between the motherboard and the back of the phone.
-
Carefully lift the right edge of the motherboard from the phone.
-
-
-
Use a plastic opening tool to disconnect the battery wires from the motherboard.
-
-
-
Flip the motherboard over.
-
-
crwdns2935267:0crwdne2935267:0Tweezers$4.99
-
Using tweezers, pry open the black front camera cover and remove it from the motherboard.
-
-
-
Remove the front camera from the device.
-


To reassemble your device, follow these instructions in reverse order.
To reassemble your device, follow these instructions in reverse order.
crwdns2935221:0crwdne2935221:0
crwdns2935227:0crwdne2935227:0

crwdns2915084:0crwdne2915084:0

Baylor, Team S5-G3, Williams Spring 2018 crwdns2935289:0Baylor, Team S5-G3, Williams Spring 2018crwdne2935289:0
BU-WILLIAMS-S18S5G3
crwdns2931471:03crwdne2931471:0
crwdns2935297:09crwdne2935297:0