crwdns2915892:0crwdne2915892:0
This guide will show you how to remove the motherboard of your Moto G 3rd Generation. Follow these step for access into the phone's interior. The disassembly requires the use of a heat gun or an iOpener.
Before you begin, download the Software Fix app to backup your device and diagnose whether your problem is software or hardware related.
crwdns2942213:0crwdne2942213:0
-
-
Use your fingernail to pry under the notch on the bottom of the phone and remove the back cover.
-
-
-
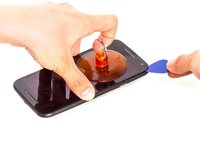
Evenly apply heat to the edges of the touchscreen to loosen the adhesive. Continue to Step 3 once the edge of the screen is warm to the touch.
-
-
-
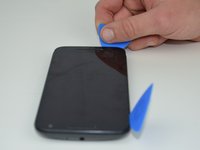
As the adhesive loosens, pry up an edge of the screen with a plastic opening tool or an opening pick. A suction cup may also be useful here.
-
Use an opening pick to hold that edge in place and continue this process around the entire screen, applying more heat as necessary.
-
-
-
crwdns2935267:0crwdne2935267:0Tesa 61395 Tape$5.99
-
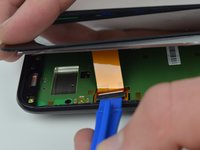
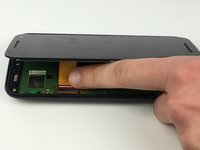
Use a plastic opening tool to flip up the lock on the display cable ZIF connector.
-
Pull the display cable from its socket on the motherboard.
-
-
-
Remove the ten 2.4 mm T4 screws from the sides of the motherboard.
-
Remove the four 4.5 mm T4 screws from the top and bottom of the motherboard.
-
-
-
If adhesive residue is holding the motherboard in place, use a Jimmy to cut the adhesive between the motherboard and the back of the phone.
-
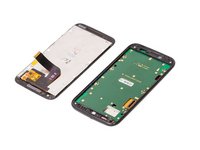
Carefully lift the right edge of the motherboard from the phone.
-
-
-
Use a plastic opening tool to disconnect the battery wires from the motherboard.
-


To reassemble your device, follow these instructions in reverse order.
To reassemble your device, follow these instructions in reverse order.
crwdns2935221:0crwdne2935221:0
crwdns2935229:012crwdne2935229:0
crwdns2915084:0crwdne2915084:0

USF Tampa, Team 1-3, Nance Spring 2016 crwdns2935289:0USF Tampa, Team 1-3, Nance Spring 2016crwdne2935289:0
USFT-NANCE-S16S1G3
crwdns2931471:04crwdne2931471:0
crwdns2935297:021crwdne2935297:0
crwdns2947412:02crwdne2947412:0
My phone is broken inside, it’s not cracked but it did fall off the table i need it fixed
my moto g3 display light problem,this display have no light what can i do