crwdns2915892:0crwdne2915892:0
This guide will show the user how to replace the screen assembly in the Motorola Moto E6. It should be replaced if it is malfunctioning or broken. A cracked screen is prone to further damage and should be fixed promptly. A cracked screen can also be potentially hazardous and the user should be cautious while replacing.
Before you begin, download the Rescue and Smart Assistant app to backup your device and diagnose whether your problem is software or hardware related.
crwdns2942213:0crwdne2942213:0
-
-
Begin by prying open the bottom right of the device using the plastic opening tool.
-
Work your way around the edge of the device, slowly prying open the casing until it pops off.
-
-
-
Use the opening tool on the divot located below the battery to pop it out.
-
-
-
Remove the eleven 3.8 mm T4 Torx screws located above the battery compartment.
-
-
-
Use the plastic opening tools to pry open the piece located at the top of the device.
-
Start by prying open the side of the compartment and work your way towards the camera module, prying open the compartment as you go.
-
Pop off the piece above the battery compartment.
-
-
-
-
Remove the two 1.1 mm T4 Torx screws from the bottom left and top right sides of the motherboard.
-
-
-
Remove the two press fit cables at the bottom of the motherboard with the plastic opening tool.
-
Remove the coaxial cable using the plastic opening tool.
-
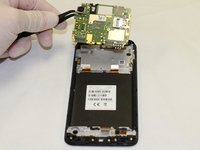
After removing the cables, remove the motherboard from the phone by hand.
-
-
-
Remove the seven 3.8 mm T4 screws on the piece located below the battery compartment.
-
-
-
Begin prying off the bottom piece with the opening tools on the divot located at the bottom left.
-
Work your way around the piece until it pops off.
-
-
-
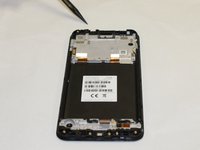
Remove the press fit cable at the top of the charging dock with the plastic opening tool.
-
Remove the coaxial cable using the plastic opening tool.
-
-
-
Remove the two 1.1 mm T4 Torx screws on the bottom right and top left sides of the charging dock.
-
Remove the charging dock by hand.
-
-
-
After removing the motherboard and the charging dock, the screen assembly can be replaced.
-


To reassemble your device, follow these instructions in reverse order.
To reassemble your device, follow these instructions in reverse order.
crwdns2935221:0crwdne2935221:0
crwdns2935229:03crwdne2935229:0

crwdns2915084:0crwdne2915084:0

The Citadel Military College of South Carolina, Team S2-G16, Eggleston Fall 2020 crwdns2935289:0The Citadel Military College of South Carolina, Team S2-G16, Eggleston Fall 2020crwdne2935289:0
CMCSC-EGGLESTON-F20S2G16
crwdns2931471:03crwdne2931471:0
crwdns2935297:05crwdne2935297:0
crwdns2947412:04crwdne2947412:0
Pro Tip.
The OEM parts for this do not include the flex that connects the Sub to main PBA, nor the earspeaker, nor the buttons or Vibration motor, so all of those will need to be moved over if you are utilizing OEM original components.
you get me right to the point where i can get to the screen. now, how i do iget it off? put the new one on???
Use heat on the display to loosen the adhesive. Then you can separate the display and put in the new one.
Sorry, these instructions are far from complete.