crwdns2933423:0crwdne2933423:0

Motorola Moto E Display Assembly Replacement

crwdns2942213:0crwdne2942213:0

  1. Motorola Moto E Display Assembly Replacement, Motherboard: crwdns2935265:01crwdnd2935265:01crwdnd2935265:01crwdne2935265:0
    • Turn off the device before beginning.

    • To remove the back cover, start at one corner and stick the plastic opening tool under the cover and pry it away from the phone.

    • With the plastic opening tool, pry all the way around the phone while lifting up on the cover.

    • You should hear a snapping sound at each corner.

  2. Motorola Moto E Display Assembly Replacement: crwdns2935265:02crwdnd2935265:01crwdnd2935265:01crwdne2935265:0
    • Unscrew the 14- 4mm screws using a T4 Torx driver head.

    • Working on a magnet board is recommended as the screws are small and can be easily misplaced.

  3. Motorola Moto E Display Assembly Replacement: crwdns2935265:03crwdnd2935265:01crwdnd2935265:01crwdne2935265:0
    • Using the same plastic opening tool as in step 1, once again pry up on the edges of the plastic back cover.

    • Be sure that all of the screws are out before lifting the cover. The plastic backing is fragile, and it may break.

  4. Motorola Moto E Display Assembly Replacement: crwdns2935265:04crwdnd2935265:01crwdnd2935265:01crwdne2935265:0
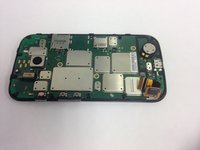
    • Gently lift the back plate away, exposing the motherboard. The battery will be stuck to the back of the cover, so be careful when lifting it off.

    • Do not touch the connections to the battery in the red square on the picture.

  5. Motorola Moto E Display Assembly Replacement: crwdns2935265:05crwdnd2935265:01crwdnd2935265:01crwdne2935265:0
    • Gently pull up on the red and black power cable to lift the connector out of the motherboard.

    • Move the battery and cover away from the motherboard.

  6. Motorola Moto E Display Assembly Replacement: crwdns2935265:06crwdnd2935265:01crwdnd2935265:01crwdne2935265:0
    • Unscrew the 3- 1mm screws using the T4 torx driver head.

  7. Motorola Moto E Display Assembly Replacement: crwdns2935265:07crwdnd2935265:01crwdnd2935265:01crwdne2935265:0
    • Lift up on the white plastic mount.

    • Pull the orange ribbon cable out gently.

  8. Motorola Moto E Display Assembly Replacement: crwdns2935265:08crwdnd2935265:01crwdnd2935265:02crwdne2935265:0 Motorola Moto E Display Assembly Replacement: crwdns2935265:08crwdnd2935265:02crwdnd2935265:02crwdne2935265:0
    • Gently pull the black ribbon cable out.

  9. Motorola Moto E Display Assembly Replacement: crwdns2935265:09crwdnd2935265:01crwdnd2935265:01crwdne2935265:0
    • Using the metal spudger, pry the motherboard away from the screen assembly.

  10. Motorola Moto E Display Assembly Replacement, Display Assembly: crwdns2935265:010crwdnd2935265:01crwdnd2935265:01crwdne2935265:0
    • Use a heat gun or hairdryer to heat up the edges. This will loosen the glue so the screen can be removed.

    • The phone will be extremely hot. Avoid direct contact with metal pieces.

  11. Motorola Moto E Display Assembly Replacement: crwdns2935265:011crwdnd2935265:01crwdnd2935265:01crwdne2935265:0
    • Gently slide the metal spudger underneath the screen and pry it away from the backing.

    • Move the metal spudger under the digitizer and along the entire length of the phone to separate the screen from the adhesive.

    • If the screen was broken, glass shards may come off of the screen and puncture skin.

  12. Motorola Moto E Display Assembly Replacement: crwdns2935265:012crwdnd2935265:01crwdnd2935265:01crwdne2935265:0
    • Continue to heat and separate until the screen comes completely apart from the rest of the phone.

  13. Motorola Moto E Display Assembly Replacement: crwdns2935265:013crwdnd2935265:01crwdnd2935265:01crwdne2935265:0
    • To put the new screen on, press the new screen and digitizer into place, and then reapply heat to adhere the new screen.

crwdns2915888:0crwdne2915888:0

To reassemble your device, follow these instructions in reverse order.

crwdns2935229:023crwdne2935229:0

Alex Craig

crwdns2935283:003/11/15crwdne2935283:0

2,578 crwdns2915208:0crwdne2915208:0

crwdns2935297:05crwdne2935297:0

crwdns2915084:0crwdne2915084:0

Colorado Springs, Team 5-7, Panko Spring 2015 crwdns2935289:0Colorado Springs, Team 5-7, Panko Spring 2015crwdne2935289:0

UCCS-PANKO-S15S5G7

crwdns2931471:02crwdne2931471:0

crwdns2935297:010crwdne2935297:0

crwdns2944067:00crwdne2944067:0

crwdns2917038:0crwdne2917038:0

crwdns2936625:0crwdne2936625:0:

crwdns2936751:024crwdne2936751:0 1

crwdns2936753:07crwdne2936753:0 4

crwdns2936753:030crwdne2936753:0 36

crwdns2942667:0crwdne2942667:0 30,793