crwdns2915892:0crwdne2915892:0
This guide shows you how to replace the camera as it may be damaged or malfunctioning. The removal of the camera itself is simple, but getting there can be tricky because of the motherboard. Carefully follow guide. Tools are required for this.
crwdns2942213:0crwdne2942213:0
-
-
Slide the plastic case off of the back of the phone, exposing the battery.
-
-
-
Pull up on the red battery release tab and pull the battery out of the phone.
-
-
-
Remove the circled screws using a T-5 torques. These screws will be 4.3 millimeters in length.
-
-
-
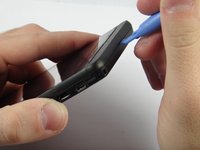
Using a prying tool, snap off the front casing on the top and bottom of the phone.
-
-
-
Remove the circled screws using a T-5 torques.. These screws should be 5.8 millimeters in length.
-
-
-
-
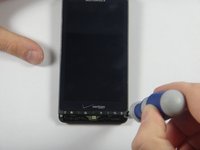
Using a plastic opening tool, snap open the phone. It should separate into a front piece with the hardware and a plastic backing.
-
-
crwdns2935267:0crwdne2935267:0Tweezers$4.99
-
Using tweezers, remove the white wire at the top of the phone near the camera.
-
-
-
Remove these nine screws using a T-3 torques. These screws should be 2.40 mm in length
-
-
-
Using tweezers, removed the white electrical tape on the motherboard.
-
-
-
Using the plastic opening tool, lift up to remove the connector.
-
-
-
Using a pry tool, lift the jawbone connector.
-
-
-
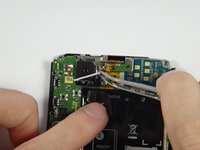
Using tweezers, carefully disconnect the cable connector by pulling the cable out.
-
-
-
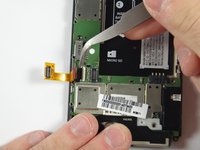
Use a spudger to disconnect the cable connector.
-
-
-
Using a spudger, remove the camera. Lift up the motherboard and slide the spudger under the camera.
-
-
crwdns2935267:0crwdne2935267:0Tweezers$4.99
-
Using tweezers, remove cable from motherboard.
-


To reassemble your device, follow these instructions in reverse order.
To reassemble your device, follow these instructions in reverse order.
crwdns2915084:0crwdne2915084:0

UMass Dartmouth, Team 4-3, Miles Fall 2014 crwdns2935289:0UMass Dartmouth, Team 4-3, Miles Fall 2014crwdne2935289:0
UMASSD-MILES-F14S4G3
crwdns2931471:03crwdne2931471:0
crwdns2935297:08crwdne2935297:0
crwdns2947410:01crwdne2947410:0
how do u get it back on when it dose not come back on
brianna