crwdns2933423:0crwdne2933423:0

Motorola Droid Turbo Earpiece Speaker Replacement

crwdns2942213:0crwdne2942213:0

  1. Motorola Droid Turbo Earpiece Speaker Replacement, Rear Case: crwdns2935265:01crwdnd2935265:01crwdnd2935265:01crwdne2935265:0
    • Prepare an iOpener and lay it over the rear case to soften the adhesive on securing the rear case to the phone.

  2. Motorola Droid Turbo Earpiece Speaker Replacement: crwdns2935265:02crwdnd2935265:01crwdnd2935265:02crwdne2935265:0 Motorola Droid Turbo Earpiece Speaker Replacement: crwdns2935265:02crwdnd2935265:02crwdnd2935265:02crwdne2935265:0
    • Use a plastic opening tool to pry the rear case off of the rest of the device.

    • Remove the rear case.

    • The wireless charging coil may try to stick to the rear case, so make sure to remove it from the case before fully separating the rear case from the rest of the device.

  3. Motorola Droid Turbo Earpiece Speaker Replacement, Midframe: crwdns2935265:03crwdnd2935265:01crwdnd2935265:01crwdne2935265:0
    • Remove the midframe bezel.

  4. Motorola Droid Turbo Earpiece Speaker Replacement: crwdns2935265:04crwdnd2935265:01crwdnd2935265:01crwdne2935265:0
    • Remove the four Torx T5 screws securing the midframe plate.

  5. Motorola Droid Turbo Earpiece Speaker Replacement: crwdns2935265:05crwdnd2935265:01crwdnd2935265:01crwdne2935265:0
    • Remove the midframe.

  6. Motorola Droid Turbo Earpiece Speaker Replacement, Earpiece Speaker: crwdns2935265:06crwdnd2935265:01crwdnd2935265:02crwdne2935265:0 Motorola Droid Turbo Earpiece Speaker Replacement, Earpiece Speaker: crwdns2935265:06crwdnd2935265:02crwdnd2935265:02crwdne2935265:0
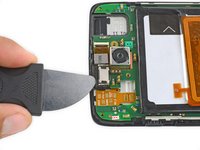
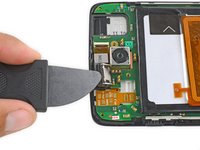
    • Use a Jimmy to pry under the speaker and lift to remove it.

    • Be sure to place your tool under the entire speaker assembly, against the plastic frame, and pry there.

    • These photos show an incorrect tool position—prying this high up on the speaker assembly may damage it. Place your tool underneath the speaker assembly, not on the edge as shown here.

    • The speaker is secured with some light adhesive, so some force may be required.

crwdns2915888:0crwdne2915888:0

To reassemble your device, follow these instructions in reverse order.

crwdns2935227:0crwdne2935227:0

Geoff Wacker

crwdns2935283:009/30/13crwdne2935283:0

89,889 crwdns2915208:0crwdne2915208:0

crwdns2935297:089crwdne2935297:0

crwdns2944067:00crwdne2944067:0

crwdns2917038:0crwdne2917038:0

crwdns2936625:0crwdne2936625:0:

crwdns2936751:024crwdne2936751:0 0

crwdns2936753:07crwdne2936753:0 1

crwdns2936753:030crwdne2936753:0 5

crwdns2942667:0crwdne2942667:0 7,055