crwdns2933423:0crwdne2933423:0

Motorola Droid RAZR Maxx Battery Replacement

crwdns2942213:0crwdne2942213:0

  1. Motorola Droid RAZR Maxx Battery Replacement, Removing the battery: crwdns2935265:01crwdnd2935265:01crwdnd2935265:02crwdne2935265:0 Motorola Droid RAZR Maxx Battery Replacement, Removing the battery: crwdns2935265:01crwdnd2935265:02crwdnd2935265:02crwdne2935265:0
    • Remove the SIM card.

    • Remove the microSD card.

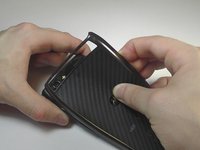
    • Insert the plastic opening tool between the back cover and the front piece of the case, freeing the plastic clips between the phone.

    • Do this along the back right side of the phone cover until you reach the top.

  2. Motorola Droid RAZR Maxx Battery Replacement: crwdns2935265:02crwdnd2935265:01crwdnd2935265:02crwdne2935265:0 Motorola Droid RAZR Maxx Battery Replacement: crwdns2935265:02crwdnd2935265:02crwdnd2935265:02crwdne2935265:0
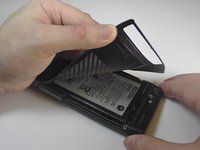
    • Use the plastic opening tool to carefully work your way around the top of the phone, freeing the plastic clips.

    • Be cautious when using the tool around the top of the device because the plastic case is very thin and could easily be cracked or snapped.

    • After this continue using the tool and pry down the remaining side and the bottom of the phone.

  3. Motorola Droid RAZR Maxx Battery Replacement: crwdns2935265:03crwdnd2935265:01crwdnd2935265:03crwdne2935265:0 Motorola Droid RAZR Maxx Battery Replacement: crwdns2935265:03crwdnd2935265:02crwdnd2935265:03crwdne2935265:0 Motorola Droid RAZR Maxx Battery Replacement: crwdns2935265:03crwdnd2935265:03crwdnd2935265:03crwdne2935265:0
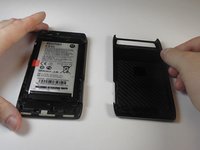
    • With all the plastic clips released, pull away the back cover from the phone to remove it.

    • The back cover is attached to the battery with a large amount of adhesive. Some force may be required to pull the back cover from the phone.

    • The back cover is very durable and will not break from some bending or pulling.

  4. Motorola Droid RAZR Maxx Battery Replacement: crwdns2935265:04crwdnd2935265:01crwdnd2935265:01crwdne2935265:0
    • Looking at the top rectangular hump where the camera is located, use the plastic opening tool to remove the camera cover.

    • Using the plastic opening tool, apply pressure into any surrounding crease of the camera cover to remove it.

  5. Motorola Droid RAZR Maxx Battery Replacement: crwdns2935265:05crwdnd2935265:01crwdnd2935265:03crwdne2935265:0 Motorola Droid RAZR Maxx Battery Replacement: crwdns2935265:05crwdnd2935265:02crwdnd2935265:03crwdne2935265:0 Motorola Droid RAZR Maxx Battery Replacement: crwdns2935265:05crwdnd2935265:03crwdnd2935265:03crwdne2935265:0
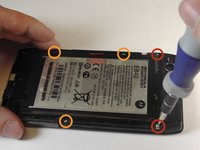
    • Using the T5 and T4 bit pieces, remove the silver screws located around the rear case of the phone.

    • Remove the three 6.7 mm silver T4 screws that are located at the top of the phone.

    • Remove the five 4.0 mm silver T5 screws that are located near the middle of the phone.

  6. Motorola Droid RAZR Maxx Battery Replacement: crwdns2935265:06crwdnd2935265:01crwdnd2935265:01crwdne2935265:0
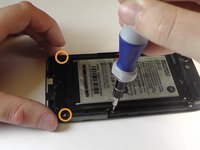
    • Using the T5 bit piece remove the three black 4.5 mm screws that are located at the bottom of the phone.

  7. Motorola Droid RAZR Maxx Battery Replacement: crwdns2935265:07crwdnd2935265:01crwdnd2935265:02crwdne2935265:0 Motorola Droid RAZR Maxx Battery Replacement: crwdns2935265:07crwdnd2935265:02crwdnd2935265:02crwdne2935265:0
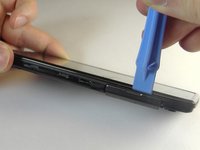
    • Insert the plastic opening tool between the rear case and motherboard assembly.

    • Using the plastic opening tool, carefully work your way around the phone, freeing the plastic clips.

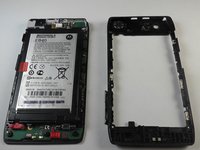
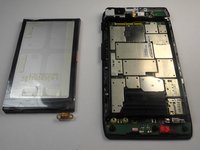
    • Carefully pull the rear case off the motherboard assembly.

  8. Motorola Droid RAZR Maxx Battery Replacement: crwdns2935265:08crwdnd2935265:01crwdnd2935265:03crwdne2935265:0 Motorola Droid RAZR Maxx Battery Replacement: crwdns2935265:08crwdnd2935265:02crwdnd2935265:03crwdne2935265:0 Motorola Droid RAZR Maxx Battery Replacement: crwdns2935265:08crwdnd2935265:03crwdnd2935265:03crwdne2935265:0
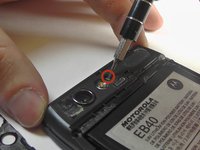
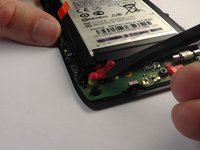
    • Using the tip of the spudger, lift the red silicone cover off the battery terminal screws.

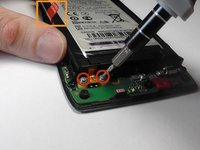
    • Remove the two 3.3mm T5 Torx battery terminal screws.

    • Grab the red battery removal tab and pull the battery out.

    • There might be some adhesive between the battery and motherboard assembly.

crwdns2915888:0crwdne2915888:0

To reassemble your device, follow these instructions in reverse order.

crwdns2935229:09crwdne2935229:0

jean Florival

crwdns2935283:010/08/14crwdne2935283:0

149 crwdns2915208:0crwdne2915208:0

crwdns2935295:0crwdne2935295:0

crwdns2915084:0crwdne2915084:0

USF Tampa, Team 14-6, Leahy Fall 2014 crwdns2935289:0USF Tampa, Team 14-6, Leahy Fall 2014crwdne2935289:0

USFT-LEAHY-F14S14G6

crwdns2931471:04crwdne2931471:0

crwdns2935297:010crwdne2935297:0

crwdns2917034:0crwdne2917034:0

can we put droid razr max battery with its cover in the xt912 (simple droid razr)

saif ur rehman - crwdns2934203:0crwdne2934203:0

crwdns2917038:0crwdne2917038:0

crwdns2936625:0crwdne2936625:0:

crwdns2936751:024crwdne2936751:0 1

crwdns2936753:07crwdne2936753:0 4

crwdns2936753:030crwdne2936753:0 7

crwdns2942667:0crwdne2942667:0 9,924