crwdns2933423:0crwdne2933423:0

Motorola Droid RAZR Back Cover Replacement

crwdns2942213:0crwdne2942213:0

  1. Motorola Droid RAZR Back Cover Replacement, Back Cover: crwdns2935265:01crwdnd2935265:01crwdnd2935265:02crwdne2935265:0 Motorola Droid RAZR Back Cover Replacement, Back Cover: crwdns2935265:01crwdnd2935265:02crwdnd2935265:02crwdne2935265:0
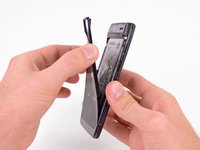
    • Insert a plastic opening tool between the back cover and rear case at the lower left edge of the back cover.

    • Pry the back cover up with the plastic opening tool to free the plastic clips.

    • Continue prying along the left edge of the back cover towards the top of the phone.

  2. Motorola Droid RAZR Back Cover Replacement: crwdns2935265:02crwdnd2935265:01crwdnd2935265:03crwdne2935265:0 Motorola Droid RAZR Back Cover Replacement: crwdns2935265:02crwdnd2935265:02crwdnd2935265:03crwdne2935265:0 Motorola Droid RAZR Back Cover Replacement: crwdns2935265:02crwdnd2935265:03crwdnd2935265:03crwdne2935265:0
    • Work the plastic opening tool across the top of the back case to free the plastic clips.

    • The top edge of the back case is very thin. Pry carefully to avoid cracking or snapping it.

    • Continue prying down the right side of the back cover to free the remaining clips.

  3. Motorola Droid RAZR Back Cover Replacement: crwdns2935265:03crwdnd2935265:01crwdnd2935265:03crwdne2935265:0 Motorola Droid RAZR Back Cover Replacement: crwdns2935265:03crwdnd2935265:02crwdnd2935265:03crwdne2935265:0 Motorola Droid RAZR Back Cover Replacement: crwdns2935265:03crwdnd2935265:03crwdnd2935265:03crwdne2935265:0
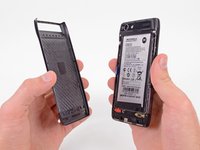
    • Pull the back cover away from the phone to remove it.

    • The back cover is attached to the battery with a generous amount of adhesive, so you may have to use quite a bit of force to separate the two pieces.

    • The battery must remain in the phone and not come off with the back cover or you will break the power lead.

    • Since the back cover is made of Kevlar, it can handle a fair amount of twisting and tugging without breaking.

crwdns2915888:0crwdne2915888:0

To reassemble your device, follow these instructions in reverse order.

crwdns2935229:07crwdne2935229:0

David Hodson

crwdns2935283:004/13/10crwdne2935283:0

150 352 crwdns2915208:0crwdne2915208:0

crwdns2935297:0127crwdne2935297:0

crwdns2944067:00crwdne2944067:0

crwdns2917038:0crwdne2917038:0

crwdns2936625:0crwdne2936625:0:

crwdns2936751:024crwdne2936751:0 0

crwdns2936753:07crwdne2936753:0 0

crwdns2936753:030crwdne2936753:0 2

crwdns2942667:0crwdne2942667:0 14,216