crwdns2933423:0crwdne2933423:0

Motorola Droid MAXX 2 Screen Only Replacement

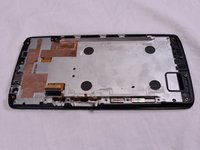
crwdns2942213:0crwdne2942213:0

  1. Motorola Droid MAXX 2 Screen Only Replacement, Battery: crwdns2935265:01crwdnd2935265:01crwdnd2935265:01crwdne2935265:0
    • Insert a small pointed object into the hole on the sim card tray to eject the tray from the phone.

  2. Motorola Droid MAXX 2 Screen Only Replacement: crwdns2935265:02crwdnd2935265:01crwdnd2935265:01crwdne2935265:0
    • Pull the sim card tray up out of the phone

  3. Motorola Droid MAXX 2 Screen Only Replacement: crwdns2935265:03crwdnd2935265:01crwdnd2935265:02crwdne2935265:0 Motorola Droid MAXX 2 Screen Only Replacement: crwdns2935265:03crwdnd2935265:02crwdnd2935265:02crwdne2935265:0
    • Wedge your thumb into the indent located on the bottom left corner of the back cover and pull up to remove the back cover.

  4. Motorola Droid MAXX 2 Screen Only Replacement: crwdns2935265:04crwdnd2935265:01crwdnd2935265:01crwdne2935265:0
    • Remove the seventeen 3.2mm Torx T4 screws from the mid-frame.

    • These may be T3 screws. If you are having trouble unscrewing these, stop and try a T3 bit.

  5. Motorola Droid MAXX 2 Screen Only Replacement: crwdns2935265:05crwdnd2935265:01crwdnd2935265:01crwdne2935265:0
    • Pull the mid-frame off of the phone.

    • Keep track of the on/off and volume buttons when you take the phone apart because they are likely to fall out when the halves are separated.

  6. Motorola Droid MAXX 2 Screen Only Replacement: crwdns2935265:06crwdnd2935265:01crwdnd2935265:03crwdne2935265:0 Motorola Droid MAXX 2 Screen Only Replacement: crwdns2935265:06crwdnd2935265:02crwdnd2935265:03crwdne2935265:0 Motorola Droid MAXX 2 Screen Only Replacement: crwdns2935265:06crwdnd2935265:03crwdnd2935265:03crwdne2935265:0
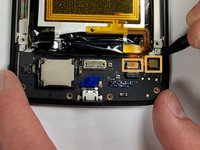
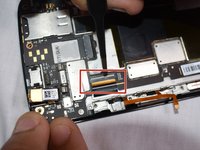
    • Remove the static tape covering the two connectors.

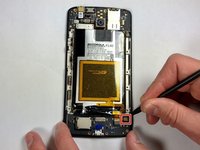
    • Use a spudger to disconnect the battery cables from the motherboard.

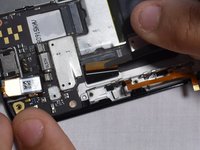
    • If battery has adhesive, use heat gun for one to two minutes to loosen it. Be careful of the points outlined in red when prying it up. Use guitar picks or a spudger to gently lift the battery and separate the adhesive.

  7. Motorola Droid MAXX 2 Screen Only Replacement: crwdns2935265:07crwdnd2935265:01crwdnd2935265:01crwdne2935265:0
    • Remove the disconnected battery from the phone.

  8. Motorola Droid MAXX 2 Screen Only Replacement, Screen Assembly: crwdns2935265:08crwdnd2935265:01crwdnd2935265:02crwdne2935265:0 Motorola Droid MAXX 2 Screen Only Replacement, Screen Assembly: crwdns2935265:08crwdnd2935265:02crwdnd2935265:02crwdne2935265:0
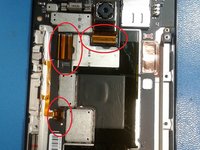
    • We will be removing these 3 ribbon cables.

    • Using an opening pick, lift the grey tab on the rear camera's ZIF connector. Remove the ribbon cable and the camera.

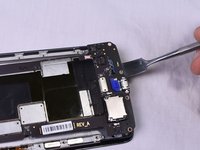
    • Use tweezers to lift up on the grey latch on the ZIF connector.

    • Remove the ribbon cable from the ZIF connector.

  9. Motorola Droid MAXX 2 Screen Only Replacement: crwdns2935265:09crwdnd2935265:01crwdnd2935265:02crwdne2935265:0 Motorola Droid MAXX 2 Screen Only Replacement: crwdns2935265:09crwdnd2935265:02crwdnd2935265:02crwdne2935265:0
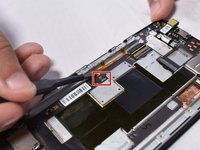
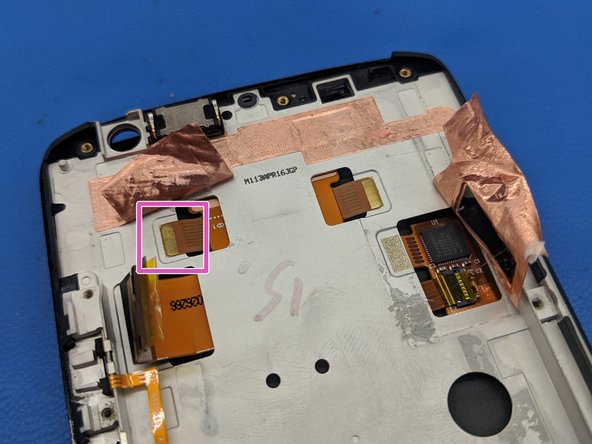
    • Use a pair of tweezers to lift up the black latch on the ZIF connector.

    • Pull the ribbon cable out of the ZIF connector.

  10. Motorola Droid MAXX 2 Screen Only Replacement: crwdns2935265:010crwdnd2935265:01crwdnd2935265:03crwdne2935265:0 Motorola Droid MAXX 2 Screen Only Replacement: crwdns2935265:010crwdnd2935265:02crwdnd2935265:03crwdne2935265:0 Motorola Droid MAXX 2 Screen Only Replacement: crwdns2935265:010crwdnd2935265:03crwdnd2935265:03crwdne2935265:0
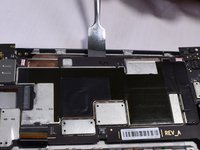
    • Using a metal spudger, work your way around the perimeter of the main board and screen.

    • There is a lot of adhesive between the two pieces, so be careful to try to remove the adhesive slowly in order to not break anything.

  11. Motorola Droid MAXX 2 Screen Only Replacement, Screen Only: crwdns2935265:011crwdnd2935265:01crwdnd2935265:02crwdne2935265:0 Motorola Droid MAXX 2 Screen Only Replacement, Screen Only: crwdns2935265:011crwdnd2935265:02crwdnd2935265:02crwdne2935265:0
    • Use an opening pick or metal jimmy to carefully peel up a corner of this section of copper tape.

    • Slowly peel the entire piece of copper tape off of the frame, trying not to tear or kink it. Set aside and re-install after attaching new display.

    • Using the pointy tip of a spudger, detach these display cable tabs from the frame.

  12. Motorola Droid MAXX 2 Screen Only Replacement: crwdns2935265:012crwdnd2935265:01crwdnd2935265:02crwdne2935265:0 Motorola Droid MAXX 2 Screen Only Replacement: crwdns2935265:012crwdnd2935265:02crwdnd2935265:02crwdne2935265:0
    • Carefully peel up the bottom part of this piece of copper tape and fold it over.

    • Using the point of a spudger, detach this display cable tab from the frame.

    • The plastic edge around the digitizer is very fragile. Use caution when separating the adhesive.

    • Heat the top bezel to soften the adhesive and carefully start removing the display from the frame using a plastic opening picks and a metal jimmy as necessary.

    • The display cable is lightly adhered to the frame. Remove the display starting from the top.

crwdns2915888:0crwdne2915888:0

To reassemble your device, follow these instructions in reverse order.

Patrick

crwdns2935283:005/14/14crwdne2935283:0

6,574 crwdns2915208:0crwdne2915208:0

crwdns2935297:021crwdne2935297:0

crwdns2944067:00crwdne2944067:0

crwdns2917038:0crwdne2917038:0

crwdns2936625:0crwdne2936625:0:

crwdns2936751:024crwdne2936751:0 0

crwdns2936753:07crwdne2936753:0 1

crwdns2936753:030crwdne2936753:0 3

crwdns2942667:0crwdne2942667:0 397