crwdns2933423:0crwdne2933423:0

Motorola Droid MAXX 2 Rear Camera Replacement

crwdns2942213:0crwdne2942213:0

  1. Motorola Droid MAXX 2 Rear Camera Replacement, Battery: crwdns2935265:01crwdnd2935265:01crwdnd2935265:01crwdne2935265:0
    • Insert a small pointed object into the hole on the sim card tray to eject the tray from the phone.

  2. Motorola Droid MAXX 2 Rear Camera Replacement: crwdns2935265:02crwdnd2935265:01crwdnd2935265:01crwdne2935265:0
    • Pull the sim card tray up out of the phone

  3. Motorola Droid MAXX 2 Rear Camera Replacement: crwdns2935265:03crwdnd2935265:01crwdnd2935265:02crwdne2935265:0 Motorola Droid MAXX 2 Rear Camera Replacement: crwdns2935265:03crwdnd2935265:02crwdnd2935265:02crwdne2935265:0
    • Wedge your thumb into the indent located on the bottom left corner of the back cover and pull up to remove the back cover.

  4. Motorola Droid MAXX 2 Rear Camera Replacement: crwdns2935265:04crwdnd2935265:01crwdnd2935265:01crwdne2935265:0
    • Remove the seventeen 3.2mm Torx T4 screws from the mid-frame.

    • These may be T3 screws. If you are having trouble unscrewing these, stop and try a T3 bit.

  5. Motorola Droid MAXX 2 Rear Camera Replacement: crwdns2935265:05crwdnd2935265:01crwdnd2935265:01crwdne2935265:0
    • Pull the mid-frame off of the phone.

    • Keep track of the on/off and volume buttons when you take the phone apart because they are likely to fall out when the halves are separated.

  6. Motorola Droid MAXX 2 Rear Camera Replacement: crwdns2935265:06crwdnd2935265:01crwdnd2935265:03crwdne2935265:0 Motorola Droid MAXX 2 Rear Camera Replacement: crwdns2935265:06crwdnd2935265:02crwdnd2935265:03crwdne2935265:0 Motorola Droid MAXX 2 Rear Camera Replacement: crwdns2935265:06crwdnd2935265:03crwdnd2935265:03crwdne2935265:0
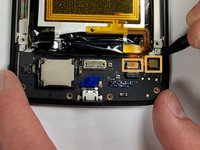
    • Remove the static tape covering the two connectors.

    • Use a spudger to disconnect the battery cables from the motherboard.

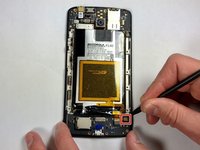
    • If battery has adhesive, use heat gun for one to two minutes to loosen it. Be careful of the points outlined in red when prying it up. Use guitar picks or a spudger to gently lift the battery and separate the adhesive.

  7. Motorola Droid MAXX 2 Rear Camera Replacement: crwdns2935265:07crwdnd2935265:01crwdnd2935265:01crwdne2935265:0
    • Remove the disconnected battery from the phone.

  8. Motorola Droid MAXX 2 Rear Camera Replacement, Rear Camera: crwdns2935265:08crwdnd2935265:01crwdnd2935265:01crwdne2935265:0
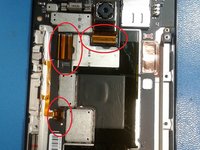
    • Peel up orange adhesive that covers the ZIF connector.

  9. Motorola Droid MAXX 2 Rear Camera Replacement: crwdns2935265:09crwdnd2935265:01crwdnd2935265:01crwdne2935265:0
    • Use a spudger to lift up the black tab on the ZIF connector.

    • Remove the camera.

crwdns2915888:0crwdne2915888:0

To reassemble your device, follow these instructions in reverse order.

Burke Seggerman

crwdns2935283:003/18/18crwdne2935283:0

704 crwdns2915208:0crwdne2915208:0

crwdns2935297:05crwdne2935297:0

crwdns2915084:0crwdne2915084:0

Baylor, Team S3-G4, Williams Spring 2018 crwdns2935289:0Baylor, Team S3-G4, Williams Spring 2018crwdne2935289:0

BU-WILLIAMS-S18S3G4

crwdns2931471:03crwdne2931471:0

crwdns2935297:06crwdne2935297:0

crwdns2944067:00crwdne2944067:0

crwdns2917038:0crwdne2917038:0

crwdns2936625:0crwdne2936625:0:

crwdns2936751:024crwdne2936751:0 1

crwdns2936753:07crwdne2936753:0 1

crwdns2936753:030crwdne2936753:0 1

crwdns2942667:0crwdne2942667:0 300