crwdns2933423:0crwdne2933423:0

Motorola Droid Bionic LCD Replacement

crwdns2942213:0crwdne2942213:0

  1. Motorola Droid Bionic LCD Replacement, LCD: crwdns2935265:01crwdnd2935265:01crwdnd2935265:01crwdne2935265:0
    • Remove the back battery cover.

  2. Motorola Droid Bionic LCD Replacement: crwdns2935265:02crwdnd2935265:01crwdnd2935265:01crwdne2935265:0
    • Remove the battery

  3. Motorola Droid Bionic LCD Replacement: crwdns2935265:03crwdnd2935265:01crwdnd2935265:02crwdne2935265:0 Motorola Droid Bionic LCD Replacement: crwdns2935265:03crwdnd2935265:02crwdnd2935265:02crwdne2935265:0
    • Remove the 11 T4 Torx Screws

    • Next, remove the information sticker.

  4. Motorola Droid Bionic LCD Replacement: crwdns2935265:04crwdnd2935265:01crwdnd2935265:02crwdne2935265:0 Motorola Droid Bionic LCD Replacement: crwdns2935265:04crwdnd2935265:02crwdnd2935265:02crwdne2935265:0
    • Using a plastic removal tool, work around the edges of the back housing.

    • Lift off the back housing.

  5. Motorola Droid Bionic LCD Replacement: crwdns2935265:05crwdnd2935265:01crwdnd2935265:03crwdne2935265:0 Motorola Droid Bionic LCD Replacement: crwdns2935265:05crwdnd2935265:02crwdnd2935265:03crwdne2935265:0 Motorola Droid Bionic LCD Replacement: crwdns2935265:05crwdnd2935265:03crwdnd2935265:03crwdne2935265:0
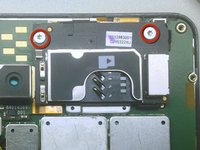
    • Remove the two silver T4 screws securing the SIM tray.

    • Carefully lift the SIM tray to disconnect it from the board.

    • Carefully remove the plastic spacer beneath by lifting gently in the center with a plastic removal tool.

    • Then, using a plastic removal tool, disconnect the speaker & front facing camera assembly from the board. The speaker is attached with adhesive, so be careful not to rip the flex cable.

  6. Motorola Droid Bionic LCD Replacement: crwdns2935265:06crwdnd2935265:01crwdnd2935265:01crwdne2935265:0
    • Disconnect the 2 digitizer connectors using a plastic removal tool.

    • Then disconnect the LCD connector

  7. Motorola Droid Bionic LCD Replacement: crwdns2935265:07crwdnd2935265:01crwdnd2935265:02crwdne2935265:0 Motorola Droid Bionic LCD Replacement: crwdns2935265:07crwdnd2935265:02crwdnd2935265:02crwdne2935265:0
    • The board is now free from all connections. Carefully lift from the top and remove the board.

  8. Motorola Droid Bionic LCD Replacement: crwdns2935265:08crwdnd2935265:01crwdnd2935265:02crwdne2935265:0 Motorola Droid Bionic LCD Replacement: crwdns2935265:08crwdnd2935265:02crwdnd2935265:02crwdne2935265:0
    • Carefully peel the two flex cables from the back housing of the LCD. Be exceptionally careful during this process, as those flex cables can be easily ripped.

    • With the flex cables out of the way, you can now use a plastic opening tool to carefully pry the old LCD loose and out of the display.

    • If you're installing a new LCD, simply add it now and follow these instructions in reverse to complete the installation.

crwdns2915888:0crwdne2915888:0

To reassemble your device, follow these instructions in reverse order.

crwdns2935229:04crwdne2935229:0

Taylor

crwdns2935283:008/30/12crwdne2935283:0

244 crwdns2915208:0crwdne2915208:0

crwdns2935295:0crwdne2935295:0

crwdns2944067:00crwdne2944067:0

crwdns2917038:0crwdne2917038:0

crwdns2936625:0crwdne2936625:0:

crwdns2936751:024crwdne2936751:0 0

crwdns2936753:07crwdne2936753:0 0

crwdns2936753:030crwdne2936753:0 2

crwdns2942667:0crwdne2942667:0 1,766