crwdns2933423:0crwdne2933423:0

Motorola C290 Screen Replacement

crwdns2942213:0crwdne2942213:0

  1. Motorola C290 Screen Replacement, Outside Case removal: crwdns2935265:01crwdnd2935265:01crwdnd2935265:03crwdne2935265:0 Motorola C290 Screen Replacement, Outside Case removal: crwdns2935265:01crwdnd2935265:02crwdnd2935265:03crwdne2935265:0 Motorola C290 Screen Replacement, Outside Case removal: crwdns2935265:01crwdnd2935265:03crwdnd2935265:03crwdne2935265:0
    • Flip open your Motorola C290.

    • Remove rubber stoppers located around main screen using a push pin.

    • This reveals four screws.

    • Use a Torx T6 Screwdriver to unscrew the four screws.

  2. Motorola C290 Screen Replacement, Removing the front casing: crwdns2935265:02crwdnd2935265:01crwdnd2935265:02crwdne2935265:0 Motorola C290 Screen Replacement, Removing the front casing: crwdns2935265:02crwdnd2935265:02crwdnd2935265:02crwdne2935265:0
    • Use a plastic opening tool to pry open a gap between the top cover and the face of the phone.

    • Slide the plastic opening tool along gap and pry open case.

    • Remove top cover.

  3. Motorola C290 Screen Replacement, Disconnect the motherboard: crwdns2935265:03crwdnd2935265:01crwdnd2935265:02crwdne2935265:0 Motorola C290 Screen Replacement, Disconnect the motherboard: crwdns2935265:03crwdnd2935265:02crwdnd2935265:02crwdne2935265:0
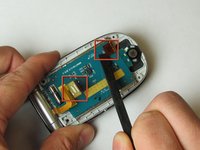
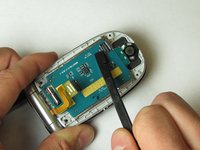
    • Unclip circuit attachments located on back of screen circuit board using a Spudger.

  4. Motorola C290 Screen Replacement, Removing the motherboard/screen: crwdns2935265:04crwdnd2935265:01crwdnd2935265:03crwdne2935265:0 Motorola C290 Screen Replacement, Removing the motherboard/screen: crwdns2935265:04crwdnd2935265:02crwdnd2935265:03crwdne2935265:0 Motorola C290 Screen Replacement, Removing the motherboard/screen: crwdns2935265:04crwdnd2935265:03crwdnd2935265:03crwdne2935265:0
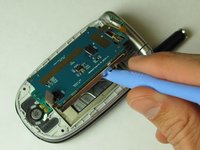
    • Insert the plastic opening tool between the metal screen components and the plastic frame at the corners.

    • Firmly pry the screen components from the frame with a twisting motion

    • You will need to apply a good amount of force as you pry, twisting in a right-to-left motion.

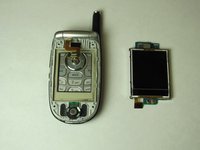
    • Completely remove screen components from frame.

crwdns2915888:0crwdne2915888:0

To reassemble your device, follow these instructions in reverse order.

Angelo Ballungay

crwdns2935283:004/15/10crwdne2935283:0

79 crwdns2915208:0crwdne2915208:0

crwdns2935297:04crwdne2935297:0

crwdns2915084:0crwdne2915084:0

Cal Poly, Team 24-28, Regan Spring 2010 crwdns2935289:0Cal Poly, Team 24-28, Regan Spring 2010crwdne2935289:0

CPSU-REGAN-S10S24G28

crwdns2931471:04crwdne2931471:0

crwdns2935297:06crwdne2935297:0

crwdns2944067:00crwdne2944067:0

crwdns2917038:0crwdne2917038:0

crwdns2936625:0crwdne2936625:0:

crwdns2936751:024crwdne2936751:0 0

crwdns2936753:07crwdne2936753:0 1

crwdns2936753:030crwdne2936753:0 1

crwdns2942667:0crwdne2942667:0 1,751