crwdns2933423:0crwdne2933423:0

Monster SoundStage S1 Mini Speaker Replacement

crwdns2942213:0crwdne2942213:0

  1. Monster SoundStage S1 Mini Speaker Replacement, Speaker: crwdns2935265:01crwdnd2935265:01crwdnd2935265:02crwdne2935265:0 Monster SoundStage S1 Mini Speaker Replacement, Speaker: crwdns2935265:01crwdnd2935265:02crwdnd2935265:02crwdne2935265:0
    • Remove the speaker wires from the motherboard by pinching the plastic tab at the end of the cable and pulling towards you.

  2. Monster SoundStage S1 Mini Speaker Replacement: crwdns2935265:02crwdnd2935265:01crwdnd2935265:02crwdne2935265:0 Monster SoundStage S1 Mini Speaker Replacement: crwdns2935265:02crwdnd2935265:02crwdnd2935265:02crwdne2935265:0
    • Unscrew 1.2 cm Torx security screw, holding the silver circle connector, to disconnect the wire from the speakerboard to the motherboard

  3. Monster SoundStage S1 Mini Speaker Replacement: crwdns2935265:03crwdnd2935265:01crwdnd2935265:01crwdne2935265:0
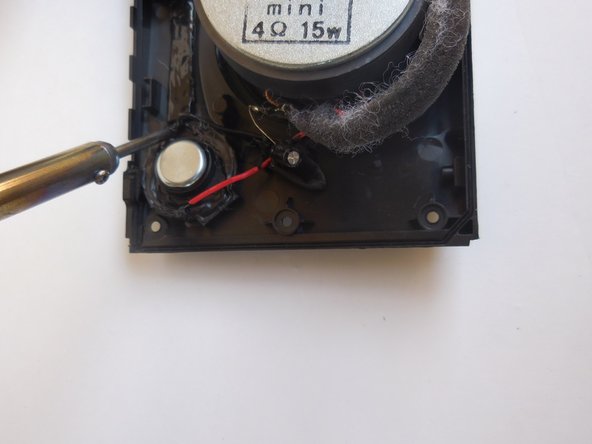
    • Remove the black putty from the speaker wires at both ends of the speaker board.

  4. Monster SoundStage S1 Mini Speaker Replacement: crwdns2935265:04crwdnd2935265:01crwdnd2935265:03crwdne2935265:0 Monster SoundStage S1 Mini Speaker Replacement: crwdns2935265:04crwdnd2935265:02crwdnd2935265:03crwdne2935265:0 Monster SoundStage S1 Mini Speaker Replacement: crwdns2935265:04crwdnd2935265:03crwdnd2935265:03crwdne2935265:0
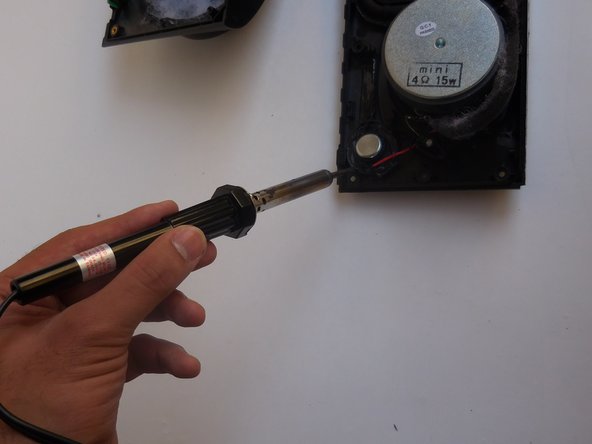
    • Solder the black plastic encasing the red and black wires.

  5. Monster SoundStage S1 Mini Speaker Replacement: crwdns2935265:05crwdnd2935265:01crwdnd2935265:02crwdne2935265:0 Monster SoundStage S1 Mini Speaker Replacement: crwdns2935265:05crwdnd2935265:02crwdnd2935265:02crwdne2935265:0
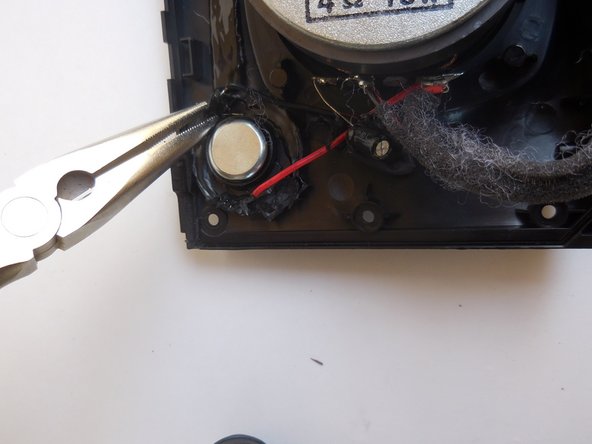
    • Remove both the black and red wires with pliers

    • Pliers may stick to speaker because it is magnetic.

  6. Monster SoundStage S1 Mini Speaker Replacement: crwdns2935265:06crwdnd2935265:01crwdnd2935265:02crwdne2935265:0 Monster SoundStage S1 Mini Speaker Replacement: crwdns2935265:06crwdnd2935265:02crwdnd2935265:02crwdne2935265:0
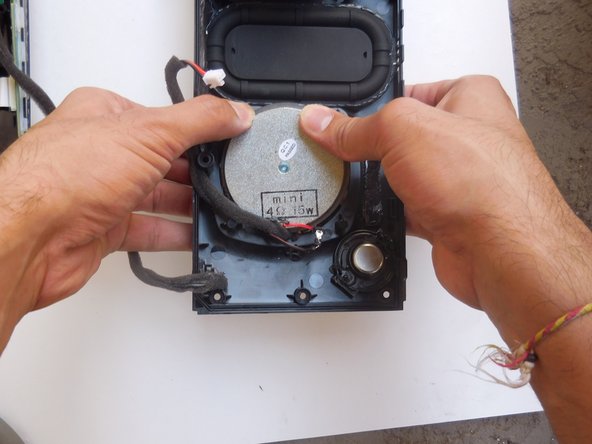
    • Tuck wires through the hole where the speaker is located, then gently push the speaker out.

    • The 1.2 cm Torx security screws that stayed in place near the speaker will now fall out.

    • To remove the other speaker repeat steps 3-6

crwdns2915888:0crwdne2915888:0

To reassemble your device, follow these instructions in reverse order.

crwdns2935227:0crwdne2935227:0

Heather Carrillo

crwdns2935283:009/12/16crwdne2935283:0

412 crwdns2915208:0crwdne2915208:0

crwdns2935297:02crwdne2935297:0

crwdns2915084:0crwdne2915084:0

CSU Fullerton, Team 2-6, Bruce Fall 2016 crwdns2935289:0CSU Fullerton, Team 2-6, Bruce Fall 2016crwdne2935289:0

CSUF-BRUCE-F16S2G6

crwdns2931471:04crwdne2931471:0

crwdns2935297:07crwdne2935297:0

crwdns2944067:00crwdne2944067:0

crwdns2917038:0crwdne2917038:0

crwdns2936625:0crwdne2936625:0:

crwdns2936751:024crwdne2936751:0 1

crwdns2936753:07crwdne2936753:0 6

crwdns2936753:030crwdne2936753:0 9

crwdns2942667:0crwdne2942667:0 492