crwdns2933423:0crwdne2933423:0

Microsoft Surface Pro X Sensor Bar Lift

crwdns2862623:0crwdne2862623:0
crwdns2942641:0crwdne2942641:0

crwdns2942213:0crwdne2942213:0

  1. Microsoft Surface Pro X Sensor Bar Lift, Remove the front-facing sensor bar screws: crwdns2935265:01crwdnd2935265:01crwdnd2935265:01crwdne2935265:0
    • Depending on what component you are repairing, different shields on the motherboard may be removed at this point. For example, the shield covering the rear-facing camera connector has been removed in this step's image.

    • Use a T3 Torx screwdriver to remove the eight 5.5 mm screws securing the front-facing sensor bar.

  2. Microsoft Surface Pro X Sensor Bar Lift, Dislodge the front-facing sensor bar: crwdns2935265:02crwdnd2935265:01crwdnd2935265:02crwdne2935265:0 Microsoft Surface Pro X Sensor Bar Lift, Dislodge the front-facing sensor bar: crwdns2935265:02crwdnd2935265:02crwdnd2935265:02crwdne2935265:0
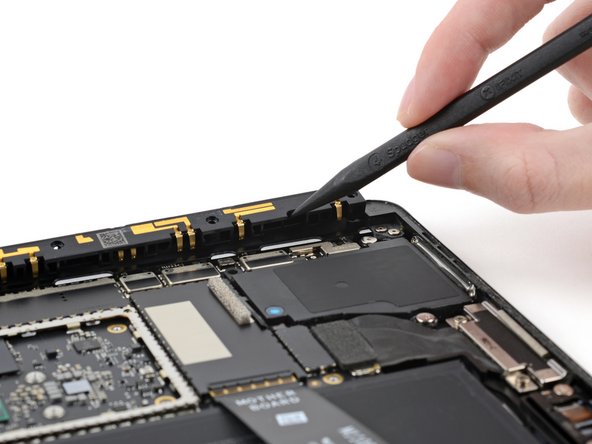
    • Insert the pointed end of a spudger into the gap on the right side of the sensor bar between the rightmost screw hole and the adjacent screw hole.

    • Lift up the right side of the sensor bar to dislodge it from the frame.

    • You only need to lift the sensor bar so that it is loose in the frame. Don't try to remove the front sensor bar—it is still attached to the Surface by a cable that connects under the motherboard.

  3. Microsoft Surface Pro X Sensor Bar Lift: crwdns2935265:03crwdnd2935265:01crwdnd2935265:02crwdne2935265:0 Microsoft Surface Pro X Sensor Bar Lift: crwdns2935265:03crwdnd2935265:02crwdnd2935265:02crwdne2935265:0
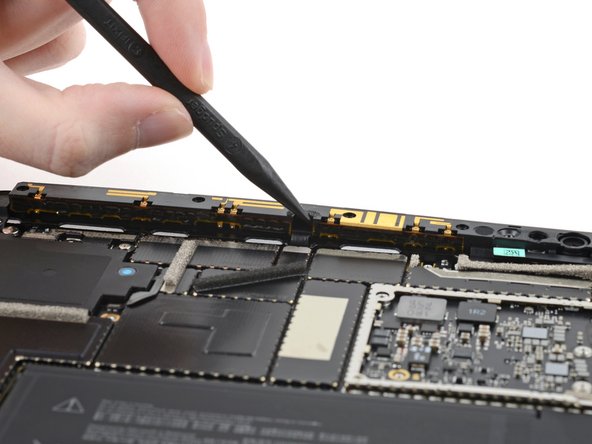
    • Repeat the last step for the gap in the sensor bar between the second and third screw hole from the left.

    • This gap is where the sensor bar's cable is located.

  4. Microsoft Surface Pro X Sensor Bar Lift, Lift the front-facing sensor bar: crwdns2935265:04crwdnd2935265:01crwdnd2935265:02crwdne2935265:0 Microsoft Surface Pro X Sensor Bar Lift, Lift the front-facing sensor bar: crwdns2935265:04crwdnd2935265:02crwdnd2935265:02crwdne2935265:0
    • Lift the sensor bar 90° so that it's perpendicular to the frame.

    • Don't push the sensor bar past 90° and don't rotate it horizontally to avoid damaging the cable connecting it to the motherboard.

crwdns2915888:0crwdne2915888:0

To reassemble your device, follow these instructions in reverse order.

Kyle Smith

crwdns2935283:002/01/21crwdne2935283:0

45,455 crwdns2915208:0crwdne2915208:0

crwdns2935297:0123crwdne2935297:0

crwdns2947412:00crwdne2947412:0

crwdns2917038:0crwdne2917038:0

crwdns2936625:0crwdne2936625:0:

crwdns2936751:024crwdne2936751:0 0

crwdns2936753:07crwdne2936753:0 0

crwdns2936753:030crwdne2936753:0 2

crwdns2942667:0crwdne2942667:0 23