crwdns2933423:0crwdne2933423:0

Microsoft Surface Pro 3 Battery Replacement

crwdns2942213:0crwdne2942213:0

  1. Microsoft Surface Pro 3 Battery Replacement, Display: crwdns2935265:01crwdnd2935265:01crwdnd2935265:02crwdne2935265:0 Microsoft Surface Pro 3 Battery Replacement, Display: crwdns2935265:01crwdnd2935265:02crwdnd2935265:02crwdne2935265:0
    • Before you begin, discharge the Surface Pro's battery below 25%. A charged lithium-ion battery can catch fire and/or explode if accidentally damaged during the repair.

    • The display is strongly glued to the frame of the device.

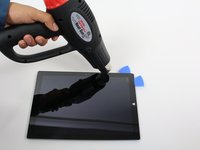
    • To remove the display, first soften the adhesive by applying heat. You can use a heat pad, heat gun, or iOpener. In a pinch, a hair dryer can also work.

    • Be careful when using a heat gun, as too much heat can permanently damage the display and/or battery.

    • Steadily and evenly heat the perimeter of the display until it's too hot to touch, and try to maintain that temperature for several minutes.

  2. Microsoft Surface Pro 3 Battery Replacement: crwdns2935265:02crwdnd2935265:01crwdnd2935265:02crwdne2935265:0 Microsoft Surface Pro 3 Battery Replacement: crwdns2935265:02crwdnd2935265:02crwdnd2935265:02crwdne2935265:0
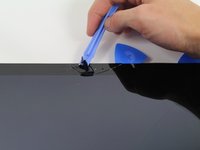
    • Use a suction cup or an iSclack to pull up on the glass and create a slight gap between the glass and the metal frame.

    • If your display is badly cracked, a suction cup may not adhere. It may help to first cover the display with a layer of packing tape. Alternatively, you can superglue your suction cup to the display.

    • Carefully insert an opening pick into the gap between the screen and the device to cut the adhesive.

    • Slide the pick around the sides and bottom of the display to cut the adhesive. Apply more heat as needed.

    • Work carefully—the glass is thin and will crack easily if you try to force it.

    • The wi-fi antennas are glued under the screen border along the top edge (on either side of the camera), and can be damaged easily. Use extra care when separating the top edge, and apply more heat if necessary.

  3. Microsoft Surface Pro 3 Battery Replacement: crwdns2935265:03crwdnd2935265:01crwdnd2935265:03crwdne2935265:0 Microsoft Surface Pro 3 Battery Replacement: crwdns2935265:03crwdnd2935265:02crwdnd2935265:03crwdne2935265:0 Microsoft Surface Pro 3 Battery Replacement: crwdns2935265:03crwdnd2935265:03crwdnd2935265:03crwdne2935265:0
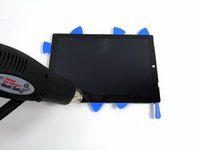
    • Continue to heat sections of the screen with the heat gun.

    • As you make your way around the screen with the heat gun, use the plastic opening tool and the opening picks to pry the screen loose.

    • The screen is extremely thin and very easy to break. Be careful working with broken glass.

  4. Microsoft Surface Pro 3 Battery Replacement: crwdns2935265:04crwdnd2935265:01crwdnd2935265:02crwdne2935265:0 Microsoft Surface Pro 3 Battery Replacement: crwdns2935265:04crwdnd2935265:02crwdnd2935265:02crwdne2935265:0
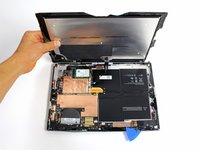
    • Lift the screen up carefully so that no wires are torn.

  5. Microsoft Surface Pro 3 Battery Replacement: crwdns2935265:05crwdnd2935265:01crwdnd2935265:02crwdne2935265:0 Microsoft Surface Pro 3 Battery Replacement: crwdns2935265:05crwdnd2935265:02crwdnd2935265:02crwdne2935265:0
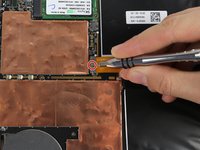
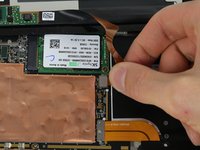
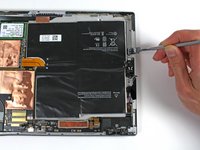
    • Remove the 3 mm T3 Torx screw securing the battery connector, and disconnect the battery connector.

    • Be careful not lose the small, rectangular bridge connector that lies underneath.

  6. Microsoft Surface Pro 3 Battery Replacement: crwdns2935265:06crwdnd2935265:01crwdnd2935265:03crwdne2935265:0 Microsoft Surface Pro 3 Battery Replacement: crwdns2935265:06crwdnd2935265:02crwdnd2935265:03crwdne2935265:0 Microsoft Surface Pro 3 Battery Replacement: crwdns2935265:06crwdnd2935265:03crwdnd2935265:03crwdne2935265:0
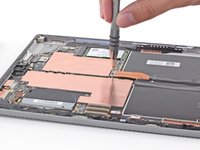
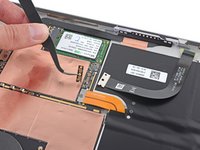
    • Remove the single 4 mm T3 Torx screw securing the display cable.

    • Lift the connector to disconnect the cable.

    • Be careful not lose the small, rectangular bridge connector that lies underneath.

  7. Microsoft Surface Pro 3 Battery Replacement: crwdns2935265:07crwdnd2935265:01crwdnd2935265:03crwdne2935265:0 Microsoft Surface Pro 3 Battery Replacement: crwdns2935265:07crwdnd2935265:02crwdnd2935265:03crwdne2935265:0 Microsoft Surface Pro 3 Battery Replacement: crwdns2935265:07crwdnd2935265:03crwdnd2935265:03crwdne2935265:0
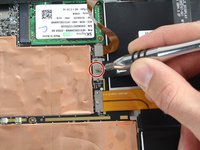
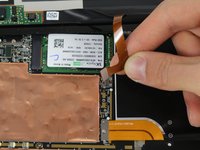
    • Grasp the orange cable connected to the silver connecter.

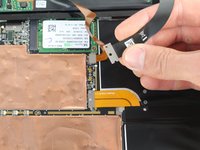
    • Carefully lift the orange cable up until the connecter pops off.

    • The screen will now be completely disconnected.

    • The replacement display may not include all the parts needed for installation. Save all the parts from the original display, and transfer them to the new display as needed.

  8. Microsoft Surface Pro 3 Battery Replacement, Battery: crwdns2935265:08crwdnd2935265:01crwdnd2935265:02crwdne2935265:0 Microsoft Surface Pro 3 Battery Replacement, Battery: crwdns2935265:08crwdnd2935265:02crwdnd2935265:02crwdne2935265:0
    crwdns2935267:0crwdne2935267:0
    Plastic Cards
    $2.99
    crwdns2942207:0crwdne2942207:0
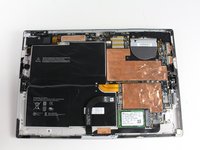
    • Use the metal spudger to scrape the battery off of the device.

    • There will be a fair bit of adhesive securing the battery to the device, so make sure to take your time and work the spudger around the perimeter of the battery to loosen all of the adhesive.

    • The Metal Spudger can potentially puncture the battery. It is safer to use the plastic card to remove the battery.

  9. Microsoft Surface Pro 3 Battery Replacement: crwdns2935265:09crwdnd2935265:01crwdnd2935265:01crwdne2935265:0
    • Lift the battery out of the device.

    • Be sure to follow instructions listed on the batteries for proper disposal.

crwdns2915888:0crwdne2915888:0

To reassemble your device, follow these instructions in reverse order.

crwdns2935229:052crwdne2935229:0

Erik Snyder

crwdns2935283:010/01/15crwdne2935283:0

5.193 crwdns2915208:0crwdne2915208:0

crwdns2935297:05crwdne2935297:0

crwdns2915084:0crwdne2915084:0

Cal Poly, Team 12-18, Maness Fall 2015 crwdns2935289:0Cal Poly, Team 12-18, Maness Fall 2015crwdne2935289:0

CPSU-MANESS-F15S12G18

crwdns2931471:05crwdne2931471:0

crwdns2935297:031crwdne2935297:0

crwdns2944067:032crwdne2944067:0

Do you have to glue everything back together? Do you heat the parts back up to get the glue to stick again?

Danny O'Boyle - crwdns2934203:0crwdne2934203:0

I slowly removed the old adhesive watching out for glass shards. A spundger and razer blade didn’t really help. In the end, I just used my fingernail and finger to roll the adhesive like I was removing rubber cement. It too about 30 minutes but I was able to get it cleaned off. I replaced the adhesive with 2 mm Tesa tape. This worked great.

michael jones -

Has anyone ever successfully opened a surface pro 3 without breaking the screen?

juliusmalexander - crwdns2934203:0crwdne2934203:0

Yes I have successfully open the surface pro with out breaking the screen by using a heat gun, the islack and the using the picks around the screen as anchors, then use the islack as you will use it to replace the screen in the iphone. It takes time and patience and a lot of heat. It took me 25 minutes to remove the screen with out breaking it.

computertechomar -

Only wizards can accomplish this task without breaking the screen. Yes the screen must be reheated for the glue to stick again. A simple fix to avoid all of these problems is to switch to Apple products.

Erik Snyder - crwdns2934203:0crwdne2934203:0

crwdns2917038:0crwdne2917038:0

crwdns2936625:0crwdne2936625:0:

crwdns2936751:024crwdne2936751:0 29

crwdns2936753:07crwdne2936753:0 219

crwdns2936753:030crwdne2936753:0 1,029

crwdns2942667:0crwdne2942667:0 174,136