crwdns2933423:0crwdne2933423:0

Microsoft Surface 3 Speaker Replacement

crwdns2942213:0crwdne2942213:0

  1. Microsoft Surface 3 Speaker Replacement, Casing: crwdns2935265:01crwdnd2935265:01crwdnd2935265:02crwdne2935265:0 Microsoft Surface 3 Speaker Replacement, Casing: crwdns2935265:01crwdnd2935265:02crwdnd2935265:02crwdne2935265:0
    • Warm up an iOpener following the instructions found in the iOpener guide.

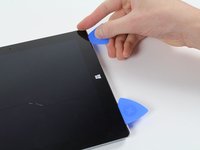
    • Place the warm iOpener on top of the edges of the screen. This heat will weaken the strength of the adhesive between the display and body.

  2. Microsoft Surface 3 Speaker Replacement: crwdns2935265:02crwdnd2935265:01crwdnd2935265:02crwdne2935265:0 Microsoft Surface 3 Speaker Replacement: crwdns2935265:02crwdnd2935265:02crwdnd2935265:02crwdne2935265:0
    • Use iFixit opening picks to wedge under the edge of the screen at the speaker port.

    • This may take significant force. A fingernail might work better for the initial lift

    • If you push straight down near the edge you will go through the speaker mesh and possibly end up damaging your speaker; try to push the pick in at a shallow angle.

  3. Microsoft Surface 3 Speaker Replacement: crwdns2935265:03crwdnd2935265:01crwdnd2935265:02crwdne2935265:0 Microsoft Surface 3 Speaker Replacement: crwdns2935265:03crwdnd2935265:02crwdnd2935265:02crwdne2935265:0
    • Carefully try to work your way around the device using the picks, reapplications of the heated iOpener, and luck.

    • If you break the glass on one side you might want to try again starting from the other side so that you have a clean, unbroken, edge on that side.

    • While the glass on this display is not particularly sharp when broken, it is still broken glass and you should be careful with it.

  4. Microsoft Surface 3 Speaker Replacement: crwdns2935265:04crwdnd2935265:01crwdnd2935265:01crwdne2935265:0
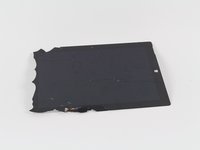
    • Flip the display over so that parts underneath it are easily accessible.

    • Do not pull out the display as it is still attached to the motherboard.

    • If you are replacing the display, or want it out of the way, continue with the display replacement guide steps.

  5. Microsoft Surface 3 Speaker Replacement, Speaker: crwdns2935265:05crwdnd2935265:01crwdnd2935265:01crwdne2935265:0
    • You will be working in these areas of the Surface 3 in order to replace the speakers.

  6. Microsoft Surface 3 Speaker Replacement: crwdns2935265:06crwdnd2935265:01crwdnd2935265:01crwdne2935265:0
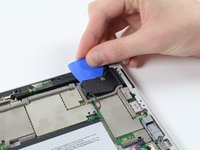
    • Use a pick to get under the speaker part and undo the adhesive that keeps it attached to the back casing.

  7. Microsoft Surface 3 Speaker Replacement: crwdns2935265:07crwdnd2935265:01crwdnd2935265:01crwdne2935265:0
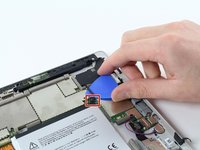
    • Use the pick to gently lift on the red and black wire in order to dislodge the connection between the speaker wire and the motherboard.

  8. Microsoft Surface 3 Speaker Replacement: crwdns2935265:08crwdnd2935265:01crwdnd2935265:02crwdne2935265:0 Microsoft Surface 3 Speaker Replacement: crwdns2935265:08crwdnd2935265:02crwdnd2935265:02crwdne2935265:0
    • Repeat the same steps for the second speaker.

  9. Microsoft Surface 3 Speaker Replacement: crwdns2935265:09crwdnd2935265:01crwdnd2935265:01crwdne2935265:0
    • Simply replace the old speakers by snapping the new speakers into place and connecting the red and black wire to the motherboard.

crwdns2915888:0crwdne2915888:0

To reassemble your device, follow these instructions in reverse order.

Andy Stone

crwdns2935283:010/08/15crwdne2935283:0

284 crwdns2915208:0crwdne2915208:0

crwdns2935297:02crwdne2935297:0

crwdns2915084:0crwdne2915084:0

Cal Poly, Team 5-12, Maness Fall 2015 crwdns2935289:0Cal Poly, Team 5-12, Maness Fall 2015crwdne2935289:0

CPSU-MANESS-F15S5G12

crwdns2931471:04crwdne2931471:0

crwdns2935297:018crwdne2935297:0

crwdns2944067:00crwdne2944067:0

crwdns2917038:0crwdne2917038:0

crwdns2936625:0crwdne2936625:0:

crwdns2936751:024crwdne2936751:0 1

crwdns2936753:07crwdne2936753:0 7

crwdns2936753:030crwdne2936753:0 14

crwdns2942667:0crwdne2942667:0 3,351