crwdns2933423:0crwdne2933423:0

Microsoft Surface 2 Volume Control Replacement

crwdns2942213:0crwdne2942213:0

  1. Microsoft Surface 2 Volume Control Replacement, Screen: crwdns2935265:01crwdnd2935265:01crwdnd2935265:03crwdne2935265:0 Microsoft Surface 2 Volume Control Replacement, Screen: crwdns2935265:01crwdnd2935265:02crwdnd2935265:03crwdne2935265:0 Microsoft Surface 2 Volume Control Replacement, Screen: crwdns2935265:01crwdnd2935265:03crwdnd2935265:03crwdne2935265:0
    • Begin by using a heat gun or the iOpener (This will take longer.) to melt the adhesive all around the outer edge of the screen.

    • Avoid holding the heat gun too close to the Microsoft Surface 2 so as to not cause any unwanted warping.

    • Avoid touching the metal end of the gun. It will be very hot and can burn you.

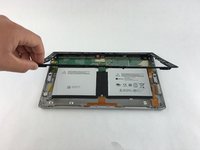
    • Insert the opening picks just under the screen and black edging. Be sure to place them evenly on each side.

    • Using the gap created by the picks, slowly pry the screen from the body of the Microsoft Surface 2 with a plastic opening tool. Pry as uniformly as possible.

  2. Microsoft Surface 2 Volume Control Replacement: crwdns2935265:02crwdnd2935265:01crwdnd2935265:03crwdne2935265:0 Microsoft Surface 2 Volume Control Replacement: crwdns2935265:02crwdnd2935265:02crwdnd2935265:03crwdne2935265:0 Microsoft Surface 2 Volume Control Replacement: crwdns2935265:02crwdnd2935265:03crwdnd2935265:03crwdne2935265:0
    • Once the screen is free from the body, there will be a single ribbon cable connecting the screen to the motherboard.

    • Use a plastic spudger to pry the retaining clip away from the display cable.

    • The ribbon cable may be glued to the motherboard.

    • Carefully pull the ribbon cable from its socket on the motherboard.

  3. Microsoft Surface 2 Volume Control Replacement, Volume Control: crwdns2935265:03crwdnd2935265:01crwdnd2935265:02crwdne2935265:0 Microsoft Surface 2 Volume Control Replacement, Volume Control: crwdns2935265:03crwdnd2935265:02crwdnd2935265:02crwdne2935265:0
    • Work close to Magnetic Project Map to avoid losing screws.

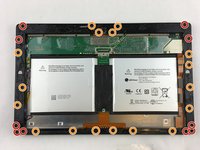
    • Remove ten 3.45 mm T3 screws from the corners of the black plastic bezel.

    • Remove the remaining seventeen 4.4 mm T5 screws from the perimeter of the bezel.

    • Once all screws have been removed, lift and remove the bezel from the rest of the device.

  4. Microsoft Surface 2 Volume Control Replacement: crwdns2935265:04crwdnd2935265:01crwdnd2935265:01crwdne2935265:0
    crwdns2935267:0crwdne2935267:0
    Tweezers
    $4.99
    crwdns2942207:0crwdne2942207:0
    • Gently peel off the yellow plastic tape using a pair of tweezers.

  5. Microsoft Surface 2 Volume Control Replacement: crwdns2935265:05crwdnd2935265:01crwdnd2935265:01crwdne2935265:0
    • Remove the two 1.70 mm T3 screws from the volume control switch.

    • Work close to Magnetic Project Map to avoid losing screws.

  6. Microsoft Surface 2 Volume Control Replacement: crwdns2935265:06crwdnd2935265:01crwdnd2935265:01crwdne2935265:0
    • Use a spudger to lift up the retaining flap on the volume control cable ZIF connector.

    • Make sure you are prying up on the retaining flap, not the connector itself.

  7. Microsoft Surface 2 Volume Control Replacement: crwdns2935265:07crwdnd2935265:01crwdnd2935265:01crwdne2935265:0
    • Now that the volume control switch is loose, pull it gently away from the motherboard.

    • No force is needed to plug in or remove the ribbon cable.

crwdns2915888:0crwdne2915888:0

To reassemble your device, follow these instructions in reverse order.

oluchianya

crwdns2935283:002/04/16crwdne2935283:0

157 crwdns2915208:0crwdne2915208:0

crwdns2935295:0crwdne2935295:0

crwdns2915084:0crwdne2915084:0

USF Tampa, Team 3-1, Wollert Spring 2016 crwdns2935289:0USF Tampa, Team 3-1, Wollert Spring 2016crwdne2935289:0

USFT-WOLLERT-S16S3G1

crwdns2931471:04crwdne2931471:0

crwdns2935297:05crwdne2935297:0

crwdns2944067:00crwdne2944067:0

crwdns2917038:0crwdne2917038:0

crwdns2936625:0crwdne2936625:0:

crwdns2936751:024crwdne2936751:0 2

crwdns2936753:07crwdne2936753:0 8

crwdns2936753:030crwdne2936753:0 20

crwdns2942667:0crwdne2942667:0 1,414