crwdns2915892:0crwdne2915892:0
If you have tried multiple times but cannot get the Microsoft Surface 2 to turn on, you may need to replace the I/O cable, which houses the charging port. This cable will also need to be replaced if your SD card slot is not working properly.
crwdns2942213:0crwdne2942213:0
-
-
Begin by using a heat gun or the iOpener (This will take longer.) to melt the adhesive all around the outer edge of the screen.
-
Insert the opening picks just under the screen and black edging. Be sure to place them evenly on each side.
-
Using the gap created by the picks, slowly pry the screen from the body of the Microsoft Surface 2 with a plastic opening tool. Pry as uniformly as possible.
-
-
-
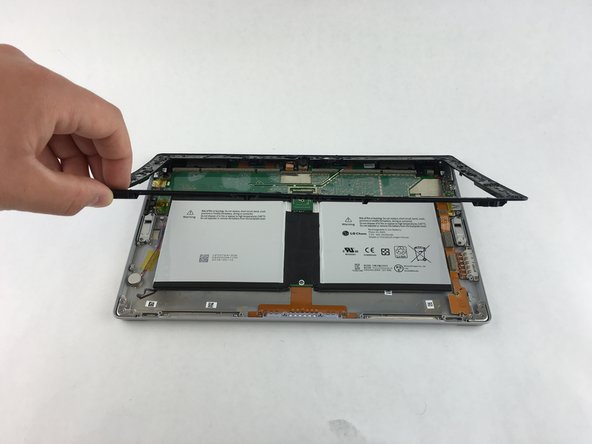
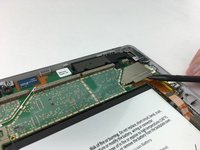
Use a plastic spudger to pry the retaining clip away from the display cable.
-
Carefully pull the ribbon cable from its socket on the motherboard.
Please tell people about unlatching the socket lock before trying to remove the ribbon cable from the socket on the motherboard! The white latch handle is still in the locked position in the photograph showing the ribbon cable being pulled. (And they’ll NEVER get the ribbon cable back in the socket without raising that latch!)
Be sure to get just under the glass. There is a thin black edging under the glass. I found it better to start at the bottom edge.
There is a lot of glue, and it is about 1/2” wide.
Do no overheat. The frame is plastic and can deform.
If you want to preserve the screen, be careful near the bottom edge near the windows logo. There are 2 flex cables, one on either side of the logo. If you stab a tool too far in, you may tear a cable.
If you have a new screen “without cable”, the directions are slightly different. Do not disconnect the ribbon cable from the motherboard. Instead, locate and remove 3 hexalobe screws that attach a narrow circuit board to the display. Carefully lift the narrow circuit board, disconnecting two sockets from the display board. Roll this narrow circuit board over and locate 2 flex cables. Lift the flaps on each flex cable to reveal the zif sockets underneath. Use a fingernail or plastic spudger to lift up the catches on the zif sockets and slide out the flex cables.
Where do you buy actual oem replacement speakers for this tablet???
I'm assuming the go 1 speakers, Will not work with this tablet.
-
-
-
-
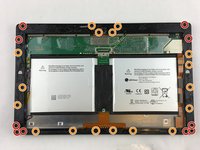
Remove ten 3.45 mm T3 screws from the corners of the black plastic bezel.
-
Remove the remaining seventeen 4.4 mm T5 screws from the perimeter of the bezel.
-
Once all screws have been removed, lift and remove the bezel from the rest of the device.
-
-
-
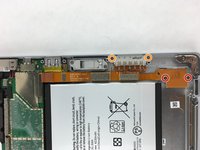
Remove the two 2.19 mm T3 screws that hold down the SD card ribbon cable.
-
Remove the two 3.27 mm T3 screws holding down the charging port.
-
-
-
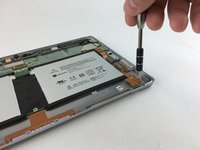
Use a spudger to pry up the retaining plate at the end of the ribbon cable.
-
Use the spudger to flip up the small retaining flap on the cable's zero insertion force connector.
-
Remove the ribbon cable from its port.
-


To reassemble your device, follow these instructions in reverse order.
To reassemble your device, follow these instructions in reverse order.
crwdns2935221:0crwdne2935221:0
crwdns2935229:04crwdne2935229:0
crwdns2915084:0crwdne2915084:0

USF Tampa, Team 3-1, Wollert Spring 2016 crwdns2935289:0USF Tampa, Team 3-1, Wollert Spring 2016crwdne2935289:0
USFT-WOLLERT-S16S3G1
crwdns2931471:04crwdne2931471:0
crwdns2935297:05crwdne2935297:0
crwdns2947412:02crwdne2947412:0
I want to replace the battery of Microsoft Surface 2, which steps I have to follow to replace it?
Cosa devo utilizzare per attaccare il cavo del display sotto al fermaglio di distanza, colla o nastro biadesivo?
there is no mention of just how strong the adhesive actually is. i might go as far as to say this has been one of he hardest i have ever had to separate. its a combination of the strength of the adhesive and the amount of it to get through. i use a heat mat rather than a heat gun as its far better than the gun.. been able to control the temperature by 1 degrees up to 100. also the digitizer runs right to the edge of the glass, so its possible to damage it while trying to remove the screen.
stuart - crwdns2934203:0crwdne2934203:0