crwdns2933423:0crwdne2933423:0

MiTM Pressure Washers CA2703HDHB1 2017 Unloader Replacement

crwdns2942213:0crwdne2942213:0

  1. MiTM Pressure Washers CA2703HDHB1 2017 Unloader Replacement, Determine the unloader assembly: crwdns2935265:01crwdnd2935265:01crwdnd2935265:03crwdne2935265:0 MiTM Pressure Washers CA2703HDHB1 2017 Unloader Replacement, Determine the unloader assembly: crwdns2935265:01crwdnd2935265:02crwdnd2935265:03crwdne2935265:0 MiTM Pressure Washers CA2703HDHB1 2017 Unloader Replacement, Determine the unloader assembly: crwdns2935265:01crwdnd2935265:03crwdnd2935265:03crwdne2935265:0
    • There are two versions of the unloader assembly:

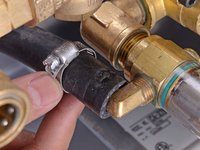
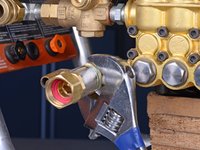
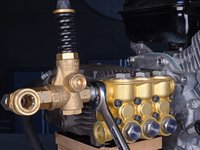
    • First image—earlier pressure washers feature an all-in-one assembly (part 8-0631) that’s easy to replace, but gave users the ability to break the pump.

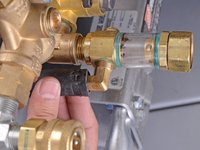
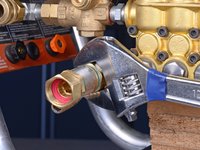
    • Second image—later models use a tamper-proof, harder to remove unloader (part 8-0656), connected by a series of pipe fittings.

    • This guide is written for the tamper-proof unloader assembly.

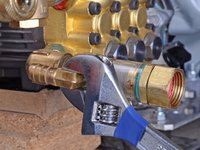
    • If you need to remove an all-in-one style unloader, use a large adjustable wrench to unscrew the two large Banjo bolts. This will disconnect the unloader from the pump assembly.

  2. MiTM Pressure Washers CA2703HDHB1 2017 Unloader Replacement: crwdns2935265:02crwdnd2935265:01crwdnd2935265:02crwdne2935265:0 MiTM Pressure Washers CA2703HDHB1 2017 Unloader Replacement: crwdns2935265:02crwdnd2935265:02crwdnd2935265:02crwdne2935265:0
    • Before you begin, be sure that the engine is powered off and is cool to the touch.

    • Grab the plastic housing at the end of the spark plug wire.

    • Pull firmly to disconnect the wire from the spark plug.

  3. MiTM Pressure Washers CA2703HDHB1 2017 Unloader Replacement, Loosen the hose clamp: crwdns2935265:03crwdnd2935265:01crwdnd2935265:02crwdne2935265:0 MiTM Pressure Washers CA2703HDHB1 2017 Unloader Replacement, Loosen the hose clamp: crwdns2935265:03crwdnd2935265:02crwdnd2935265:02crwdne2935265:0
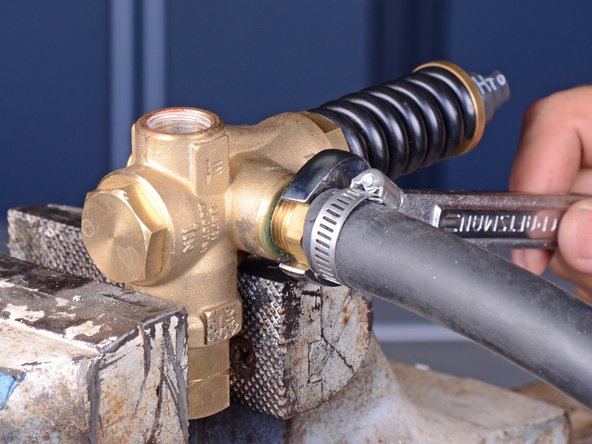
    • Use a 1/4" socket or a large flathead screwdriver to loosen the hose clamp near the inlet filter.

    • Slide the hose clamp away from the end of the hose.

  4. MiTM Pressure Washers CA2703HDHB1 2017 Unloader Replacement, Disconnect the return hose: crwdns2935265:04crwdnd2935265:01crwdnd2935265:02crwdne2935265:0 MiTM Pressure Washers CA2703HDHB1 2017 Unloader Replacement, Disconnect the return hose: crwdns2935265:04crwdnd2935265:02crwdnd2935265:02crwdne2935265:0
    • Wiggle the hose and pull it off of the brass nipple.

  5. MiTM Pressure Washers CA2703HDHB1 2017 Unloader Replacement, Position the support block: crwdns2935265:05crwdnd2935265:01crwdnd2935265:01crwdne2935265:0
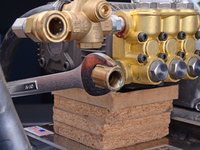
    • Slide a 3" tall block underneath the pump assembly to help support the pump.

  6. MiTM Pressure Washers CA2703HDHB1 2017 Unloader Replacement, Re-position the return elbow: crwdns2935265:06crwdnd2935265:01crwdnd2935265:02crwdne2935265:0 MiTM Pressure Washers CA2703HDHB1 2017 Unloader Replacement, Re-position the return elbow: crwdns2935265:06crwdnd2935265:02crwdnd2935265:02crwdne2935265:0
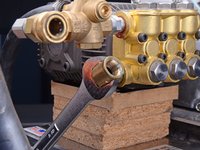
    • Use a 1/2" or adjustable wrench to loosen and twist the return elbow half a turn, so that it faces the opposite direction.

    • This will allow the fitting to clear the pump edge without being removed.

  7. MiTM Pressure Washers CA2703HDHB1 2017 Unloader Replacement, Loosen the filter: crwdns2935265:07crwdnd2935265:01crwdnd2935265:02crwdne2935265:0 MiTM Pressure Washers CA2703HDHB1 2017 Unloader Replacement, Loosen the filter: crwdns2935265:07crwdnd2935265:02crwdnd2935265:02crwdne2935265:0
    • Use a large adjustable wrench to loosen and unscrew the filter.

  8. MiTM Pressure Washers CA2703HDHB1 2017 Unloader Replacement, Remove the filter: crwdns2935265:08crwdnd2935265:01crwdnd2935265:01crwdne2935265:0
    • Remove the filter with the return elbow attached.

  9. MiTM Pressure Washers CA2703HDHB1 2017 Unloader Replacement, Loosen the input elbow: crwdns2935265:09crwdnd2935265:01crwdnd2935265:02crwdne2935265:0 MiTM Pressure Washers CA2703HDHB1 2017 Unloader Replacement, Loosen the input elbow: crwdns2935265:09crwdnd2935265:02crwdnd2935265:02crwdne2935265:0
    • Use a 1" or large adjustable wrench to loosen and unscrew the pump input elbow.

  10. MiTM Pressure Washers CA2703HDHB1 2017 Unloader Replacement, Remove the input elbow: crwdns2935265:010crwdnd2935265:01crwdnd2935265:01crwdne2935265:0
    • Remove the input elbow fitting.

  11. MiTM Pressure Washers CA2703HDHB1 2017 Unloader Replacement, Loosen the output assembly: crwdns2935265:011crwdnd2935265:01crwdnd2935265:02crwdne2935265:0 MiTM Pressure Washers CA2703HDHB1 2017 Unloader Replacement, Loosen the output assembly: crwdns2935265:011crwdnd2935265:02crwdnd2935265:02crwdne2935265:0
    • Use a 3/4" or adjustable wrench to loosen and disconnect the coupling from the pump assembly.

  12. MiTM Pressure Washers CA2703HDHB1 2017 Unloader Replacement, Remove the output assembly: crwdns2935265:012crwdnd2935265:01crwdnd2935265:01crwdne2935265:0
    • Remove the output assembly.

  13. MiTM Pressure Washers CA2703HDHB1 2017 Unloader Replacement, Clamp the output assembly: crwdns2935265:013crwdnd2935265:01crwdnd2935265:01crwdne2935265:0
    • You will need to remove the remaining fittings from the output assembly in order to replace the unloader.

    • Secure the output assembly in a large vise.

  14. MiTM Pressure Washers CA2703HDHB1 2017 Unloader Replacement, Loosen the output elbow: crwdns2935265:014crwdnd2935265:01crwdnd2935265:03crwdne2935265:0 MiTM Pressure Washers CA2703HDHB1 2017 Unloader Replacement, Loosen the output elbow: crwdns2935265:014crwdnd2935265:02crwdnd2935265:03crwdne2935265:0 MiTM Pressure Washers CA2703HDHB1 2017 Unloader Replacement, Loosen the output elbow: crwdns2935265:014crwdnd2935265:03crwdnd2935265:03crwdne2935265:0
    • Hold the outlet fitting in place with a 15/16" or large adjustable wrench.

    • Use a 3/4" or adjustable wrench to loosen and unscrew the output elbow from the outlet fitting.

  15. MiTM Pressure Washers CA2703HDHB1 2017 Unloader Replacement: crwdns2935265:015crwdnd2935265:01crwdnd2935265:01crwdne2935265:0
    • Remove the output elbow with the quick-connect socket attached to it.

  16. MiTM Pressure Washers CA2703HDHB1 2017 Unloader Replacement, Loosen the coupling nipple: crwdns2935265:016crwdnd2935265:01crwdnd2935265:02crwdne2935265:0 MiTM Pressure Washers CA2703HDHB1 2017 Unloader Replacement, Loosen the coupling nipple: crwdns2935265:016crwdnd2935265:02crwdnd2935265:02crwdne2935265:0
    • Use a 3/4" or adjustable wrench to loosen and unscrew the coupling nipple from the unloader.

  17. MiTM Pressure Washers CA2703HDHB1 2017 Unloader Replacement, Remove the coupling nipple: crwdns2935265:017crwdnd2935265:01crwdnd2935265:01crwdne2935265:0
    • Remove the coupling nipple.

  18. MiTM Pressure Washers CA2703HDHB1 2017 Unloader Replacement, Loosen the return hose nipple: crwdns2935265:018crwdnd2935265:01crwdnd2935265:02crwdne2935265:0 MiTM Pressure Washers CA2703HDHB1 2017 Unloader Replacement, Loosen the return hose nipple: crwdns2935265:018crwdnd2935265:02crwdnd2935265:02crwdne2935265:0
    • Use a 11/16" or adjustable wrench to loosen and unscrew the return hose nipple from the unloader.

    • You do not need to disconnect the hose from the nipple.

  19. MiTM Pressure Washers CA2703HDHB1 2017 Unloader Replacement, Remove the return hose: crwdns2935265:019crwdnd2935265:01crwdnd2935265:01crwdne2935265:0
    • Remove the return hose nipple with the hose attached.

  20. MiTM Pressure Washers CA2703HDHB1 2017 Unloader Replacement, Check for plug placement: crwdns2935265:020crwdnd2935265:01crwdnd2935265:03crwdne2935265:0 MiTM Pressure Washers CA2703HDHB1 2017 Unloader Replacement, Check for plug placement: crwdns2935265:020crwdnd2935265:02crwdnd2935265:03crwdne2935265:0 MiTM Pressure Washers CA2703HDHB1 2017 Unloader Replacement, Check for plug placement: crwdns2935265:020crwdnd2935265:03crwdnd2935265:03crwdne2935265:0
    • Only the unloader assembly remains.

    • Compare the original unloader with the replacement part. The replacement part may have a plug installed in the wrong port.

    • Use an 8 mm (5/16" OK) hex key to remove and re-install the plug into the correct port.

crwdns2915888:0crwdne2915888:0

To reassemble your device, follow these instructions in reverse order.

When you re-connect the fittings, clean off the old thread sealant and apply new thread sealant (tape or pipe dope).

crwdns2935229:04crwdne2935229:0

Arthur Shi

crwdns2935283:001/03/18crwdne2935283:0

253,505 crwdns2915208:0crwdne2915208:0

crwdns2935297:0526crwdne2935297:0

crwdns2915084:0crwdne2915084:0

iFixit crwdns2935289:0iFixitcrwdne2935289:0

Staff

crwdns2931471:0135crwdne2931471:0

crwdns2935297:017,199crwdne2935297:0

crwdns2944067:00crwdne2944067:0

crwdns2917038:0crwdne2917038:0

crwdns2936625:0crwdne2936625:0:

crwdns2936751:024crwdne2936751:0 1

crwdns2936753:07crwdne2936753:0 17

crwdns2936753:030crwdne2936753:0 42

crwdns2942667:0crwdne2942667:0 1,077