crwdns2933423:0crwdne2933423:0

Meta Quest 2 Controller Faceplate prereq

crwdns2862623:0crwdne2862623:0
crwdns2942641:0crwdne2942641:0

crwdns2942213:0crwdne2942213:0

  1. Meta Quest 2 Controller Faceplate prereq, Remove the battery cover: crwdns2935265:01crwdnd2935265:01crwdnd2935265:03crwdne2935265:0 Meta Quest 2 Controller Faceplate prereq, Remove the battery cover: crwdns2935265:01crwdnd2935265:02crwdnd2935265:03crwdne2935265:0 Meta Quest 2 Controller Faceplate prereq, Remove the battery cover: crwdns2935265:01crwdnd2935265:03crwdnd2935265:03crwdne2935265:0
    • Use your fingers to slide the battery cover down towards the strap end of the controller.

    • Remove the battery cover.

    • If you're taking the controller apart for repairs, remove the batteries in the controller.

  2. Meta Quest 2 Controller Faceplate prereq, Loosen the faceplate adhesive: crwdns2935265:02crwdnd2935265:01crwdnd2935265:01crwdne2935265:0
    • Heat an iOpener and apply it to the bottom edge of the controller faceplate for a minute.

  3. Meta Quest 2 Controller Faceplate prereq, Loosen the controller faceplate: crwdns2935265:03crwdnd2935265:01crwdnd2935265:03crwdne2935265:0 Meta Quest 2 Controller Faceplate prereq, Loosen the controller faceplate: crwdns2935265:03crwdnd2935265:02crwdnd2935265:03crwdne2935265:0 Meta Quest 2 Controller Faceplate prereq, Loosen the controller faceplate: crwdns2935265:03crwdnd2935265:03crwdnd2935265:03crwdne2935265:0
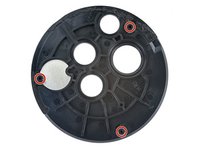
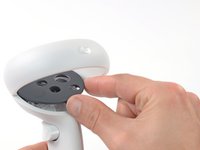
    • The controller faceplate is secured with adhesive and three friction pegs.

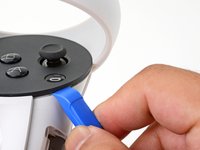
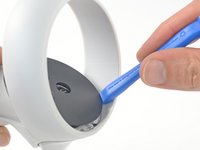
    • Press the edge of an opening tool into the seam between the controller faceplate and shell, near the Oculus button.

    • If you can’t get the opening tool into the seam, heat the area with an iOpener for a minute and try again.

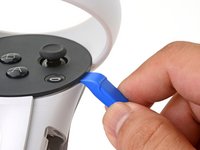
    • Slide the opening tool to the base of the ring shell to loosen the adhesive.

  4. Meta Quest 2 Controller Faceplate prereq: crwdns2935265:04crwdnd2935265:01crwdnd2935265:02crwdne2935265:0 Meta Quest 2 Controller Faceplate prereq: crwdns2935265:04crwdnd2935265:02crwdnd2935265:02crwdne2935265:0
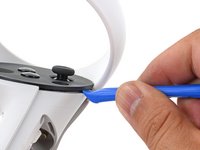
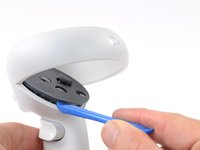
    • Use an opening tool to pry up on the seam to loosen the first friction peg.

  5. Meta Quest 2 Controller Faceplate prereq: crwdns2935265:05crwdnd2935265:01crwdnd2935265:02crwdne2935265:0 Meta Quest 2 Controller Faceplate prereq: crwdns2935265:05crwdnd2935265:02crwdnd2935265:02crwdne2935265:0
    • Continue prying around the entire faceplate to separate the remaining friction pegs and adhesive.

    • If you're having trouble, apply a heated iOpener to the faceplate for a minute and try again.

  6. Meta Quest 2 Controller Faceplate prereq, Remove the faceplate: crwdns2935265:06crwdnd2935265:01crwdnd2935265:03crwdne2935265:0 Meta Quest 2 Controller Faceplate prereq, Remove the faceplate: crwdns2935265:06crwdnd2935265:02crwdnd2935265:03crwdne2935265:0 Meta Quest 2 Controller Faceplate prereq, Remove the faceplate: crwdns2935265:06crwdnd2935265:03crwdnd2935265:03crwdne2935265:0
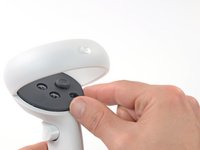
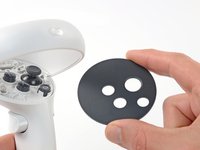
    • Remove the controller faceplate.

    • The three friction pegs should hold the faceplate securely, so you don’t need to replace the adhesive during reassembly. Be sure to firmly press the faceplate onto the controller so that all friction pegs fully engage.

crwdns2915888:0crwdne2915888:0

To reassemble your device, follow these instructions in reverse order.

Arthur Shi

crwdns2935283:001/03/18crwdne2935283:0

284.159 crwdns2915208:0crwdne2915208:0

crwdns2935297:0588crwdne2935297:0

crwdns2915084:0crwdne2915084:0

iFixit crwdns2935289:0iFixitcrwdne2935289:0

Staff

crwdns2931471:0121crwdne2931471:0

crwdns2935297:019.763crwdne2935297:0

crwdns2947412:00crwdne2947412:0

crwdns2917038:0crwdne2917038:0

crwdns2936625:0crwdne2936625:0:

crwdns2936751:024crwdne2936751:0 0

crwdns2936753:07crwdne2936753:0 0

crwdns2936753:030crwdne2936753:0 23

crwdns2942667:0crwdne2942667:0 55