crwdns2933423:0crwdne2933423:0

Merch Source Projector Entertainment II Cooling Fan Replacement

crwdns2942213:0crwdne2942213:0

  1. Merch Source Projector Entertainment II Cooling Fan Replacement, Outer Casing: crwdns2935265:01crwdnd2935265:01crwdnd2935265:02crwdne2935265:0 Merch Source Projector Entertainment II Cooling Fan Replacement, Outer Casing: crwdns2935265:01crwdnd2935265:02crwdnd2935265:02crwdne2935265:0
    • Flip the projector onto its back and unscrew the nine 15mm screws using the Phillips #0 screw driver.

  2. Merch Source Projector Entertainment II Cooling Fan Replacement: crwdns2935265:02crwdnd2935265:01crwdnd2935265:01crwdne2935265:0
    • Flip the projector right side up and unscrew the two 12mm screws on the light bulb panel located at the rear of the projector with a Phillips #0 screw head.

    • The bottom right panel screw does not come completely out the panel door.

  3. Merch Source Projector Entertainment II Cooling Fan Replacement: crwdns2935265:03crwdnd2935265:01crwdnd2935265:02crwdne2935265:0 Merch Source Projector Entertainment II Cooling Fan Replacement: crwdns2935265:03crwdnd2935265:02crwdnd2935265:02crwdne2935265:0
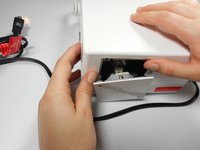
    • Using your hands, gently pry the top and bottom of the projector casing apart.

  4. Merch Source Projector Entertainment II Cooling Fan Replacement, Cooling Fan: crwdns2935265:04crwdnd2935265:01crwdnd2935265:02crwdne2935265:0 Merch Source Projector Entertainment II Cooling Fan Replacement, Cooling Fan: crwdns2935265:04crwdnd2935265:02crwdnd2935265:02crwdne2935265:0
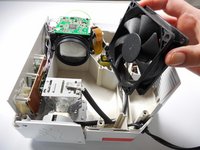
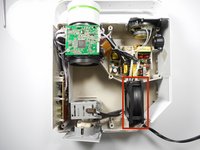
    • Locate the 80 mm fan and slide upward straight out of the housing.

  5. Merch Source Projector Entertainment II Cooling Fan Replacement: crwdns2935265:05crwdnd2935265:01crwdnd2935265:02crwdne2935265:0 Merch Source Projector Entertainment II Cooling Fan Replacement: crwdns2935265:05crwdnd2935265:02crwdnd2935265:02crwdne2935265:0
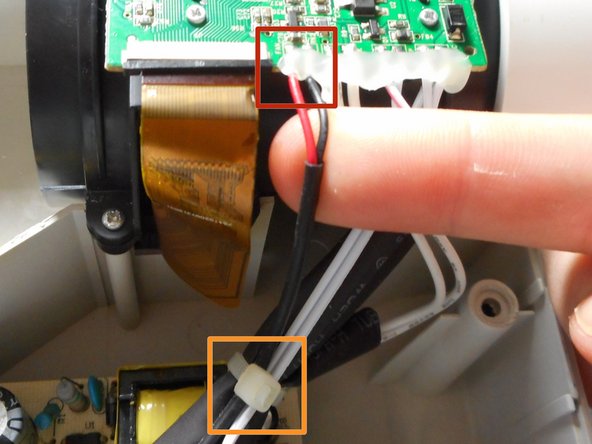
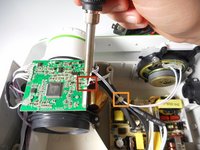
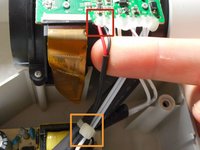
    • Unsolder the red and black connections off of the motherboard.

    • If there are zip ties around the cables, they will need to be cut to remove the fan.

    • Need some help? Follow this guide to learn soldering basics.

    • While soldering the metal connections will get very hot. Never touch the iron with your hand.

    • Make sure that the projector is fully turned off and not plugged in. Allow up to 30 minutes for projector to cool down.

    • If there is hot glue within the connection in on the motherboard, you will need to peel it off simply using your fingers.

crwdns2915888:0crwdne2915888:0

To reassemble your device, follow these instructions in reverse order.

crwdns2935227:0crwdne2935227:0
Stephanie

crwdns2935283:001/08/15crwdne2935283:0

276 crwdns2915208:0crwdne2915208:0

crwdns2935297:03crwdne2935297:0

crwdns2915084:0crwdne2915084:0

Cal Poly, Team 18-3, Maness Winter 2015 crwdns2935289:0Cal Poly, Team 18-3, Maness Winter 2015crwdne2935289:0

CPSU-MANESS-W15S18G3

crwdns2931471:03crwdne2931471:0

crwdns2935297:04crwdne2935297:0

crwdns2944067:00crwdne2944067:0

crwdns2917038:0crwdne2917038:0

crwdns2936625:0crwdne2936625:0:

crwdns2936751:024crwdne2936751:0 0

crwdns2936753:07crwdne2936753:0 10

crwdns2936753:030crwdne2936753:0 18

crwdns2942667:0crwdne2942667:0 2,263