crwdns2915892:0crwdne2915892:0
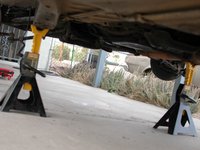
To do many of the jobs on your car you will need to put the front, back, or both up in the air and secure them safely on jack stands. Doing so provides easier access to under vehicle components and is required for any work on the brakes or other running gear.It's important to learn your car's specific jack locations for both your safety, and to avoid damaging the car.This guide is for informational purposes only. The reader assumes all risks and is responsible for using correct safety equipment and using their best judgement before going underneath their car.
crwdns2942213:0crwdne2942213:0
-
-
Before beginning to jack up the vehicle you must put wheel chocks on the end of the car you are not jacking up. This includes times when you are jacking up one end, say to change the coolant or install new front brake pads, or when you're jacking up the whole car and are starting on one end.
-
The wheel chock is designed to prevent the vehicle from rolling. Place the chocks in the direction you believe the vehicle will roll, such as in the direction of the slope of your work area. When it doubt, put wheels chocks on both sides of the wheels.
-
-
-
On the front of the W123's there is a strong cross-member that can be used to raise the front of the vehicle.
-
This cross member is located just rear of the oil pan.
-
Place the jack directly centered on this cross member and then begin slowly lifting. Re-check the position of the jack as you lift it to ensure it stays centered. If it does not, lower it and start again.
-
-
-
-
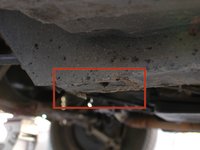
On the front of the car look for the reinforced area of the boxed section of the unibody highlighted. This is strengthened to support a jack stand.
-
Place your jack stand directly under this, raise it as close as possible to the raised area, and ensure it locks against the lock handle or that is can be secured by the locking pin.
-
Repeat on the opposite side of the car.
-
Then slowly lower the jack until the car rests on the stands. After it has lowered check that the stands are even seated under this reinforced area.
-
-
-
Move to the back of the vehicle.
-
Place the jack under the rear differential of the car. This is the strongest lift point at the rear of the vehicle.
-
Place it directly under the center of the differential and begin lifting it slowly and carefully following similar precautions as the front of the car.
-
-
-
Place the rear jack stands in a strong and secure location. At the rear of the car, there are several choices, and it will often depend on the type of work being done.
-
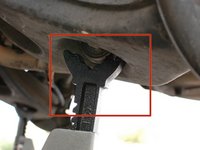
In most cases, a good choice is directly under the lower shock mounting point in the trailing arm.
-
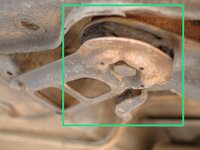
Another option is underneath the sub-frame bushing mount points.
-
Lower the jack slowly and carefully on to the rear stands and check that they are well positioned.
-
If the vehicle does not feel stable try and identify which stand is not securely placed and replace it by re-tracing the steps in this guide.
-


To lower your vehicle, lift the car off of each set of stands, remove them, and then slowly lower that end of the vehicle. Make sure there are no people, pets, tools, or parts underneath the car when lowering it.
To lower your vehicle, lift the car off of each set of stands, remove them, and then slowly lower that end of the vehicle. Make sure there are no people, pets, tools, or parts underneath the car when lowering it.
crwdns2935221:0crwdne2935221:0
crwdns2935229:012crwdne2935229:0

crwdns2915084:0crwdne2915084:0

Master Techs crwdns2935289:0Master Techscrwdne2935289:0
Community
crwdns2931471:0328crwdne2931471:0
crwdns2935297:01.440crwdne2935297:0