crwdns2933423:0crwdne2933423:0

Master and Dynamic MW50 Wireless Connector Replacement

crwdns2942213:0crwdne2942213:0

  1. Master and Dynamic MW50 Wireless Connector Replacement, Master and Dynamic MW50 Disassembly: crwdns2935265:01crwdnd2935265:01crwdnd2935265:03crwdne2935265:0 Master and Dynamic MW50 Wireless Connector Replacement, Master and Dynamic MW50 Disassembly: crwdns2935265:01crwdnd2935265:02crwdnd2935265:03crwdne2935265:0 Master and Dynamic MW50 Wireless Connector Replacement, Master and Dynamic MW50 Disassembly: crwdns2935265:01crwdnd2935265:03crwdnd2935265:03crwdne2935265:0
    • Pull the cushion off of the desired side by gripping the top of the headphones and pulling the cushion off.

  2. Master and Dynamic MW50 Wireless Connector Replacement: crwdns2935265:02crwdnd2935265:01crwdnd2935265:01crwdne2935265:0
    • Remove the four 5mm screws from the earpiece with a Y1 Triwing screwdriver.

  3. Master and Dynamic MW50 Wireless Connector Replacement: crwdns2935265:03crwdnd2935265:01crwdnd2935265:01crwdne2935265:0
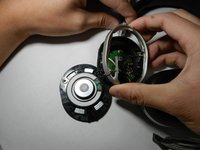
    • Use the Jimmy to lift up the black cover to get inside the device.

  4. Master and Dynamic MW50 Wireless Connector Replacement, Wireless Connector: crwdns2935265:04crwdnd2935265:01crwdnd2935265:03crwdne2935265:0 Master and Dynamic MW50 Wireless Connector Replacement, Wireless Connector: crwdns2935265:04crwdnd2935265:02crwdnd2935265:03crwdne2935265:0 Master and Dynamic MW50 Wireless Connector Replacement, Wireless Connector: crwdns2935265:04crwdnd2935265:03crwdnd2935265:03crwdne2935265:0
    • Remove the 2mm screw holding the side cover plate in place with a JIS #00 screwdriver.

    • Move the side cover off to the side.

    • The black cable connected to the motherboard from the side cover can be gently pulled off from the motherboard side. It isn't soldered on.

  5. Master and Dynamic MW50 Wireless Connector Replacement: crwdns2935265:05crwdnd2935265:01crwdnd2935265:01crwdne2935265:0
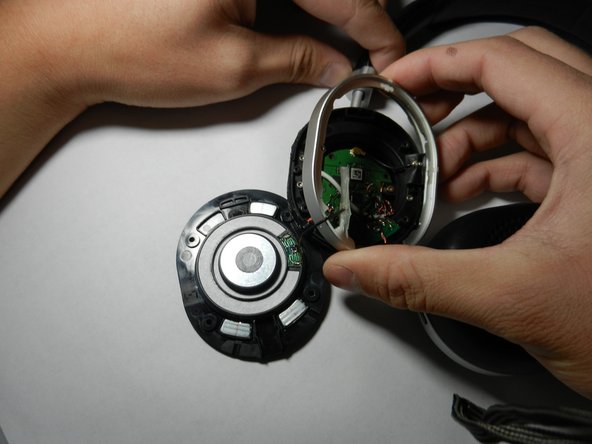
    • Pull the black tape holding the connector in place.

  6. Master and Dynamic MW50 Wireless Connector Replacement: crwdns2935265:06crwdnd2935265:01crwdnd2935265:01crwdne2935265:0
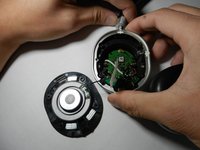
    • Desolder the connector from the motherboard.

    • Refer to this picture for soldering the connector back to the motherboard.

  7. Master and Dynamic MW50 Wireless Connector Replacement: crwdns2935265:07crwdnd2935265:01crwdnd2935265:01crwdne2935265:0
    • Solder the new Bluetooth connector into place.

crwdns2915888:0crwdne2915888:0

To reassemble your device, follow these instructions in reverse order.

Neil Patel

crwdns2935283:001/24/19crwdne2935283:0

162 crwdns2915208:0crwdne2915208:0

crwdns2935295:0crwdne2935295:0

crwdns2915084:0crwdne2915084:0

Cal Poly, Team S1-G4, White Winter 2019 crwdns2935289:0Cal Poly, Team S1-G4, White Winter 2019crwdne2935289:0

CPSU-WHITE-W19S1G4

crwdns2931471:04crwdne2931471:0

crwdns2935297:012crwdne2935297:0

crwdns2944067:00crwdne2944067:0

crwdns2917038:0crwdne2917038:0

crwdns2936625:0crwdne2936625:0:

crwdns2936751:024crwdne2936751:0 0

crwdns2936753:07crwdne2936753:0 3

crwdns2936753:030crwdne2936753:0 5

crwdns2942667:0crwdne2942667:0 258