crwdns2915892:0crwdne2915892:0
The charging port bay is responsible for charging the battery of the Marshall Emberton. With constant plugging and unplugging, the charging port develops breakage. With the help of this guide you will be able to locate the charging port and on how to remove and replace it. The charging port bay is a small piece located by the battery. When replacing the charging port bay or locating it you must be very careful due to it's location inside the speaker.
crwdns2942213:0crwdne2942213:0
-
-
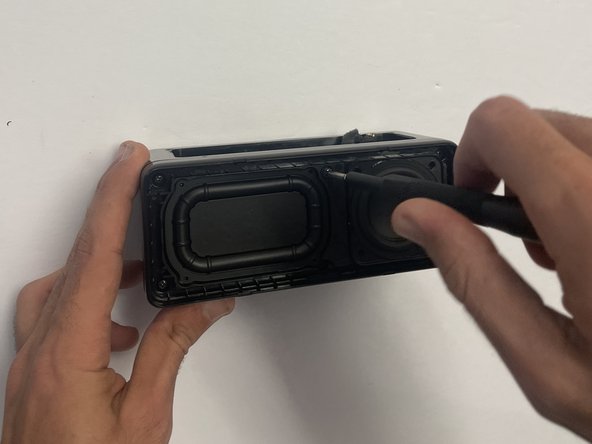
In order to start uncrewing any of the screws off the speaker we have to take off the protective cover.
-
-
-
In order to get inside the speaker you will have to unscrew the screws on the side.
-
-
-
Prying the front of the speaker where it says "Marshall" in order to get into the insides of the speaker.
-
-
-
-
Once the "Marshall" part of the speaker is off this is how it will look. It's another protective layer that needs to be removed.
-
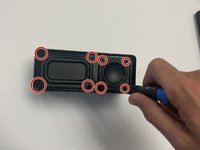
When removing all of the eight 1cm screws that are on the protective layer, will give us access to the insides of the speaker.
you could maybe circle the 8 screws like you did with the other steps
-
-
-
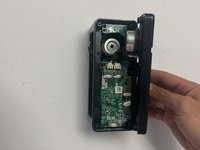
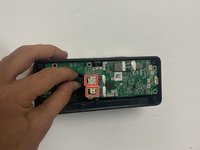
Once speaker is opened the motherboard will be the first thing that is seen. Then you will have to look for the 6 1cm screws (Shown in photograph)
-
-
-
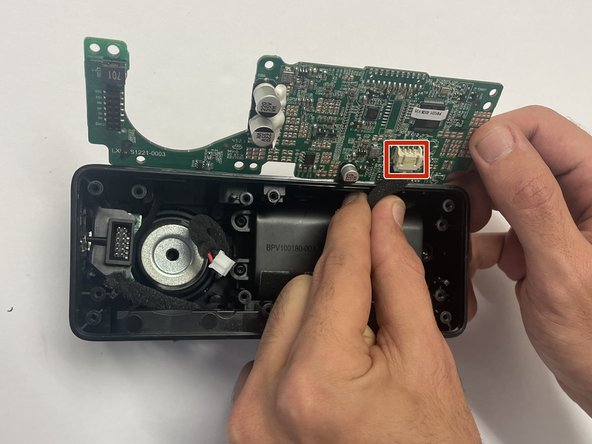
Once screws are all off, there will be a wire (red/black) that will need to be disconnected from the motherboard.
-
Once the first wire is disconnected from the motherboard, you will then have to flip it over and do the same on the bottom side of the motherboard.
-
Once those wires are disconnected from the motherboard it will simply come right out.
-
-
-
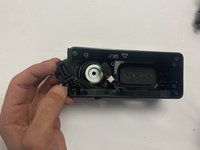
Once the motherboard is pulled out, you will be able to locate the charging port on the left side.
-
Once it is located there will be 2 1.2 cm screws that will need to be removed.
-
Once removed the charging port will be out.
It would be helpful if you can mark the screw locations that need to be removed.
Charging port purchasing but market mein no available please send link charging port spare parts Link
-


To reassemble your device, follow these instructions in reverse order.
To reassemble your device, follow these instructions in reverse order.
crwdns2935221:0crwdne2935221:0
crwdns2935229:03crwdne2935229:0
crwdns2915084:0crwdne2915084:0

CSU Los Angeles, Team 5-1, Adachi Fall 2022 crwdns2935289:0CSU Los Angeles, Team 5-1, Adachi Fall 2022crwdne2935289:0
CSULA-ADACHI-F22S5G1
crwdns2931471:05crwdne2931471:0
crwdns2935297:06crwdne2935297:0
crwdns2947412:010crwdne2947412:0
Where can i buy that part? In europe. Thank you.
Where can I purchase a replacement charging port in uk
Where can I buy the usb port in the US?
Hello. Nice guide for this. Next question😉 where can i buy a New bay? 🤔 Mine is very boken 😆
/Peter
Hi where can i buy the part?
Where can I purchase a replacement charging port in philippines
I made a bypass to another DC input charging plug. You have to find out where the GRND and VBUS are on the charging port (is marked on it). Make a connection to a new charging plug you make on the outside. It's a lot of finding out work. But it works!. The USB-C charging port is useless.
I made a work around fix for this problem on my Emberton Speaker. Somehow the speaker got dropped while the charging cable was attached and it broke the usb-c port. I cannot find the replacement part for the usb-c either. The usb-c port as shown is attached to a chip but it is not actually necissary. What I did was find an old usb cable and cut the end off that would go into a device so one end of the cable has a standard usb port still attached. Then I stripped the sheathing back to expose the 4 wires contained inside. What you want to look for is the red (positive wire) and black (negative wire). Then I stripped those wires to expose the wire inside. I then attached the head of a breadboard pin head like you use with Arduino projects to the red and black cables. Moving to the inside of the Marshal speaker and looking at the motherboard where the usb-c chip inserted in, you will see that there are 12 pin holes. Six of them are clearly marked for different purposes. You can ignore that row.
Directly across from the cc1 and cc2 inputs is the ground. You feed the black wire from your usb cable through the usb hole and insert it there. At the opposit end of the inputs directly across from the rx input is the vbus (positive) input. Feed the red wire through the usb hole in the speaker enclosure and insert it into that input hole. Now all you have to do is put the speaker back together with all the items attached and plug the usb end into a standard usb port and your speaker should start charging. If it doesn't start charging then double check that you put the cables in correctly or that you didn't accidentally connect the wrong color. Also the wires are thin so sometimes during the process of stripping them and attaching them you might accidentally cut through the wire. It might take some trial and error but if you have some basic needle nose plyer skills or even soldering then you should be able to figure it out. You wont be able to do data transfer or updates via usb. This only charges.
I am happy to hear if anyone could forsee a problem with the battery using this solution as it dosent involve any power negotiation data communicated via usb-c protocol but as I understand the speaker only uses standard 5v 2-3amp input from a usb-A plug not power delivery.