crwdns2933423:0crwdne2933423:0

Makita GA4030K Armature Replacement

crwdns2942213:0crwdne2942213:0

  1. Makita GA4030K Armature Replacement, Disk Cover: crwdns2935265:01crwdnd2935265:01crwdnd2935265:01crwdne2935265:0
    • Check for the provided lock nut wrench. This is used for loosening the piece that keeps the disk and cover attached.

  2. Makita GA4030K Armature Replacement: crwdns2935265:02crwdnd2935265:01crwdnd2935265:01crwdne2935265:0
    • Unscrew the handle unit until it is removed completely.

  3. Makita GA4030K Armature Replacement: crwdns2935265:03crwdnd2935265:01crwdnd2935265:02crwdne2935265:0 Makita GA4030K Armature Replacement: crwdns2935265:03crwdnd2935265:02crwdnd2935265:02crwdne2935265:0
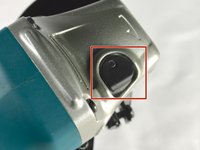
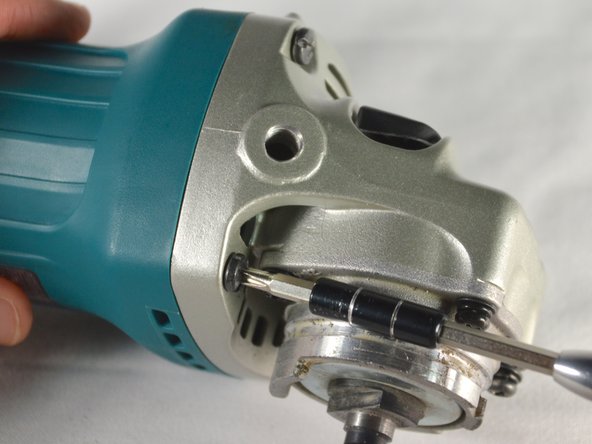
    • Hold the black switch located on the front casing.

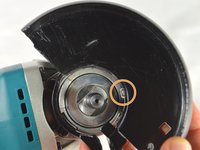
    • Still holding the switch, use the lock nut wrench to loosen the silver disk holding everything in place.

    • Once loose, remove the silver disk and/or your grinding disk.

  4. Makita GA4030K Armature Replacement: crwdns2935265:04crwdnd2935265:01crwdnd2935265:02crwdne2935265:0 Makita GA4030K Armature Replacement: crwdns2935265:04crwdnd2935265:02crwdnd2935265:02crwdne2935265:0
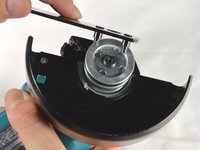
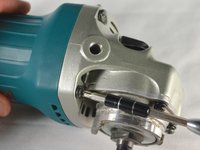
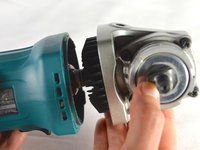
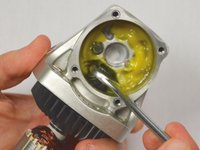
    • Use a Phillips #02 screwdriver to remove the 15 mm pan head screw that holds the cover in place.

    • Remove the cover by lining up the knob on the cover with the notch in face plate.

  5. Makita GA4030K Armature Replacement, Back Cover: crwdns2935265:05crwdnd2935265:01crwdnd2935265:02crwdne2935265:0 Makita GA4030K Armature Replacement, Back Cover: crwdns2935265:05crwdnd2935265:02crwdnd2935265:02crwdne2935265:0
    • Unscrew the 20 mm tapping screw using a Philips #02 screwdriver.

  6. Makita GA4030K Armature Replacement: crwdns2935265:06crwdnd2935265:01crwdnd2935265:01crwdne2935265:0
    • Slide the back cover down the power cable.

  7. Makita GA4030K Armature Replacement, Armature: crwdns2935265:07crwdnd2935265:01crwdnd2935265:02crwdne2935265:0 Makita GA4030K Armature Replacement, Armature: crwdns2935265:07crwdnd2935265:02crwdnd2935265:02crwdne2935265:0
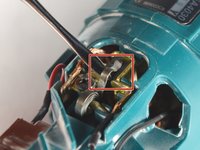
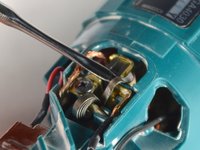
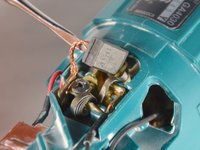
    • Use a spudger to gently move the brush holder coil to the side.

    • There are two brushes that are secured by two separate brush holders, one on each side.

  8. Makita GA4030K Armature Replacement: crwdns2935265:08crwdnd2935265:01crwdnd2935265:02crwdne2935265:0 Makita GA4030K Armature Replacement: crwdns2935265:08crwdnd2935265:02crwdnd2935265:02crwdne2935265:0
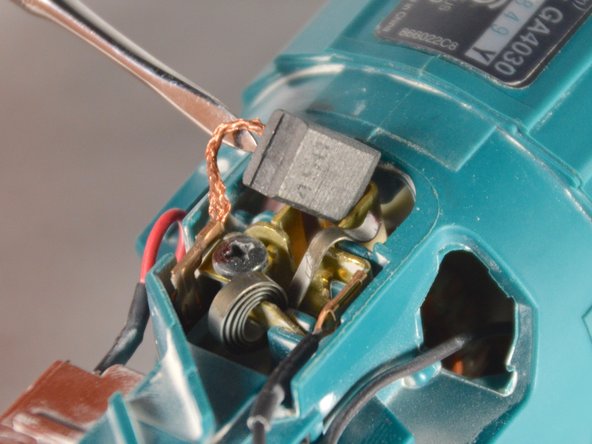
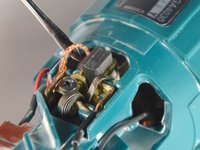
    • Using a metal spudger, remove both carbon brushes (one on each side) by their copper cabling.

  9. Makita GA4030K Armature Replacement: crwdns2935265:09crwdnd2935265:01crwdnd2935265:03crwdne2935265:0 Makita GA4030K Armature Replacement: crwdns2935265:09crwdnd2935265:02crwdnd2935265:03crwdne2935265:0 Makita GA4030K Armature Replacement: crwdns2935265:09crwdnd2935265:03crwdnd2935265:03crwdne2935265:0
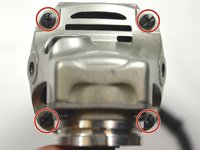
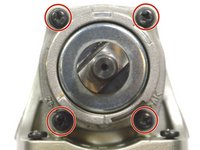
    • Use a Phillips #2 screwdriver to remove the four 20 mm tapping screws that hold the armature assembly in place.

    • Remove the armature assembly

  10. Makita GA4030K Armature Replacement: crwdns2935265:010crwdnd2935265:01crwdnd2935265:02crwdne2935265:0 Makita GA4030K Armature Replacement: crwdns2935265:010crwdnd2935265:02crwdnd2935265:02crwdne2935265:0
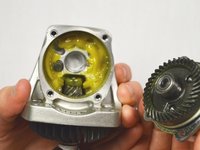
    • Unscrew the four 10 mm tapping screws holding the faceplate using a Phillips #02 screwdriver.

    • Remove the faceplate.

  11. Makita GA4030K Armature Replacement: crwdns2935265:011crwdnd2935265:01crwdnd2935265:02crwdne2935265:0 Makita GA4030K Armature Replacement: crwdns2935265:011crwdnd2935265:02crwdnd2935265:02crwdne2935265:0
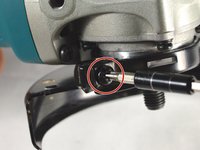
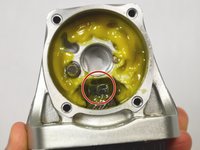
    • Hold the highlighted nut with a size 10 wrench. Unscrew by turning the armature and holding the nut in place.

    • The nut may be difficult to remove.

  12. Makita GA4030K Armature Replacement: crwdns2935265:012crwdnd2935265:01crwdnd2935265:01crwdne2935265:0
    • Remove the armature.

crwdns2915888:0crwdne2915888:0

To reassemble your device, follow these instructions in reverse order.

crwdns2935229:05crwdne2935229:0

Laura Ann Jagels

crwdns2935283:004/01/15crwdne2935283:0

490 crwdns2915208:0crwdne2915208:0

crwdns2935297:03crwdne2935297:0

crwdns2915084:0crwdne2915084:0

Cal Poly, Team 12-5, Lancaster Spring 2015 crwdns2935289:0Cal Poly, Team 12-5, Lancaster Spring 2015crwdne2935289:0

CPSU-LANCASTER-S15S12G5

crwdns2931471:04crwdne2931471:0

crwdns2935297:013crwdne2935297:0

crwdns2944067:00crwdne2944067:0

crwdns2917038:0crwdne2917038:0

crwdns2936625:0crwdne2936625:0:

crwdns2936751:024crwdne2936751:0 0

crwdns2936753:07crwdne2936753:0 5

crwdns2936753:030crwdne2936753:0 20

crwdns2942667:0crwdne2942667:0 3,398