crwdns2933423:0crwdne2933423:0
crwdns2947577:0crwdnd2947577:0crwdne2947577:0

crwdns2956850:0crwdne2956850:0 crwdns2956756:0crwdnd2956756:0crwdne2956756:0

Magimix Toaster Vision heating element replacement

    1. Magimix Toaster Vision heating element replacement, Side Panel Removal - Bottom Screws: crwdns2935265:01crwdnd2935265:01crwdnd2935265:01crwdne2935265:0
      • Remove the crumb tray

      • Removal of the bottom screws

      • Turn the device over

      • Remove the 3 Phillips screws under each of the side panels

      crwdns2952109:0crwdne2952109:0

      crwdns2917038:0crwdne2917038:0

    2. Magimix Toaster Vision heating element replacement, Side Panel Removal - Top Screws: crwdns2935265:02crwdnd2935265:01crwdnd2935265:03crwdne2935265:0 Magimix Toaster Vision heating element replacement, Side Panel Removal - Top Screws: crwdns2935265:02crwdnd2935265:02crwdnd2935265:03crwdne2935265:0 Magimix Toaster Vision heating element replacement, Side Panel Removal - Top Screws: crwdns2935265:02crwdnd2935265:03crwdnd2935265:03crwdne2935265:0
      • Removal of the top screws

      • Unlock the side glass panels

      • Remove the top screws

      • The side panel is now unlocked and can be removed by sliding it upward

      crwdns2952109:0crwdne2952109:0

      crwdns2917038:0crwdne2917038:0

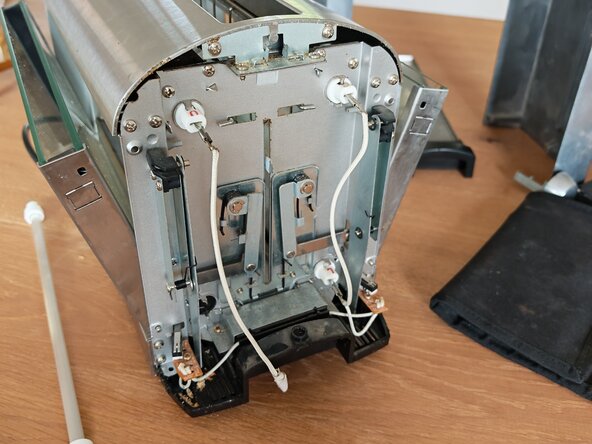
    3. Magimix Toaster Vision heating element replacement, Resistance Removal: crwdns2935265:03crwdnd2935265:01crwdnd2935265:02crwdne2935265:0 Magimix Toaster Vision heating element replacement, Resistance Removal: crwdns2935265:03crwdnd2935265:02crwdnd2935265:02crwdne2935265:0
      • The ends of the four resistances appear on each side.

      • Unplug the terminals on each side of the resistance.

      • The resistance is held in place on the frame by tabs. Carefully spread the 2 tabs on each side of the resistance. Remove the resistance from its housing by sliding it out.

      • If the resistance is broken inside the device, remove all the pieces.

      crwdns2952109:0crwdne2952109:0

      crwdns2917038:0crwdne2917038:0

    4. Magimix Toaster Vision heating element replacement, Installing the new resistance: crwdns2935265:04crwdnd2935265:01crwdnd2935265:01crwdne2935265:0
      • Insert the new resistance by sliding it into its slot from either side.

      • Return the tabs to their position on each side.

      • Connect the power wires on each side.

      crwdns2952109:0crwdne2952109:0

      crwdns2917038:0crwdne2917038:0

      • Install the cheeks by sliding them from top to bottom.

      • Reinstall the upper screws.

      • Reinstall the lower screws.

      crwdns2952109:0crwdne2952109:0

      crwdns2917038:0crwdne2917038:0

crwdns2915888:0crwdne2915888:0

To reassemble your device, follow the instructions in reverse order.

crwdns2935221:0crwdne2935221:0

PierreGlg

crwdns2935283:012/09/22crwdne2935283:0

581 crwdns2915208:0crwdne2915208:0

crwdns2935297:04crwdne2935297:0

crwdns2947412:00crwdne2947412:0

crwdns2917038:0crwdne2917038:0

crwdns2936625:0crwdne2936625:0:

crwdns2936751:024crwdne2936751:0 1

crwdns2936753:07crwdne2936753:0 16

crwdns2936753:030crwdne2936753:0 49

crwdns2942667:0crwdne2942667:0 59