crwdns2915892:0crwdne2915892:0
Use this guide to completely replace your logic board.
crwdns2942213:0crwdne2942213:0
-
-
Remove the eight 4 mm Phillips screws securing the lower case to the MacBook.
-
-
-
Slightly lift the lower case near the vent opening.
-
Continue running your fingers between the lower and upper cases until the upper case pops off its retaining clips.
-
-
-
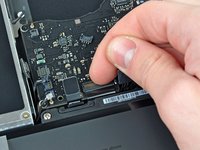
Use the flat end of a spudger to lift the battery connector up out of its socket on the logic board.
-
-
-
Remove the following screws from the optical drive side of the rear vent:
-
Two 10 mm T8 Torx
-
Two 5.2 mm Phillips
-
-
-
Remove the following screws from the port side of rear vent:
-
Two 10 mm T8 Torx
-
Two 5.2 mm Phillips
-
-
-
Carefully lift the rear vent out of the upper case.
-
-
-
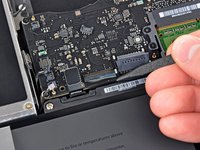
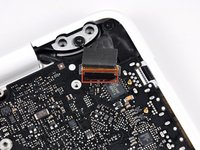
Use the flat end of a spudger to pry the AirPort/Bluetooth ribbon cable up off the logic board.
-
-
-
Use a spudger to pry the fan connector straight up and out of its socket on the logic board.
-
-
-
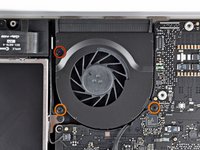
Remove the following three screws securing the fan to the upper case:
-
One 7.1 mm Phillips screw.
-
Two 5 mm Phillips screws.
-
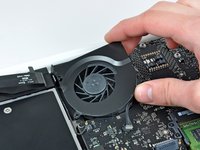
Lift the fan out of the upper case.
-
-
-
-
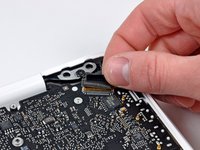
Carefully pry the delicate rear speaker connector up off the logic board. These small L/R speaker connectors are quite easily broken.
-
-
-
Use the flat end of a spudger to pry the optical drive connector up off the logic board.
-
-
-
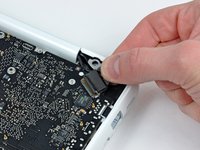
Use a spudger to pry the right speaker connector and sleep LED connector up off the logic board.
-
-
-
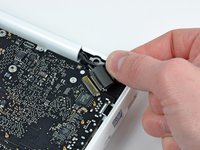
Use the flat end of a spudger to pry the trackpad ribbon cable connector up off the logic board.
-
-
-
Use your fingernail to flip up the locking flap on the ZIF socket for the keyboard ribbon cable.
-
Use the tip of a spudger to slide the keyboard ribbon cable out of its socket.
-
-
-
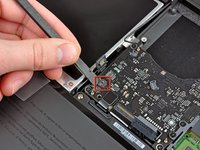
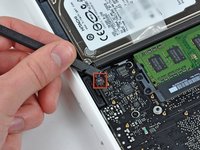
Use the flat end of a spudger to pry the hard drive cable connector up off the logic board.
-
-
-
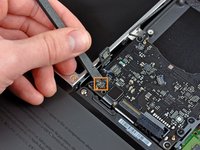
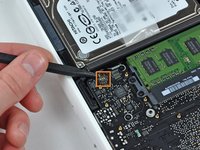
Use a spudger to pry the left speaker connector and microphone connector up off the logic board.
-
-
-
Grab the plastic pull tab secured to the display data cable lock and rotate it toward the DC-In side of the computer.
-
-
-
Gently pull the display data cable connector away from its socket on the logic board.
-
-
-
Remove the six 4.1 to 4.4 mm T6 Torx screws securing the logic board to the upper case.
-
Remove the two 4.1 to 4.5 mm T6 Torx screws securing the MagSafe board to the upper case.
-
On some models, these screws may be T7. Be careful not to strip away the head with a smaller bit.
-
-
-
Lift the side of the logic board opposite the ports out of the upper case.
-
Rotate the logic board away from the upper case until the ports clear the lip molded in the upper case.
-
Pull the logic board and MagSafe board away from the edge of the upper case as one piece.
-
-
-
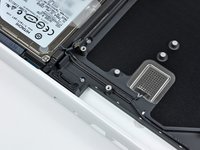
Remove the four 8.3 mm shouldered Phillips screws securing the heat sink to the logic board.
-
-
-
Lift the heat sink off the logic board.
-
-
-
Pull the DC-in board connector away from its socket on the logic board.
-
-
-
Carefully flip the logic board over.
-
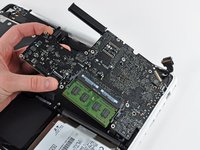
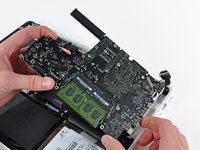
Release the tabs on each side of the chip by simultaneously pushing each tab away from the RAM.
-
-
-
After the RAM chip has popped up, pull it straight out of its socket.
-


To reassemble your device, follow these instructions in reverse order.
crwdns2935221:0crwdne2935221:0
crwdns2935229:0118crwdne2935229:0

crwdns2947412:011crwdne2947412:0
Starting in Step 10 there are very delicate connectors that are easily broken. I first attempted to lift one with a spudger and noticed it begin to crack. I found an alternative way that worked perfectly for all of these types of connectors. Using 2 straight pins, press the point of each one just on either side of the connector, between the connector and the housing. Then use each pin to evenly pry the connector up. It will pop right out of the socket with no damage.
My macbook has been gradually getting hotter and running slower. Recently it started displaying some weird behavior that I assumed was a failing HD since it's 5 years old. I ran the extended Apple Hardware Test (more than once for confirmation) and got the following error: 4SNS/1/40000000: TN1D-104.000. Googling suggested that the CPU's northbridge was reaching a temperature of 104 deg. C and that macbooks have issues with overheating that can be attributed to poor application of thermal paste.
I followed this guide. The fan, heatsink fins and the underside of the logic board were almost completely clogged with dirt and cat hair. Got rid of it that, cleaned the excessive globs of dried up thermal paste, reapplied thermal paste and put everything back together. The macbook is now running cooler and faster and video is running quite smoothly which was an issue previously. I reran the Apple Hardware Test which reported, "No trouble found".
Hi, I have a mac book 4.1 with a gma x3100 32bit graphic chip, white plastic enclosure just like the one in the pictures.
The tutorial seems pretty detailed, great job, I feel confident I can get through without problems but I have a couple of questions.
Which logic board model will suit my mac book best, I also read that the heat sink and the SuperDrive connectors may be different, is that true?
thanks!
Andrea.
This page is for a macbook 6.1 or 7.1. Wrong page for your mac!
rozakis -
I'm about to replace the logic board, assuming everything gets connected properly should it just boot up like nothing ever happened? Will I lose any data?