crwdns2933423:0crwdne2933423:0

MacBook Pro 17" Models A1151 A1212 A1229 and A1261 Heat Sink Replacement

crwdns2942213:0crwdne2942213:0

  1. MacBook Pro 17" Models A1151 A1212 A1229 and A1261 Heat Sink Replacement, Battery: crwdns2935265:01crwdnd2935265:01crwdnd2935265:01crwdne2935265:0
    • Use your fingers to push both battery release tabs away from the battery and lift the battery out of the computer.

  2. MacBook Pro 17" Models A1151 A1212 A1229 and A1261 Heat Sink Replacement, RAM Shield: crwdns2935265:02crwdnd2935265:01crwdnd2935265:01crwdne2935265:0
    • Remove the four identical Phillips 3.4 mm screws from the memory door. These screws have 4 mm diameter heads rather than the 3 mm heads on the body screws.

  3. MacBook Pro 17" Models A1151 A1212 A1229 and A1261 Heat Sink Replacement: crwdns2935265:03crwdnd2935265:01crwdnd2935265:01crwdne2935265:0
    • Lift the memory door up enough to get a grip on it, and slide it toward you, pulling it away from the casing.

  4. MacBook Pro 17" Models A1151 A1212 A1229 and A1261 Heat Sink Replacement, Upper Case: crwdns2935265:04crwdnd2935265:01crwdnd2935265:01crwdne2935265:0
    • Remove the three Phillips screws in the battery compartment near the latch. Apple was nice enough to tilt these screws at a slight angle to make them easier to remove. On the A1261 these screws have 4 mm diameter heads rather than the 3 mm heads on the body screws.

  5. MacBook Pro 17" Models A1151 A1212 A1229 and A1261 Heat Sink Replacement: crwdns2935265:05crwdnd2935265:01crwdnd2935265:01crwdne2935265:0
    • Remove the following six screws:

    • Two 14.5 mm T6 Torx screws on either side of the RAM slot.

    • Four 3.4 mm Phillips screws along the hinge.

  6. MacBook Pro 17" Models A1151 A1212 A1229 and A1261 Heat Sink Replacement: crwdns2935265:06crwdnd2935265:01crwdnd2935265:01crwdne2935265:0
    • Remove the four 3.4 mm Phillips screws on the port side of the computer.

  7. MacBook Pro 17" Models A1151 A1212 A1229 and A1261 Heat Sink Replacement: crwdns2935265:07crwdnd2935265:01crwdnd2935265:01crwdne2935265:0
    • Rotate the computer 90 degrees and remove the two Phillips screws from the rear of the computer.

  8. MacBook Pro 17" Models A1151 A1212 A1229 and A1261 Heat Sink Replacement: crwdns2935265:08crwdnd2935265:01crwdnd2935265:01crwdne2935265:0
    • Rotate the computer 90 degrees again and remove the four Phillips screws from the side of the computer.

  9. MacBook Pro 17" Models A1151 A1212 A1229 and A1261 Heat Sink Replacement: crwdns2935265:09crwdnd2935265:01crwdnd2935265:01crwdne2935265:0
    • Do not yank the upper case off quickly. The case is attached to the logic board via a ribbon cable.

    • Lift up the back of the case and work your fingers along the sides, freeing the case as you go. Once you have freed the sides, you may need to rock the case up and down to free the front of the upper case.

  10. MacBook Pro 17" Models A1151 A1212 A1229 and A1261 Heat Sink Replacement: crwdns2935265:010crwdnd2935265:01crwdnd2935265:01crwdne2935265:0
    • Disconnect the trackpad and keyboard ribbon cable from the logic board.

    • Remove the upper case.

  11. MacBook Pro 17" Models A1151 A1212 A1229 and A1261 Heat Sink Replacement, Optical Drive: crwdns2935265:011crwdnd2935265:01crwdnd2935265:01crwdne2935265:0
    • Disconnect the orange SuperDrive ribbon cable from the logic board, removing tape as necessary.

  12. MacBook Pro 17" Models A1151 A1212 A1229 and A1261 Heat Sink Replacement: crwdns2935265:012crwdnd2935265:01crwdnd2935265:01crwdne2935265:0
    • Remove the following three screws:

    • Two black 4 mm T6 Torx screws on either side of the SuperDrive.

    • One 8.7 mm silver (black in some models) T6 Torx screw at the back of the drive near the speaker.

  13. MacBook Pro 17" Models A1151 A1212 A1229 and A1261 Heat Sink Replacement: crwdns2935265:013crwdnd2935265:01crwdnd2935265:01crwdne2935265:0
    • Use one hand to pull back the speaker cable and use your other hand to lift the optical drive up and out of the computer.

    • If you have a CD or any other object jammed in your optical drive, we have an optical drive repair guide.

  14. MacBook Pro 17" Models A1151 A1212 A1229 and A1261 Heat Sink Replacement, Logic Board: crwdns2935265:014crwdnd2935265:01crwdnd2935265:03crwdne2935265:0 MacBook Pro 17" Models A1151 A1212 A1229 and A1261 Heat Sink Replacement, Logic Board: crwdns2935265:014crwdnd2935265:02crwdnd2935265:03crwdne2935265:0 MacBook Pro 17" Models A1151 A1212 A1229 and A1261 Heat Sink Replacement, Logic Board: crwdns2935265:014crwdnd2935265:03crwdnd2935265:03crwdne2935265:0
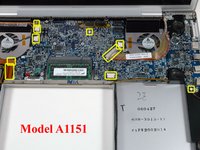
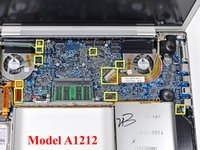
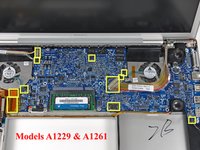
    • Disconnect the ten indicated connectors from the logic board.

    • The connectors have different positions for the four MacBook Pro revisions covered by this guide, and their locations are highlighted in the three pictures on this step.

  15. MacBook Pro 17" Models A1151 A1212 A1229 and A1261 Heat Sink Replacement: crwdns2935265:015crwdnd2935265:01crwdnd2935265:01crwdne2935265:0
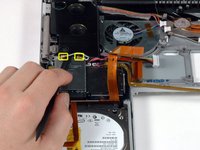
    • Rotate the large display data cable to the left and disconnect the small right thermal sensor cable beneath.

    • If you have the A1261 model, the right thermal sensor cable is located in between the right fan connector and display data cable.

  16. MacBook Pro 17" Models A1151 A1212 A1229 and A1261 Heat Sink Replacement: crwdns2935265:016crwdnd2935265:01crwdnd2935265:01crwdne2935265:0
    • Remove the single black 4 mm T6 Torx screw securing the clear plastic shield over the right ambient light sensor.

    • Lift the clear plastic shield off the right ambient light sensor.

  17. MacBook Pro 17" Models A1151 A1212 A1229 and A1261 Heat Sink Replacement: crwdns2935265:017crwdnd2935265:01crwdnd2935265:01crwdne2935265:0
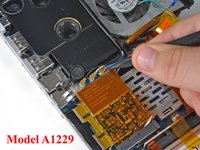
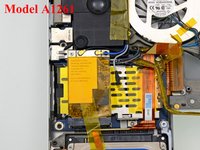
    • Peel up the orange Kapton tape securing the left thermal sensor cable to the logic board.

    • If you have a MacBook Pro 17" Model A1229, this is the middle thermal sensor.

  18. MacBook Pro 17" Models A1151 A1212 A1229 and A1261 Heat Sink Replacement: crwdns2935265:018crwdnd2935265:01crwdnd2935265:01crwdne2935265:0
    • Remove the following twelve screws:

    • Seven 6.5 mm T6 Torx screws.

    • Two shanked 7.6 mm T6 Torx screws securing the battery connector to the lower case.

    • Three 7.8 mm T6 Torx screws.

  19. MacBook Pro 17" Models A1151 A1212 A1229 and A1261 Heat Sink Replacement: crwdns2935265:019crwdnd2935265:01crwdnd2935265:01crwdne2935265:0
    • Lift up the left side of the logic board and disconnect the multi-colored power connector from the bottom of the board.

  20. MacBook Pro 17" Models A1151 A1212 A1229 and A1261 Heat Sink Replacement: crwdns2935265:020crwdnd2935265:01crwdnd2935265:01crwdne2935265:0
    • Grasp the logic board at the left side and at the thin section near the right fan, and rotate the logic board out of the lower case.

  21. MacBook Pro 17" Models A1151 A1212 A1229 and A1261 Heat Sink Replacement: crwdns2935265:021crwdnd2935265:01crwdnd2935265:01crwdne2935265:0
    • If the right speaker assembly remains attached to the logic board, hold the logic board with one hand and slide the speaker up slightly to free it from the logic board.

    • To properly reassemble your MacBook Pro, you'll have to clean off and replace the thermal compound from the three chips on the underside of the logic board. Use our Applying Thermal Paste Guide to prepare the processor and heat sink surfaces.

  22. MacBook Pro 17" Models A1151 A1212 A1229 and A1261 Heat Sink Replacement, Heat Sink: crwdns2935265:022crwdnd2935265:01crwdnd2935265:03crwdne2935265:0 MacBook Pro 17" Models A1151 A1212 A1229 and A1261 Heat Sink Replacement, Heat Sink: crwdns2935265:022crwdnd2935265:02crwdnd2935265:03crwdne2935265:0 MacBook Pro 17" Models A1151 A1212 A1229 and A1261 Heat Sink Replacement, Heat Sink: crwdns2935265:022crwdnd2935265:03crwdnd2935265:03crwdne2935265:0
    • Disconnect the two antenna cables attached to the AirPort Extreme card.

    • The cable with the gray shielding attaches to the left side connector, while the cable with the white shielding attaches to the right side.

    • If you have a MacBook Pro 17" Model A1229, there are three antenna cables attached to the AirPort Extreme card instead of two.

    • If you have a MacBook Pro 17” Model A1261 the cable with the black shielding attaches to the left side of the connector, while the cable with blue shielding attaches to the right side. The gray cable isunattached and the end covered.

  23. MacBook Pro 17" Models A1151 A1212 A1229 and A1261 Heat Sink Replacement: crwdns2935265:023crwdnd2935265:01crwdnd2935265:01crwdne2935265:0
    • Remove the single black 4 mm T6 Torx screw from the top right corner of the AirPort Extreme card.

  24. MacBook Pro 17" Models A1151 A1212 A1229 and A1261 Heat Sink Replacement: crwdns2935265:024crwdnd2935265:01crwdnd2935265:01crwdne2935265:0
    • Lift the AirPort Extreme card up and slide it out of its connector.

  25. MacBook Pro 17" Models A1151 A1212 A1229 and A1261 Heat Sink Replacement: crwdns2935265:025crwdnd2935265:01crwdnd2935265:01crwdne2935265:0
    • Remove the two 7.8 mm silver T6 Torx screws from the top left and bottom right corners of the left speaker assembly.

    • The magnet in the MagSafe connector may pull the upper screw towards it after the screw has been freed.

  26. MacBook Pro 17" Models A1151 A1212 A1229 and A1261 Heat Sink Replacement: crwdns2935265:026crwdnd2935265:01crwdnd2935265:01crwdne2935265:0
    • Lift up on the left speaker assembly and rotate it slightly. It is not possible to entirely remove the speaker yet, as it is still connected to the left I/O board beneath.

  27. MacBook Pro 17" Models A1151 A1212 A1229 and A1261 Heat Sink Replacement: crwdns2935265:027crwdnd2935265:01crwdnd2935265:01crwdne2935265:0
    • Disconnect the right speaker from the left I/O board. Make sure to pull on the top section of the white connector, not the cable itself.

  28. MacBook Pro 17" Models A1151 A1212 A1229 and A1261 Heat Sink Replacement: crwdns2935265:028crwdnd2935265:01crwdnd2935265:01crwdne2935265:0
    • Lift the right speaker assembly out of the computer.

  29. MacBook Pro 17" Models A1151 A1212 A1229 and A1261 Heat Sink Replacement: crwdns2935265:029crwdnd2935265:01crwdnd2935265:01crwdne2935265:0
    • If tape is attaching the attenda cable bundle to the left speaker assembly remove it.

    • Disconnect the two cables attaching the left speaker assembly to the left I/O board.

  30. MacBook Pro 17" Models A1151 A1212 A1229 and A1261 Heat Sink Replacement: crwdns2935265:030crwdnd2935265:01crwdnd2935265:01crwdne2935265:0
    • Peel up the iSight and inverter cables which are attached with a mild adhesive above the left fan.

  31. MacBook Pro 17" Models A1151 A1212 A1229 and A1261 Heat Sink Replacement: crwdns2935265:031crwdnd2935265:01crwdnd2935265:01crwdne2935265:0
    • Remove the five 7.8 mm T6 Torx screws securing the fans to the lower case.

  32. MacBook Pro 17" Models A1151 A1212 A1229 and A1261 Heat Sink Replacement: crwdns2935265:032crwdnd2935265:01crwdnd2935265:01crwdne2935265:0
    • Lift the heat sink and attached fans out of the computer.

    • If you are replacing the heat sink, be sure to transfer the attached thermal sensor to your new heat sink.

    • If you need to mount the heat sink back into the laptop, we have a thermal paste guide that makes replacing the thermal compound easy.

    • Now is a good time to lean the fans back and clean out any dust bunnies from the grill. Also clean any dried thermal paste from the heat sink contact pads.

crwdns2915888:0crwdne2915888:0

To reassemble your device, follow these instructions in reverse order.

crwdns2935229:017crwdne2935229:0

iRobot

crwdns2935283:009/24/09crwdne2935283:0

1 crwdns2915208:0crwdne2915208:0

crwdns2935297:0636crwdne2935297:0

crwdns2944067:03crwdne2944067:0

Does anyone know if it is possible to remove and replace the motherboard and heat sink without detaching the heat sink? I sent out my mobo to be reballed and they returned it with a heat sink attached and would not honor their warranty if I separated the two, and they assured me it could be done.

thanks for any help

maccentric - crwdns2934203:0crwdne2934203:0

Sadly that is not possible. In order to remove the Heat Sink, you have to remove the Logic Board first. Also the speaker system and other parts are in between the Heat Sink and the Logic board, and you can't just pop the Heat Sink in with the Logic Board attached due to the port slots on the right side. To be honest with you, the fact that they reballed your board and shipped it with the Heat Sink attached, is very unusual? Especially for this model. It would work for other Logic Boards where the Heat Sink is actually screwed directly onto the Logic Board. If they assured you that it can be done, ask them to show you how to do it.

Maximilian Willert -

Thanks a lot for this guide! I used this guide to install new thermal paste. By far one of the more difficult operations i've done so far. My advise is to really take your time for this one and not rush anything at all. This model is now almost 10 years old but it still runs!

Maximilian Willert -

crwdns2917038:0crwdne2917038:0

crwdns2936625:0crwdne2936625:0:

crwdns2936751:024crwdne2936751:0 0

crwdns2936753:07crwdne2936753:0 3

crwdns2936753:030crwdne2936753:0 21

crwdns2942667:0crwdne2942667:0 25,827