crwdns2933423:0crwdne2933423:0

MacBook Pro 15" Unibody Mid 2012 Display Replacement

crwdns2942213:0crwdne2942213:0

  1. MacBook Pro 15" Unibody Mid 2012 Display Replacement, Lower Case: crwdns2935265:01crwdnd2935265:01crwdnd2935265:01crwdne2935265:0
    • Remove the following ten screws securing the lower case to the upper case:

    • Three 13.5 mm (14.1 mm) Phillips screws.

    • Seven 3 mm Phillips screws.

    • When removing these screws, note how they come out at a slight angle. They must be reinstalled the same way.

  2. MacBook Pro 15" Unibody Mid 2012 Display Replacement: crwdns2935265:02crwdnd2935265:01crwdnd2935265:01crwdne2935265:0
    • Using both hands, lift the lower case near the vent to pop it off two clips securing it to the upper case.

    • Remove the lower case and set it aside.

  3. MacBook Pro 15" Unibody Mid 2012 Display Replacement, Battery Connector: crwdns2935265:03crwdnd2935265:01crwdnd2935265:02crwdne2935265:0 MacBook Pro 15" Unibody Mid 2012 Display Replacement, Battery Connector: crwdns2935265:03crwdnd2935265:02crwdnd2935265:02crwdne2935265:0
    • For certain repairs (e.g. hard drive), disconnecting the battery connector is not necessary but is recommended as it prevents any accidental shorting of electronics on the motherboard. If you do not disconnect the battery connector, please be careful as parts of the motherboard might be electrified.

    • Use the edge of a spudger to pry the battery connector upwards from its socket on the logic board.

    • It is useful to pry upward on both short sides of the connector to "walk" it out of its socket.

  4. MacBook Pro 15" Unibody Mid 2012 Display Replacement: crwdns2935265:04crwdnd2935265:01crwdnd2935265:01crwdne2935265:0
    • Bend the battery cable slightly away from its socket on the logic board so it does not accidentally connect itself while you work.

  5. MacBook Pro 15" Unibody Mid 2012 Display Replacement, AirPort/Bluetooth Board Assembly: crwdns2935265:05crwdnd2935265:01crwdnd2935265:01crwdne2935265:0
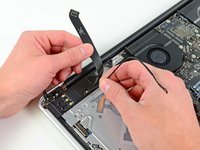
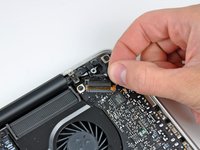
    • Pull the camera cable connector straight out of its socket on the logic board.

    • Pull the cable parallel to the face of the logic board toward the optical drive opening.

  6. MacBook Pro 15" Unibody Mid 2012 Display Replacement: crwdns2935265:06crwdnd2935265:01crwdnd2935265:01crwdne2935265:0
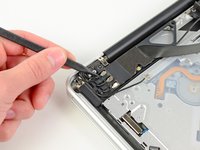
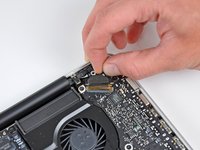
    • Use the flat end of a spudger to carefully pry the AirPort/Bluetooth ribbon cable up off its socket on the logic board.

  7. MacBook Pro 15" Unibody Mid 2012 Display Replacement: crwdns2935265:07crwdnd2935265:01crwdnd2935265:02crwdne2935265:0 MacBook Pro 15" Unibody Mid 2012 Display Replacement: crwdns2935265:07crwdnd2935265:02crwdnd2935265:02crwdne2935265:0
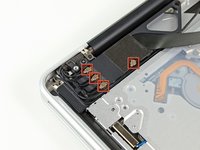
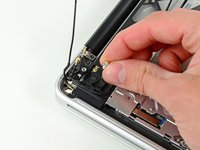
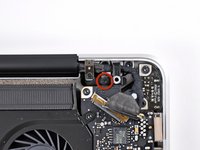
    • Use the tip of a spudger to pry the four antenna connectors up from their sockets on the AirPort/Bluetooth board.

  8. MacBook Pro 15" Unibody Mid 2012 Display Replacement: crwdns2935265:08crwdnd2935265:01crwdnd2935265:03crwdne2935265:0 MacBook Pro 15" Unibody Mid 2012 Display Replacement: crwdns2935265:08crwdnd2935265:02crwdnd2935265:03crwdne2935265:0 MacBook Pro 15" Unibody Mid 2012 Display Replacement: crwdns2935265:08crwdnd2935265:03crwdnd2935265:03crwdne2935265:0
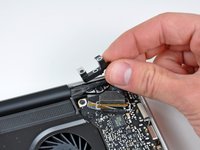
    • De-route all four antenna cables from their channels in the AirPort/Bluetooth housing.

    • De-route the camera cable from its channel in the AirPort/Bluetooth housing.

  9. MacBook Pro 15" Unibody Mid 2012 Display Replacement: crwdns2935265:09crwdnd2935265:01crwdnd2935265:01crwdne2935265:0
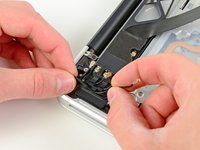
    • Remove the following two screws securing the AirPort/Bluetooth assembly to the upper case:

    • One 8.6 mm Phillips screw

    • One 3.9 mm Phillips screw

  10. MacBook Pro 15" Unibody Mid 2012 Display Replacement: crwdns2935265:010crwdnd2935265:01crwdnd2935265:01crwdne2935265:0
    • Remove the AirPort/Bluetooth assembly from the upper case, minding any cables that may get caught.

  11. MacBook Pro 15" Unibody Mid 2012 Display Replacement, Display: crwdns2935265:011crwdnd2935265:01crwdnd2935265:02crwdne2935265:0 MacBook Pro 15" Unibody Mid 2012 Display Replacement, Display: crwdns2935265:011crwdnd2935265:02crwdnd2935265:02crwdne2935265:0
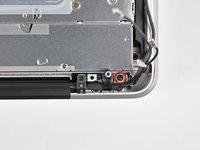
    • Remove the 8.6 mm Phillips screw securing the antenna/camera cable retainer to the upper case.

    • Remove the antenna/camera cable retainer from the upper case.

    • During reassembly, place the nearby metal grounding tab on top of the hole that the Phillips screw goes into, and then install the screw.

  12. MacBook Pro 15" Unibody Mid 2012 Display Replacement: crwdns2935265:012crwdnd2935265:01crwdnd2935265:01crwdne2935265:0
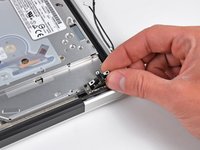
    • Remove two of the three 6 mm T6 Torx screws securing the right side of the display to the upper case.

    • We purposely have you leave one screw attaching the display to the upper case to aid in future steps.

    • Before reinstalling the screw nearest to the corner of the case, make sure the nearby metal grounding tab doesn't get caught under the hinge.

  13. MacBook Pro 15" Unibody Mid 2012 Display Replacement: crwdns2935265:013crwdnd2935265:01crwdnd2935265:03crwdne2935265:0 MacBook Pro 15" Unibody Mid 2012 Display Replacement: crwdns2935265:013crwdnd2935265:02crwdnd2935265:03crwdne2935265:0 MacBook Pro 15" Unibody Mid 2012 Display Replacement: crwdns2935265:013crwdnd2935265:03crwdnd2935265:03crwdne2935265:0
    • Grab the plastic pull tab secured to the display data cable lock and rotate it up and over the connector, toward the DC-In side of the computer.

    • Pull the display data cable straight back (not up) out of its socket on the logic board.

    • Do not lift up on the display data cable, as its socket is very fragile. Pull the cable parallel to the face of the logic board.

  14. MacBook Pro 15" Unibody Mid 2012 Display Replacement: crwdns2935265:014crwdnd2935265:01crwdnd2935265:02crwdne2935265:0 MacBook Pro 15" Unibody Mid 2012 Display Replacement: crwdns2935265:014crwdnd2935265:02crwdnd2935265:02crwdne2935265:0
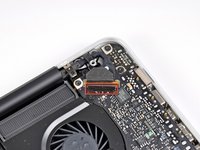
    • Remove the 8.6 mm Phillips screw securing the display data cable retainer to the upper case.

    • Remove the display data cable retainer from the upper case.

  15. MacBook Pro 15" Unibody Mid 2012 Display Replacement: crwdns2935265:015crwdnd2935265:01crwdnd2935265:01crwdne2935265:0
    • Remove two of the three 6 mm T6 Torx screws securing the left side of the display to the upper case.

    • We purposely have you leave one screw attaching the display to the upper case to aid in future steps.

    • The display assembly and MacBook body can be subtly misaligned on reassembly. With all six T6 Torx screws in place and the notebook closed, check for alignment. Loosen these six screws to correct the alignment if necessary, and then re-tighten them.

  16. MacBook Pro 15" Unibody Mid 2012 Display Replacement: crwdns2935265:016crwdnd2935265:01crwdnd2935265:01crwdne2935265:0
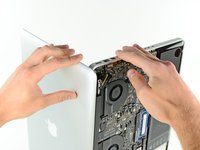
    • Open your MacBook Pro so the display is perpendicular to the upper case.

    • Place your opened MacBook Pro on a table as pictured.

    • While holding the display and upper case together with your left hand, remove the remaining T6 Torx screw from the upper display bracket.

  17. MacBook Pro 15" Unibody Mid 2012 Display Replacement: crwdns2935265:017crwdnd2935265:01crwdnd2935265:01crwdne2935265:0
    • Be sure to hold the display and upper case together with your left hand. Failure to do so may cause the freed display/upper case to fall, potentially damaging each component.

    • Remove the last remaining T6 Torx screw securing the display to the upper case.

  18. MacBook Pro 15" Unibody Mid 2012 Display Replacement: crwdns2935265:018crwdnd2935265:01crwdnd2935265:03crwdne2935265:0 MacBook Pro 15" Unibody Mid 2012 Display Replacement: crwdns2935265:018crwdnd2935265:02crwdnd2935265:03crwdne2935265:0 MacBook Pro 15" Unibody Mid 2012 Display Replacement: crwdns2935265:018crwdnd2935265:03crwdnd2935265:03crwdne2935265:0
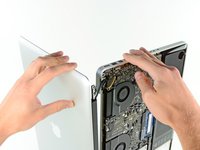
    • Grab the upper case with your right hand and rotate it slightly toward the top of the display so the upper display bracket clears the edge of the upper case.

    • Rotate the display slightly away from the upper case.

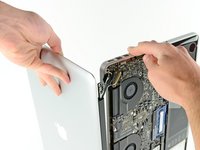
    • Lift the display up and away from the upper case, minding any brackets or cables that may get caught.

crwdns2915888:0crwdne2915888:0

To reassemble your device, follow these instructions in reverse order.

crwdns2935229:054crwdne2935229:0

Andrew Optimus Goldheart

crwdns2935283:010/17/09crwdne2935283:0

502,106 crwdns2915208:0crwdne2915208:0

crwdns2935297:0407crwdne2935297:0

crwdns2915084:0crwdne2915084:0

iFixit crwdns2935289:0iFixitcrwdne2935289:0

Staff

crwdns2931471:0135crwdne2931471:0

crwdns2935297:016,475crwdne2935297:0

crwdns2944067:010crwdne2944067:0

My macbook pro mid 2012 has a horizontal pixel line. It appeared after an actualization. Do you think it could be a matter of the display or software? Thank you

obich - crwdns2934203:0crwdne2934203:0

Actualization? What does that mean in this context?

maccentric -

Oh, accident. Most likely a hardware issue with the LCD itself.

maccentric -

This is not a difficult procedure. It takes about 10 minutes, half that if you know what you're doing, maybe twice that if you don't have a clue.

maccentric - crwdns2934203:0crwdne2934203:0

so I did the dc port succesfully because it started, but now it starting up immediately to a white screen and has a loud fan noise, Also the magsafe light stays off. but i need the files and pgp keys on this mac, now, i have a workstation,iMac, if i were to use target disk mode, would they know that i did this at Apple?and if there is a chace of a kernal panic ?woud have to send my work station in. no time machine back i know ... Please dont lecture me. So far i did a nvram reset while it was on the white scren some how it just boots back to white screen. when i do s tandard smc reset it doesnt boot at all. when i do a nvram on the white screen it just resets itsef. cannot get nto recovery becasue its just a white screen. I also do various other ways of smc resets, but it llways boots to white scren, is this dsplay? do i have to replace the dispaly as per guide? what's happening,any ideas?

mark Andrews - crwdns2934203:0crwdne2934203:0

crwdns2917038:0crwdne2917038:0

crwdns2936625:0crwdne2936625:0:

crwdns2936751:024crwdne2936751:0 7

crwdns2936753:07crwdne2936753:0 72

crwdns2936753:030crwdne2936753:0 263

crwdns2942667:0crwdne2942667:0 75,716