crwdns2933423:0crwdne2933423:0

MacBook Pro 15" Unibody Mid 2010 Hard Drive Replacement

crwdns2942213:0crwdne2942213:0

  1. MacBook Pro 15" Unibody Mid 2010 Hard Drive Replacement, Lower Case: crwdns2935265:01crwdnd2935265:01crwdnd2935265:01crwdne2935265:0
    • Remove the following ten screws securing the lower case to the upper case:

    • Three 13.5 mm (14.1 mm) Phillips screws.

    • Seven 3 mm Phillips screws.

    • When removing these screws, note how they come out at a slight angle. They must be reinstalled the same way.

    Step 1 (technically step 9 - replacing the base plate) Apparently one of my screws was a micron or two smaller than the others. This screw belongs to the hole above the optical drive, which is also apparently a couple of microns smaller than the others. It took seven attempts to figure which screw had originally been in that hole; all the other screws were too large, but fitted perfectly everywhere else.

    Bizarre much?

    Will - crwdns2934203:0crwdne2934203:0

    It might be a matter of how the screws are driven in, and not that they're slightly different sizes. When I reassembled my MacBook, a couple of the screws, including the one over the optical drive you mention, were hard to drive in and jutted up a little bit instead of sitting entirely flush. Swapping screws didn't help. The solution was to unscrew them and drive them in at a bit of an angle - perpendicular to the slightly curved surface of the back plate where the screw holes were, instead of fully vertical with respect to the ground the Macbook is sitting on. Doing it that way, the screws were easier to drive in and they all ended up flush in their holes. Didn't matter which screws they were. (I swapped a few around just to check after reading this.)

    Andrew Janke -

    I had no such screw issues. Either there are differences in manufacturing lots or I just got incredibly lucky during reassembly!

    xtophr -

    I discovered a great way of organizing the screws. I used an ice cube tray and added the screws in order, keeping the different kinds together. So when it came to reversing the steps, the screw order was an added control step to returning everything in its place.

    leonie - crwdns2934203:0crwdne2934203:0

    Great advise! Love it! :)

    Ririds -

    I used to do that and that worked really great until I bumped it by accident and the entire tray went on the rug! I spent the next day sorting things out.

    Now I use these:

    http://www.sciplus.com/p/50-114-CLEAR-PL...

    The lower ones 50 to a package. I mark them w/ blue tape. Often if it's part like the fans, or the optical drive I'll tape the screws into/near the holes where they belong. I did this a lot especially w/ the bottom screws from MBPs until I'd done so many I knew exactly where the longer ones went.

    Richard Sato -

    I wrapped the screws in a piece of blue masking tape and wrote the number on the little pouch I made. Then I stuck the blue tape pouches on the underside of the case bottom in order.

    Roscoe -

    I take double-sided tape, put that on a piece of paper, stick the crews to that, and label them.

    jelimoore -

    Best I've found is a bead sorting tray. They're like $5 at Wal-Mart and they have a lid that seals up and won't let them jump between containers.

    maccentric -

    I take a sheet of paper, pierce the screws through the paper, take a pen and box the screws and write out what step they belong to.

    Nils -

    @Will, in my case I had the same result as you did. As a reminder to myself the next time I need to open the computer, I put a dot of white paint on those two screw's head and a very, very thin ring of white on the very edge of each hole, that way I'll know they go into those two holes.

    Roger - crwdns2934203:0crwdne2934203:0

    Actually the four screws on the bottom were not threaded all the way up. I didn't check to see if the thread gauge was the same on them, but it wasn't until I had about four screws out (I didn't take them out in the order that the bottom all came out first) that I noticed a difference. I then took out the rest of the bottom ones to see if they matched the two that were already out that weren't threaded to the top. They did. So I went under the assumption that those were all bottom screws and when I put it back together everything went fine with no resistance.

    So there are three types of screws: Four for the bottom, three long ones as indicated and three others that might be slightly smaller than the bottom ones.

    wresnick - crwdns2934203:0crwdne2934203:0

    Hi,

    Although its more than a year since your contribution, I thought you might be amused to know that it is not just that the screws go in more easily when at an angle, Apple actually drilled and tapped the holes at a 15% angle. I too had tried to drive them in straight. An Apple "genius" - I was in for something else - clarified the design for me. It was done so that the screws lay flush on the angled part of the lower case. Nice design, but since Apple encourages DIY memory and drive changes, they could have mentioned this little ... trap.

    H Stahl -

    MacBookPro8,2

    Intel Core i7, 2,2 GHz, RAM 16 GB

    Mountain Lion

    May someone help me?

    I have installed the second drive with ssd 840 evo, but when I try to copy the file from the new drive to the main hd this in not allowed (errore -36)

    Piero - crwdns2934203:0crwdne2934203:0

    To my knowledge you can't transfer a single file more than 4gb. I advise compressing to a bunch of rars to split the file size and moving them individually

    1982sketcher -

    Hey everyone, here's the very best way to PERFECTLY organize your screws AND keep track of the order of the procedure: Get a piece of plain corrugated cardboard and a pen (I like using a Sharpie). For EACH step of the disassembly, draw a simple diagram of the layout of the computer on the piece of cardboard, with dots or Xs where the screws are located. Right after you remove each screw from the computer, poke a hole in the cardboard in its corresponding diagram position with your screwdriver and place the screw in that hole. If there are other non-screw related parts to be removed, you can add notes below each step diagram to remind you of where they go or how they should be placed. This cardboard method is great not only because your screws will not go flying or get mixed up by accident if bumped, but each screw goes EXACTLY back where it came from and you can keep the cardboard as a template for future use if necessary!

    - zerø K

    zeroK - crwdns2934203:0crwdne2934203:0

    These instructions worked great for me. I ordered a replacement battery from Key Power (on Amazon) for my 15" Macbook Pro (mid-2010). Cost was $74 shipped.

    Battery came with 3 different screwdrivers to help with installation. I just needed the one size though, since my 2010 seemed to use all the same size screws.

    Thanks!

    Marcos - crwdns2934203:0crwdne2934203:0

    During re-assembling (put the screws back in), it is important to note that the 3mm threaded holes are not completely vertical, but bent a little bit such that the hole direction is rectangular to the tapered surface. The force of the screwdriver must point towards the direction of the hole. Otherwise the screw gets jammed

    kusi - crwdns2934203:0crwdne2934203:0

    There is a FOOLPROOF WAY TO ORGANIZE ALL SCREWS and other parts removed.

    Print the repair guide.

    Yes, the actual photo of the bottom of the laptop with the circles around the screws.

    When you remove the screw, tape it to the photograph.

    You will tape the screw to the exact location that you just removed it from.

    Same thing with any part you remove.

    splashzoneent - crwdns2934203:0crwdne2934203:0

    Thanks Splash!!! I used your suggested method, and it was perfect: kept all my screws, and i was able to, very easily, put them back in their correct place. I greatly appreciated your feedback. Thank you for sharing!!

    Tommy Kedar -

    Thank you!!! This worked fabulously - even the I.T. people at my workplace were excited as they never thought to do that before. Replacing the battery took about 10 minutes!

    nclarke36 -

    Worked like a charm! Took less than 20 minutes.

    It's Oct. 2015, and the fan cost me about $10. it was the same brand/model...

    SUNON MG62090V1-Q020-S99 .

    SOME TRICKS -

    1- no T6 screwdriver- was careful using needle nose players to loosen 2 screws protruding up, then use a small phillips to push real hard into the T6 slots, SLOWLY turn , also used a small flat head screwdriver (for eye glass repair) was able to grab thread on T6's, made a small mark with screw driver across the top so I could see when it started to turn.

    2- no spudger -made one; cut a little strip 1/2" x 1 1/2" of plastic. couldn't get it to slide under plug, there's an edge where plug fits. so lifted old fan out, pulled upward on the plug it popped right out with very little effort. I used my home made spudger to push the new plug into place.

    3- download free "Macs Fan Control" This is how I was alerted to the fan not working in the first place. Program shows temperature of all key components in the computer.

    cheers- Durango CO!

    Dgodrummer - crwdns2934203:0crwdne2934203:0

    Watch the video first, read the entire tutorial and all the comments before you start, and spread a white towel on the floor so you can find screws when you drop them. Watch this first -- http://www.youtube.com/watch?v=qiBxhA29e...

    kevicoll409 - crwdns2934203:0crwdne2934203:0

    The link above is no longer available.

    Kristina Graham -

    I will be buying a battery from you and using your instructions. I just installed a new CD/DVD using your instructions and 1) I feel like I owe you something and 2) Although more expensive, I have the confidence your battery will work. My current battery is the original with 1399 cycles in 7.2 yrs. A tech buddy had bought me a replacement and I installed it. I had just installed a new OS and the kernel_task went going nuts, using 90% of the CPU. Hours on the phone with Apple did not resolve the issue. On a whim, I put the old battery back in and Voila! But I cannot risk my battery swelling and going south on me. I am also going to buy your installation tools. Yeah, I already have them. But you can never have enough tools…or beer. And you don’t sell beer.

    Pete Banks - crwdns2934203:0crwdne2934203:0

    The instructions say that I am removing PH00 screws. I found that my MBP, mid ‘12, Retina has pentalobe screws instead!

    jsandersonq - crwdns2934203:0crwdne2934203:0

    This laptop definitely originally shipped with Phillips screws—but, Apple has been known to replace Phillips screws with pentalobes when one of their devices is brought in for service. Sorry for the rude surprise! Fortunately the correct driver is easy to find nowadays. [Blatant self-promotion alert!] If you support free repair manuals, consider picking one up from iFixit. Good luck!

    Jeff Suovanen -

    Me, too, and it’s plausible that this machine has been serviced by Apple in the past, replacing the screws as Jeff Suovanen suggests.

    iFixit shipped a pentalobe bit with the kit, but it’s too large for the actual screws, so it looks like I now need to get another bit. But what size?

    Jeff’s link is to a driver with a P5 bit, and that page links to a P2 screwdriver, but since I don’t know what size I actually need (and I don’t have a micrometer to hand) I’m reluctant to buy two on spec.

    Norman Gray -

    (The bit in the kit appears to be a P6, so I’m inclined to order a P5 and see what happens)

    Norman Gray -

    You’re using the wrong repair guide. This guide is for the 2012 NON-Retina MBP. You have a Retina MBP. The stock case screws in the 2012 NON-Retina are all Phillips, just as the guide says.

    Steven Wymor -

    To keep track of screws, I used the suggestions above by taping a photo of the lower case to a piece of corrugated cardboard and inserting/taping the screws in place. Also, as some have noted, the screws go back in at a slight angle; they are angled toward the center of the unit.

    Kristina Graham - crwdns2934203:0crwdne2934203:0

    If your vision, like mine, is getting too fuzzy to be able to distinguish between a tiny Phillips screwdriver and a tiny Tri screwdriver, there’s an easy way. With a Phillips (or a Pozidrive) you can get two opposite wings to reflect the light from a lamp or window straight towards your eye at the same time. With a Tri (or Penta) you can only get one wing to reflect at a time, however much you twiddle it.

    Alan Waller - crwdns2934203:0crwdne2934203:0

    There’s a very easy way to avoid cross-threading a screw thread, any size.

    Put the screw into its hole and start by turning it gently, slowly BACKWARDS. When you hear a little “Click!” sound, the male thread has just passed the opening in the female thread and is in exactly the right position to enter into it correctly when you start to turn in the correct forward direction.

    Remember, all drivers except hex (Allen key) and TorX need pressure to avoid slipping out and damaging the head. So even when you want to turn it in with LOW moment/torque, keep the CONTACT PRESSURE high.

    Alan Waller - crwdns2934203:0crwdne2934203:0

    The keep the pressure on is on point. In my case once I loosened my first screw I thought I could relief my initial pressure. It was a mistake. I was doing the whole thing very slowly as a precaution. That helped me notice that the Phillips screw driver was sliding up out of the screw head. Not being sure why, I put pressure back on the screw driver until almost all the screw was out of the hole. Once out, I examined closely to find out that the threads have some sort of coating. It looks to me like some kind of locktite. Then I understood the importance of keeping the pressure on all the way through. It made me uneasy having to keep so much pressure on such tiny screws, but I found it was the only way to prevent damage to the “slots” on the heads. Anyway, all of them suffered some degree of damage, but I was able to successfully remove them and reinstall all of them back in their original holes.

    Martin Mejia -

    After reading this page on iFixit several times, I just could not face all the work of replacing the Logic Boards on two MacBookPro 2011s even if I was prepared to pay approx 400 USD (which I wasn’t). Then I read the reviews of a couple of folks who’d stripped down their machines and put their logic boards in the oven and, it worked! I wondered, if I just used my new Steinel Hot Air Tool (heat gun in my language) recently delivered from iFixit, on the logic board in-situ, without removing it? So I removed the battery, hard drive, and RAM and unplugged all the leads I could see WITHOUT removing anything else physically. Then using the 500 degrees set on the gun (setting 2) I ‘played’ the gun over the logic board for about 60 seconds on machine one with the restart problem (plus latterly, not completing start-up). Long story short… it worked! I spent a long time getting the s/w to load, but the commentary is too short to let me relate that part… ping me if I can help you do the same! blackaye@gmail.com

    Ian Black - crwdns2934203:0crwdne2934203:0

  2. MacBook Pro 15" Unibody Mid 2010 Hard Drive Replacement: crwdns2935265:02crwdnd2935265:01crwdnd2935265:01crwdne2935265:0
    • Using both hands, lift the lower case near the vent to pop it off two clips securing it to the upper case.

    • Remove the lower case and set it aside.

    What is the maximum amount of RAM that can be installed in this MacBook?

    michael - crwdns2934203:0crwdne2934203:0

    16 GB is the max

    Bradon Kelley -

    I can’t get the back panel off !! Removed all 10 screws but the panel is still on. Not a quick easy lift like in the picture of videos on youtube what going on…are the hidden screws locking tabs?

    Tachyon - crwdns2934203:0crwdne2934203:0

    Solved the tabs were hard to get off to the point I thought I was going to bend the back case off before it would let go.

    Tachyon - crwdns2934203:0crwdne2934203:0

  3. MacBook Pro 15" Unibody Mid 2010 Hard Drive Replacement, Battery: crwdns2935265:03crwdnd2935265:01crwdnd2935265:01crwdne2935265:0
    • Remove the two 7.4 mm Tri-point screws securing the battery to the upper case.

    • Note: For certain repairs (e.g. hard drive), removing the battery is not necessary but it prevents any accidental shorting of electronics on the motherboard. If you do not remove the battery, please be careful as parts of the motherboard might be electrified.

    • You do not necessarily have to follow steps 3-6 to remove the battery in order to replace the hard drive. However it is recommended to remove all power sources from electronics before working on them.

    A 1/16th flathead screwdriver easily removes the tri-wing screws in this step. I could not find a Y0 Tri-wing driver at any local stores.

    Jon Daniels - crwdns2934203:0crwdne2934203:0

    I'd like to add that for me, a 1/16th flathead screwdriver did NOT allow me to remove the tri-wing screws holding the battery in place. After several careful attempts, it became obvious I was perilously close to stripping the screw(s), so I abandoned the attempt to unscrew the tri-wing screws with a flathead screwdriver altogether. As it turned out, I didn't need to remove the battery to do what I needed to do (keyboard replacement), but it would have been a whole lot easier had the battery been easily removable.

    dave - crwdns2934203:0crwdne2934203:0

    The Tri-wing screw driver is impossible to find in retail, amazon and ebay are great bets but they vary wildly in quality... I ordered two, and both were so cheap, and barely got the job done. It could be worth getting it here. When you do get it, make sure you push, the Y0 screws were very tight in my macbook, pressing hard prevents you from stripping the Y screw.

    Abe - crwdns2934203:0crwdne2934203:0

    I believe they are Y1 screws, no?

    Mark -

    What worked for me was actually a set of needlenose pliers - the heads on those screws aren't flush, they actually stick out enough that it's possible to turn them from the outside. Caused some scuff marks on the finish of the screws but it's not like anyone's going to see them anyway!

    oboewan42 - crwdns2934203:0crwdne2934203:0

    A tri-wing screwdriver sold as 'for Nintendo Wii' marked 'HFA 360/ x50' did the job. I replaced the screws with standard-head M2x6mm metric screws (M2 = 2 mm thread, 6 mm length of threaded part). Exactly, I took them out of an old hard-disk (with torx head and slightly shorter).

    akronymus - crwdns2934203:0crwdne2934203:0

    I had a cheap Tri-wing screw driver. The one that comes with the “Newertech“ battery. It did not make the job and it rather damaged the screws. Panic! I decided to buy the screwdriver sold by ifixit, the German one, not the other. At any point did I want more surprises. Yes it’s pretty expensive, but equally useful even with the screws already damaged. Thanks guys!

    Raul Roman - crwdns2934203:0crwdne2934203:0

  4. MacBook Pro 15" Unibody Mid 2010 Hard Drive Replacement: crwdns2935265:04crwdnd2935265:01crwdnd2935265:01crwdne2935265:0
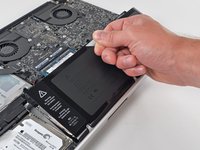
    • Use the tip of your finger to carefully peel back the corner of the warning label to reveal a hidden Tri-point screw.

    • Remove the last 7.4 mm Tri-point screw securing the battery to the upper case.

    Is removing the battery necessary?

    bname - crwdns2934203:0crwdne2934203:0

    It is not strictly necessary. As mentioned above, removing the battery is the only way to be sure that no parts of the logic board are electrified. It is very easy to replace the hard drive without removing the battery, but it is safer to remove the battery first.

    Daniel Brauer -

    Note: removing the battery can cause a hitch with OS X 10.9 Mavericks installation to a blank drive, or at least it did for me.

    Disconnecting the battery makes the hardware clock reset to something like Jan 1, 2000. This causes the Mavericks installer to fail its self-check with the error message: "This copy of the Install OS X Mavericks application can't be verified. It may have been corrupted or tampered with during downloading."

    To fix this, you need to open up Terminal from the Utilities menu in the bootable OS X installer environment and use the `date` command to set your Mac's clock back to the correct time before proceeding with the "Install OS X" menu selection, as described here: http://blog.mconserv.net/2013/10/install...

    Andrew Janke - crwdns2934203:0crwdne2934203:0

    Thanks for that warning, Andrew.

    Max Fenton -

    Happened here too, thanks for the tip!

    Franco Bianchi -

    As a note, my Mid-2010 Unibody Macbook did not have this third screw, just two to remove the battery.

    Max Fenton - crwdns2934203:0crwdne2934203:0

    Can anyone answer this question. I cannot afford the entire 80 dollar repair kit listed here and the tools needed only list a spunger t6 and a phillips...it appears from some of these comments there are more drivers needed. I am afraid to do this anyway but not having the right tools off the bat will just make things more difficult while waiting for an order to come in...can someone list the exact tools I would need ? Any help would be appreciated...I am ready to order this but want to put in one order....ifixit, can you clear this up perhaps ?

    laurie - crwdns2934203:0crwdne2934203:0

    One of the most important tool you should get is the head strap magnifier with lighting, it will make your viewing and capable ability much more confident.

    James -

    Taking the battery out is the easiest part once you have the Tri-Wing screwdriver

    Tri-point Y1 Screwdriver

    Tao - crwdns2934203:0crwdne2934203:0

    And yes, taking the battery out does naturally make the hardware clock reset.... It's easily fixed. See Andrew Janke's comment above.

    It's a small hassle, compared to needing to possibly replace your logic board because a surge from your battery fried it.

    Tao - crwdns2934203:0crwdne2934203:0

    Ne trouvant pas de tournevis Y1, j'ai utilisé avec succès une pince électrique à bouts fins pour déserrer la vis puis j'ai terminé avec un tournevis plat très fin (1.5x35)

    Ivan Keller - crwdns2934203:0crwdne2934203:0

    new battery drains at the rate of about 10% a minute. i may have received a faulty one but i wouldn't have bought it if i knew what i know now.

    aozoren - crwdns2934203:0crwdne2934203:0

    Is this a battery from iFixit?

    Scott Dingle -

  5. MacBook Pro 15" Unibody Mid 2010 Hard Drive Replacement: crwdns2935265:05crwdnd2935265:01crwdnd2935265:02crwdne2935265:0 MacBook Pro 15" Unibody Mid 2010 Hard Drive Replacement: crwdns2935265:05crwdnd2935265:02crwdnd2935265:02crwdne2935265:0
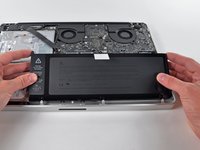
    • Lift the battery by its plastic pull tab and slide it away from the long edge of the upper case.

    • Do not try to completely remove the battery just yet.

  6. MacBook Pro 15" Unibody Mid 2010 Hard Drive Replacement: crwdns2935265:06crwdnd2935265:01crwdnd2935265:01crwdne2935265:0
    • Tilt the battery away from the logic board enough to access the battery cable connector.

    • Pull the battery cable connector away from its socket on the logic board and remove the battery from the upper case.

    • Pull the battery cable connector away from the center of the logic board.

    • If you're installing a new battery, you should calibrate it after installation:

    • Charge it to 100%, and then keep charging it for at least 2 more hours. Next, unplug and use it normally to drain the battery. When you see the low battery warning, save your work, and keep your laptop on until it goes to sleep due to low battery. Wait at least 5 hours, then charge your laptop uninterrupted to 100%.

    • If you notice any unusual behavior or problems after installing your new battery, you may need to reset your MacBook's SMC.

    I'm having the same problem as previous commenters: the battery now drains much faster. It's the original factory unit—I only replaced the HD, which is working great.

    Is there something I am missing with the battery reconnection? Maybe it's loose?

    I just want to make sure before I crack open my laptop again.

    cmalec722 - crwdns2934203:0crwdne2934203:0

    Fast battery drain problems might be due to a corrupted power manager circuit on the logic board. To reset it, remove the battery, press the power button for about 5-10 seconds, then reinstall the battery. I know the problem might have been partly due to removing the battery in the first place, but this is the procedure for resetting what might have gone wrong. It might also help to do a PRAM reset, by holding down Command-Option-P-R at power (not just from a restart), and let the Macbook chime twice after its initial powerup chime.

    johnsawyercjs -

    The spudger works well for detaching the connector.

    skat1140 - crwdns2934203:0crwdne2934203:0

    I’ve done a few of these and it should be noted this connector is a very firm fit. Using the flat end of the spudger to pry alternately at the protruding sides can be helpful.

    py - crwdns2934203:0crwdne2934203:0

    Buen tutorial, solo advertir una cosa: los tornillos de la batería (Tri-point), en mi caso estaban muy duros.. atención si se usan destornilladores baratos.. mucho cuidado porque puedes dejar el tornillo imposible de extraer..

    fserranolv - crwdns2934203:0crwdne2934203:0

  7. MacBook Pro 15" Unibody Mid 2010 Hard Drive Replacement, Hard Drive: crwdns2935265:07crwdnd2935265:01crwdnd2935265:01crwdne2935265:0
    • Remove two Phillips screws securing the hard drive bracket to the upper case.

    • These screws are captive to the hard drive bracket.

  8. MacBook Pro 15" Unibody Mid 2010 Hard Drive Replacement: crwdns2935265:08crwdnd2935265:01crwdnd2935265:01crwdne2935265:0
    • Lift the the retaining bracket out of the upper case.

  9. MacBook Pro 15" Unibody Mid 2010 Hard Drive Replacement: crwdns2935265:09crwdnd2935265:01crwdnd2935265:01crwdne2935265:0
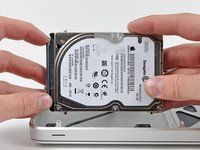
    • Lift the hard drive by its pull tab and pull it out of the chassis, minding the cable attaching it to the computer.

    Be VERY careful when you are lifting up the drive. Otherwise, you'll need to buy a new hard drive/IR sensory cable! Learn from my fail!

    goodski - crwdns2934203:0crwdne2934203:0

    After having changed the drive my disk works some times only, other times not. Some times it will boot other times not. I see that the sleep indicator is not working. Might have damaged the cable? Thought I was really careful when changing the drive.

    Eivind Johansen - crwdns2934203:0crwdne2934203:0

  10. MacBook Pro 15" Unibody Mid 2010 Hard Drive Replacement: crwdns2935265:010crwdnd2935265:01crwdnd2935265:02crwdne2935265:0 MacBook Pro 15" Unibody Mid 2010 Hard Drive Replacement: crwdns2935265:010crwdnd2935265:02crwdnd2935265:02crwdne2935265:0
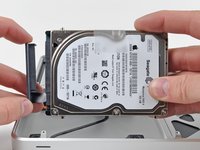
    • Remove the hard drive cable by pulling its connector straight away from the hard drive.

  11. MacBook Pro 15" Unibody Mid 2010 Hard Drive Replacement, Hard Drive: crwdns2935265:011crwdnd2935265:01crwdnd2935265:02crwdne2935265:0 MacBook Pro 15" Unibody Mid 2010 Hard Drive Replacement, Hard Drive: crwdns2935265:011crwdnd2935265:02crwdnd2935265:02crwdne2935265:0
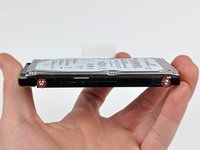
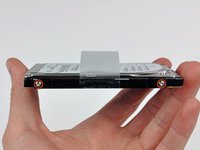
    • Remove two T6 Torx screws from each side of the hard drive (four screws total).

    • You'll need to transfer these screws to your new hard drive if you're changing drives.

    • If desired, peel the pull tab off your old hard drive and transfer it to the side of your new drive.

    • If you are installing a new hard drive, we have an OS X install guide to get you up and running. Many recent Macs may be able to use OS X Internet Recovery.

    what is the maximum tall of supported harddrives?

    patrick - crwdns2934203:0crwdne2934203:0

    i just successfully installed a Samsung spinpoint 1000Gb HDD.

    Sibe Jan Kramer -

    I looked up the Samsung spinpoint: It's 9.5mm thick/tall.

    The Hitachi removed in the video is also 9.5mm thick.

    enlimydna - crwdns2934203:0crwdne2934203:0

    Making your SATA3 drive work, in your early or late 2011 15"mbp:

    If you are unfortunate, and have the "faster" SATA3 chipset for the optical bay, use a hard drive that is either ONLY SATA2 or has a bootable utility you can use to FORCE the drive to run at SATA2 (3gpbs) ONLY. Otherwise, the hard drive (in the optical bay) will NOT be recognizable by the system...This is a lesson in futility, but....There is a cure. I know for *SURE* if you use fast (as of 2014.08) HGST 7k1000 (model HTS721010A9E630), you will NOT be able to run it at 6Gbps. You WILL be able to run it at 3Gbps though, and that beats 0Gbps!

    1. Get the HDDFT10.iso (from here: http://forums.macrumors.com/showthread.p... ),

    2. Burn it to a CD

    3. Plug in a USB keyboard WITH FUNCTION KEYS (You WILL need them)

    4. Holding down the Option key, select the CD when you boot up

    5. When prompted, hit F1 to change drives

    6. Hit F3 to change to 3Gbps

    7. Reboot

    8. *POOF* magic Pixie Dust rains down upon you...and your MBP

    clay - crwdns2934203:0crwdne2934203:0

    If you want to install OSX on it, this is what I've done (without a USB or bootable drive). First, if you're replacing the hard drive with the SSD (for example), then you just need to plug in the harddrive you replaced and boot it up via USB. Format the new hard drive you installed as a Mac OS Journal (eg: a drive that Mac understands it can install an OS on). Then, restart the computer, press CMD+OPT+R to start up the internet recovery off of the USB-attached hard drive, which will allow you to install a copy of Lion or Mavericks or Yosemite (depends on what was on your old hard drive) to the new one within the computer.

    So far, It's installing and it seems to be doing amazingly well.

    kratsgfixit - crwdns2934203:0crwdne2934203:0

    Kratsgfixit-

    Could you format the new drive before taking out the old one and replacing it? I'd rather know I had it formatted correctly, etc....before taking the old one out and putting a new SSD in. Could I just put the new SSD into one of those eSata drive holders (sorry can't remember official name) that connects via USB and do it using the instructions you provided in your post?

    Liz -

    I found out the hard way that the HDD screws are actually hex; 1.3mm if I remember correctly. I actually ended up stripping one of them by using a torx bit.

    jelimoore - crwdns2934203:0crwdne2934203:0

    The nuts sticking out of the hard drive are definitely not T6 Torx, the smallest key in my hex set worked, which I believe says .05 inches on it.

    Thom B - crwdns2934203:0crwdne2934203:0

    Yes. .05 worked. Thank you.

    Karen Fitzer -

    I too found the HDD had four hex screws .050 inches (smallest one in my set). I suggest updating tools required to indicate a .050 hex key may be needed.

    Peter Broad -

    I had to reset the SMC after installation to fix the fan noise (https://support.apple.com/en-us/HT201295).

    anonymous 9048 - crwdns2934203:0crwdne2934203:0

    My Mid 2010 MBP 15” definitely has T6 Torx screws for the HD. I replaced my 500GB 7400RPM Seagate with a Samsung EVO 860 500GB SSD. I now have a new machine! Can’t believe how much difference this made! Also used Carbon Copy to clone my old drive to the new SSD, worked perfectly.

    KenT - crwdns2934203:0crwdne2934203:0

    At first I didn’t understand why I needed to transfer the screws from the old drive to the new one. Then I figured out that the screws are used as pegs to keep the drive in place.

    Also, the software side of things confused me until I found ifixit.com’s video on copying the old drive to the new one. On YouTube it is titled “How to Transfer Your Mac’s Data to a New Hard Drive SSD”.

    ifixit.com has some amazing tutorials. Thanks! I can’t believe I’m running the latest OS version on my mid 2012 Macbook Pro!

    Kristina Graham - crwdns2934203:0crwdne2934203:0

    If you do a RAM upgrade at the same time and wish to install OSX via Internet Recovery mode you will run into dramas with any RAM over 2GB per slot. I am having to try booting via a USB and having enormous troubles with the Sierra installer. Going to try El Capitan and upgrade later.

    Toby Cameron - crwdns2934203:0crwdne2934203:0

    but what about the included external drive case? No comments on how to put your old hard drive into it?

    Matthew Matthew - crwdns2934203:0crwdne2934203:0

crwdns2915888:0crwdne2915888:0

To reassemble your device, follow these instructions in reverse order.

crwdns2935229:0380crwdne2935229:0

Walter Galan

694,044 crwdns2915208:0crwdne2915208:0

crwdns2935297:01,203crwdne2935297:0

crwdns2944067:021crwdne2944067:0

I went all over the place trying to find that stupid 7.4 mm Tri-Wing bit or driver to remove the battery per your instructions then I took a harder look and realized there was no need for all that SMFH!

Richard Vera - crwdns2934203:0crwdne2934203:0

We have you remove the battery because as long as it is connected, certain components on the logic board are electrified. If you accidentally drop something metallic on the board or touch the wrong part with a screwdriver, you could fry the board be out another $700+.

Andrew Bookholt -

I bought the 1TB and the tool kit. Got it today. The step by step directions made it a piece of cake. Afterwards I booted up my MacBook Pro off of my system software cd. The new hard drive didn't show up so I called iFixit and talked to Scott. He told me how to format my drive and had me up and running in about 2 minutes. You guys are awesome! My computer works great and I went from a maxed out 500 GB hard drive to a full 1 TB Hybrid hard drive. Thanks for the new lease on life.

josephpass - crwdns2934203:0crwdne2934203:0

So, SSD´s can replace an the original HDD without any sort of fitting?

Nico Sauer - crwdns2934203:0crwdne2934203:0

My original harddrive crashed and I bought a new ssd. How do I install the latest OS (Maverick) on it? I had it on the former HDD and I downloaded it through App Store.

Roffe - crwdns2934203:0crwdne2934203:0

Thanks for instructions, I ordered the triwing screw driver especially to shoe in my Tb SSD.

This allowed me to disconnect the battery, there were a couple of minor reboot issues, but my main problem is that my battery has stopped charging. The little green light stays on, whilst the battery although acknowledging it is connected isn't charging.

Any tips? People have talked about SMC, which will be first move, followed by reconnecting the battery cable.

Thanks though for the guide a big help, onwards and upwards!

zeristor - crwdns2934203:0crwdne2934203:0

I bought a Samsung EVO 1tb SSD for my mid 2010 Macbook Pro to replace the 500gb HDD. Swapping the drives around is no problem. The problem is, getting the MBP to recognize the SSD via a SATA adaptor with a USB 3 connector. My MBP only has USB 2 but I thought it would still work with the USB 3/SATA adaptor? Someone call me a dumb ass so I can move on! The SATA is not registering at all on my Finder or anywhere else on the Macbook. The SATA/USB3 cost me £50. Is there another way to transfer the data so I can still reboot without having to reinstall OSX? Ten questions in one I know.

jamesmcsparron - crwdns2934203:0crwdne2934203:0

Just did a similar replacement on a 2010 mac mini. I found an article saying to clone the old drive to the new SSD using CCC or SuperDuper BEFORE removing it. I did that and everything worked just fine. You might try doing the same.

jeff271 - crwdns2934203:0crwdne2934203:0

Hi guys, I would like to ask for some help. I bought the 1 TB SSHD Hybrid 2.5" Hard Drive from Seagate and used the external USB case to transfer all data from the old internal disk to the new SSHD.

Currently the new SSHD is not being readable by my Mac Book Pro Unibody 15" 2.66 GHz (Mid 2010) when I use the USB external connection. The Pop-Up Window tells me The disk you inserted was not readable by this computer".

Question 1: Do I need to initialize the new disk?

Question 2: What exactly is an initialization

As soon as I got the new disk running via external USB access, how can I copy the entire data kit incl. mac os Software from the old disk to the new one.

Thanks a lot for your support.

Andreas - crwdns2934203:0crwdne2934203:0

Anyone know where i can get a 1TB upgrade for this?

cath - crwdns2934203:0crwdne2934203:0

Maplins they sell a tool kit for £9 with all right mini screwheads Naplins 17 piece smartphone repair kit

Sally Bourliakas -

Blow me down ! It took exactly 40 minutes and it worked like a charm! Thanks !!!one flabbergasted 51 year old lady …

Sally Bourliakas - crwdns2934203:0crwdne2934203:0

After replacing the drive, how do i transfer my software & install Mac OS on the new drive?

Kelechi Kanu-Ivi - crwdns2934203:0crwdne2934203:0

Check this link for the iFixit guide to formatting and loading MacOS onto your new SSD.

How to Install macOS High Sierra

RBStorms -

Used this guide to replace my stock Hitachi HDD with an Intel SSD. I also figured I would replace the battery while I had the case open, it had almost 700 charge cycles and about 70% capacity remaining. My MBP has been running like hot garbage, literally. The fans would spin up and it would get dangerously hot near the upper left of the keyboard just doing mundane tasks like web browsing. It would chug along and I’d get the beach ball constantly. I decided to reset the SMC while I had the battery out as well out just to be safe. After the repairs were done my laptop booted up perfectly on the first try and it’s running like new again. Great guide and I hope this comment helps anybody having the same issues as I was.

David Marks - crwdns2934203:0crwdne2934203:0

Again, Ifixit makes it easy to manage my MacBook Pro. Thanks!

J.T. - crwdns2934203:0crwdne2934203:0

This guide was of great help! Thank again iFixit!

Joachim Wehinger - crwdns2934203:0crwdne2934203:0

Do the mid 2010 MacBook Pro 15 inch models support NVMe SDDs ? If yes, which NVMe SSD is supported.

Thanks

A

Asht R - crwdns2934203:0crwdne2934203:0

question? if I use an m.2 nvme to sata adapter, can I still achieve nvme speeds, or does the sata connection max out at 300 mbps

Henry Phillips - crwdns2934203:0crwdne2934203:0

You all are Awesome.

I found you when I was still running Power Pcs and needed to replace a keyboard.

My “go to” for every question about my old MacBook Pros.

This old lady just replaced the hdd on one 2010 MacBook Pro and fixed a charging issue on a second.

All in about 3 hours.

Y'all Rock!

Thank You

Dawn Vanderpool - crwdns2934203:0crwdne2934203:0

crwdns2917038:0crwdne2917038:0

crwdns2936625:0crwdne2936625:0:

crwdns2936751:024crwdne2936751:0 7

crwdns2936753:07crwdne2936753:0 58

crwdns2936753:030crwdne2936753:0 271

crwdns2942667:0crwdne2942667:0 484,736