crwdns2915892:0crwdne2915892:0
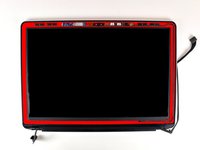
Use this guide to replace a broken front display glass panel. Removal of the front display glass is required to access the LCD. Although it is not technically necessary to remove the display to access the front display glass, it greatly simplifies the task. This guide is not applicable for anti-glare displays.
crwdns2942213:0crwdne2942213:0
-
-
Remove the following ten screws securing the lower case to the upper case:
-
Three 13.5 mm (14.1 mm) Phillips screws.
-
Seven 3 mm Phillips screws.
-
-
-
Using both hands, lift the lower case near the vent to pop it off two clips securing it to the upper case.
-
Remove the lower case and set it aside.
-
-
-
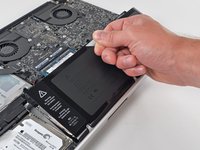
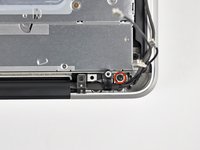
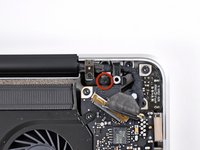
Remove the two 7.4 mm Tri-point screws securing the battery to the upper case.
-
Note: For certain repairs (e.g. hard drive), removing the battery is not necessary but it prevents any accidental shorting of electronics on the motherboard. If you do not remove the battery, please be careful as parts of the motherboard might be electrified.
-
-
-
Use the tip of your finger to carefully peel back the corner of the warning label to reveal a hidden Tri-point screw.
-
Remove the last 7.4 mm Tri-point screw securing the battery to the upper case.
-
-
-
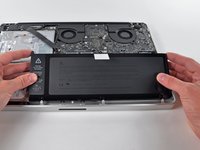
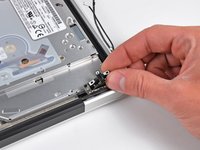
Lift the battery by its plastic pull tab and slide it away from the long edge of the upper case.
-
-
-
Tilt the battery away from the logic board enough to access the battery cable connector.
-
Pull the battery cable connector away from its socket on the logic board and remove the battery from the upper case.
-
Charge it to 100%, and then keep charging it for at least 2 more hours. Next, unplug and use it normally to drain the battery. When you see the low battery warning, save your work, and keep your laptop on until it goes to sleep due to low battery. Wait at least 5 hours, then charge your laptop uninterrupted to 100%.
-
If you notice any unusual behavior or problems after installing your new battery, you may need to reset your MacBook's SMC.
-
-
-
Use the flat end of a spudger to carefully pry the AirPort/Bluetooth ribbon cable up off its socket on the logic board.
-
-
-
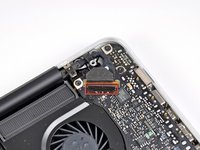
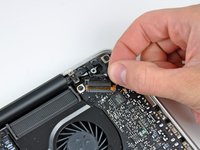
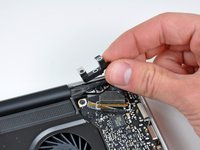
Pull the camera cable connector straight out of its socket on the logic board.
-
-
-
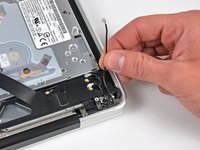
Use the tip of a spudger to pry the three antenna connectors up off the AirPort/Bluetooth board.
-
-
-
De-route all three antenna cables from their channels in the AirPort/Bluetooth housing.
-
De-route the camera cable from its channel in the AirPort/Bluetooth housing.
-
-
-
-
Remove the following two screws securing the AirPort/Bluetooth housing to the upper case:
-
One 3.8 mm Phillips
-
One 8.6 mm Phillips
-
-
-
Remove the AirPort/Bluetooth assembly from the upper case, minding any cables that may get caught.
-
-
-
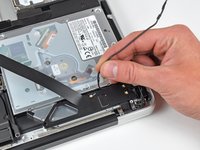
Remove the 8.6 mm Phillips screw securing the antenna/camera cable retainer to the upper case.
-
Remove the antenna/camera cable retainer from the upper case.
-
-
-
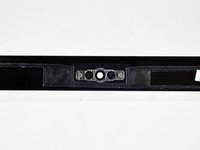
Remove two of the three 6 mm T6 Torx screws securing the right side of the display to the upper case.
-
-
-
Grab the plastic pull tab secured to the display data cable lock and rotate it toward the DC-In side of the computer.
-
Pull the display data cable straight out of its socket on the logic board.
-
-
-
Remove the 8.6 mm Phillips screw securing the display data cable retainer to the upper case.
-
Remove the display data cable retainer from the upper case.
-
-
-
Remove two of the three 6 mm T6 Torx screws securing the left side of the display to the upper case.
-
-
-
Open your MacBook Pro so the display is perpendicular to the upper case.
-
Place your opened MacBook Pro on a table as pictured.
-
While holding the display and upper case together with your left hand, remove the remaining T6 Torx screw from the upper display bracket.
-
-
-
Remove the last remaining T6 Torx screw securing the display to the upper case.
-
-
-
Grab the upper case with your right hand and rotate it slightly toward the top of the display so the upper display bracket clears the edge of the upper case.
-
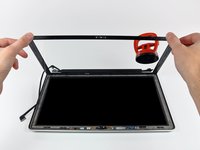
Rotate the display slightly away from the upper case.
-
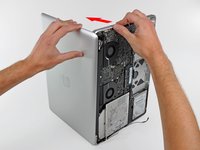
Lift the display up and away from the upper case, minding any brackets or cables that may get caught.
-
-
-
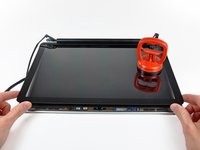
Before starting, be sure to clean the display glass with lint-free cloth moistened with a mild solution; it will make the suction cup adhere better, and will make checking for dust on reassembly easier
-
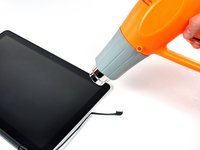
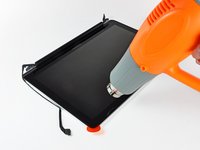
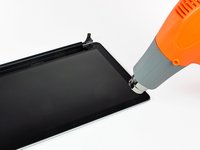
With the heat gun set to low, start by heating the outer black border near the upper right corner of the glass panel.
-
-
crwdns2935267:0crwdne2935267:0Heavy-Duty Suction Cups (Pair)$14.95
-
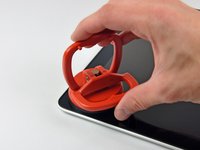
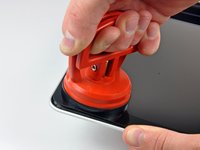
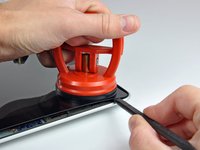
With the panel sufficiently heated, fasten a heavy-duty suction cup near the upper right corner of the display glass.
-
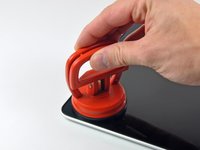
Slowly and gently pull the corner of the display glass up off the display assembly.
-
-
-
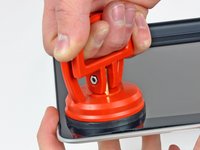
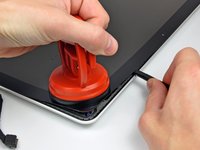
Gently lift the corner of the display glass enough to insert a spudger between it and the display assembly.
-
Use the flat end of a spudger to gently pry up the adhesive securing the front glass to the display.
-
Pry up the glass panel a few inches away from the upper right corner along the top and right edges of the display.
-
-
-
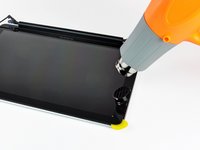
Use a heat gun to soften the adhesive under the black strip along the right side of the front glass panel.
-
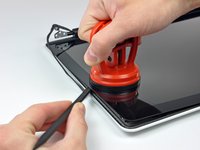
Attach a suction cup along the right side of the front glass panel.
-
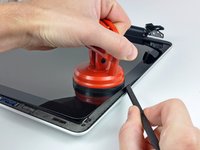
Pull up on the glass panel while you use the flat end of a spudger to separate it from the rest of the display assembly.
-
Continue working along the right edge of the front display glass until it is separated from the display.
-
-
-
Use your heat gun to soften the adhesive under the black strip along the top edge of the glass display panel.
-
Attach a suction cup near the top edge of the glass display panel and use it to pull the glass panel up off the display.
-
Work along the top edge of the glass panel, carefully using the flat end of a spudger to separate the adhesive if necessary.
-
-
-
Use a heat gun to soften the adhesive under the black strip near the upper left corner of the glass display panel.
-
Attach a suction cup near the upper left corner of the glass display panel.
-
Pull up on the suction cup and use the flat end of a spudger to carefully pry the glass display panel out of the display assembly.
-
-
-
Use a heat gun to soften the adhesive under the black strip along the left side of the front glass panel.
-
Attach a suction cup along the left side of the front glass panel.
-
Pull up on the glass panel while you use the flat end of a spudger to separate it from the rest of the display assembly.
-
Continue working along the left edge of the front display glass until it is separated from the display.
-
-
-
Now that the top, left, and right edges of the glass are free from the display, slowly lift the top edge of the glass panel and gently rotate it out of the display.
-
-
-
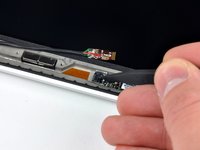
Insert the edge of a plastic opening tool between the display glass and the camera bracket, and run it around the camera bracket to separate it from the display glass.
-
-
-
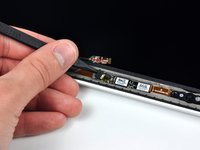
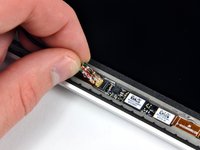
To reconnect the cable, first use the tip of a spudger to remove the piece of foam tape over the camera cable ZIF socket.
-
Use the tip of a spudger to flip up the ZIF cable retainer on the camera cable socket.
-
Insert the camera cable into its socket on the camera board and use the tip of a spudger to snap down the ZIF cable retainer, locking the cable in place.
-


To reassemble your device, follow these instructions in reverse order.
To reassemble your device, follow these instructions in reverse order.
crwdns2935221:0crwdne2935221:0
crwdns2935229:021crwdne2935229:0

crwdns2947412:06crwdne2947412:0
It is easier to start in one of the lower corners. The glass is not held by the rubber bushing.
Is it really necessary to remove the display from the uppercase? Why can't you just start from step 21?
I was wondering the same, is absolutely necessary to disassemble the screen to change the glass? Can I jump to step 21?
No you don't need to remove the Top or Display to replace the glass.
I'm under the presumption that this method would be similar for other unibody versions such as the early / late 2011?