crwdns2915892:0crwdne2915892:0
MacBook Pro not reading CDs? Use this guide to replace a burned-out optical drive.
crwdns2942213:0crwdne2942213:0
-
-
Remove the following ten screws securing the lower case to the upper case:
-
Three 13.5 mm (14.1 mm) Phillips screws.
-
Seven 3 mm Phillips screws.
-
-
-
Using both hands, lift the lower case near the vent to pop it off two clips securing it to the upper case.
-
Remove the lower case and set it aside.
-
-
-
Use the edge of a spudger to pry the battery connector upwards from its socket on the logic board.
-
-
-
Bend the battery cable slightly away from its socket on the logic board so it does not accidentally connect itself while you work.
-
-
-
-
Disconnect the camera cable connector from its socket on the logic board.
-
-
-
Use the flat end of a spudger to pry the AirPort/Bluetooth connector up from its socket on the logic board.
-
-
-
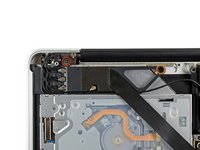
Use the flat end of a spudger to pry the optical drive connector up from its socket on the logic board.
-
-
-
Remove following two screws:
-
One 8.6 mm Phillips screw
-
One 3.9 mm Phillips screw
-
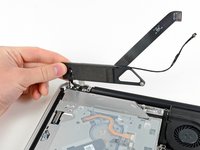
Carefully rotate the AirPort/Bluetooth board housing (with AirPort/Antenna cables still attached) out of the lower case.
-
-
-
Remove the three 3.5 mm T6 Torx screws securing the optical drive to the upper case.
-
-
-
Lift the optical drive near its connector and pull it away from the upper case to remove it from the computer.
-
-
-
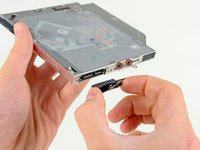
Pull the optical drive cable out of the optical drive.
-
Remove the two black Phillips #0 screws securing the small metal mounting bracket. Transfer this bracket to your new optical drive or hard drive enclosure.
-
-
-
Optical drive remains.
-


To reassemble your device, follow these instructions in reverse order.
To reassemble your device, follow these instructions in reverse order.
crwdns2935221:0crwdne2935221:0
crwdns2935229:052crwdne2935229:0

crwdns2947412:07crwdne2947412:0
Many thanks for this superb resource. My 4 year old had actually shoved a couple of coins into the drive. I would never have had the guts to replace it myself without your help - by far the best on the web!
For anyone who has stripped a screw in step 8 this note might make your day. I stripped the longer screw using a #00 bit. I then took a 1.5mm flat head bit from the iFixit screwdriver kit and rocked it along the line of the flat head into the stripped screw head, with some pressure a few times and that created enough of a depression to easily remove the screw. There was even enough purchase to reinstall it securely so no need to hunt down a replacement screw.
I'd need to know where I could find the connector between the optical drive and the logicboard. I put my hdd in a caddie to put it instead of the optical drive but my macbook keep disconnecting it. Already changed the caddie so I guess that the connector is faulty.
Anyone ? :)
Found it ! But iFixit you should put a link to the other tutorial when you mention the connector in step 11 :D
Right as rain! The comments were especially helpful, although so many stories about stripping screws had me concerned..but I used pressure, care, and voila… success without heartache! I made a template to keep track of the screws and it was very helpful. I did note my mounting bracket was held on by Phillips #00…reattaching was the hardest part, but that could have to do with the fact that I am a disabled Vietnam Vet (yeah, do the math). Thank you so much.
Thank you very much for your work saving post. Had this completed in 17 minutes from start to finish.