crwdns2915892:0crwdne2915892:0
Use this guide to help you replace a damaged, broken, or faulty right fan.
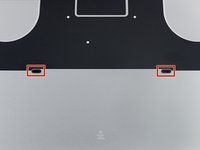
Note that the right fan is on the right of the machine while you're using it, and on the left while you're working on it.
crwdns2942213:0crwdne2942213:0
-
-
Remove the following P5 pentalobe screws securing the lower case to the MacBook Pro:
-
Eight 3.1 mm
-
Two 2.3 mm
 crwdns2952109:0crwdne2952109:0
-
-
-
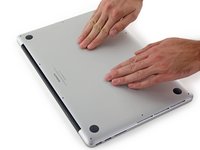
Lifting from the edge nearest the clutch cover, lift the lower case off the MacBook Pro.
-
-
-
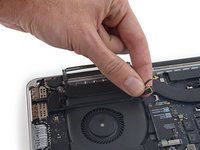
Peel back the sticker covering the battery connector.
-
-
-
Gently lift each side of the battery connector to pry the connector out of its socket on the logic board.
-
Bend the connector back toward the battery, ensuring that the battery connector doesn't accidentally make contact with the logic board.
-
-
crwdns2935267:0crwdne2935267:0Tweezers$4.99
-
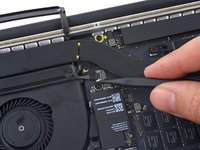
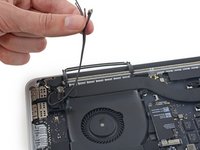
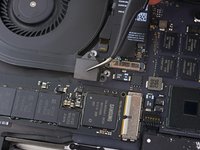
Use a spudger or tweezers to pry the three AirPort antenna cables straight up off of their sockets on the AirPort board, and bend them up and out of the way.
-
-
-
-
Peel the right rubber cover up off the fan and fold it out of the way.
-
-
-
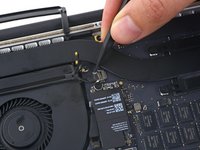
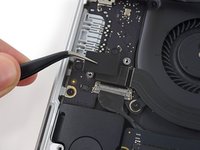
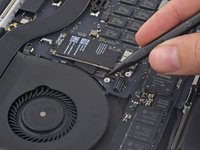
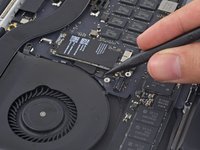
Use the tip of a spudger to push the camera cable connector out of its socket on the logic board.
-
-
-
Use your fingers to pull the AirPort/Camera cables up off the fan.
-
Carefully de-route the cables from the plastic cable guide.
-
-
-
Remove the four 2.2 mm T5 Torx screws securing the I/O board cable connector covers.
-
-
-
Remove the left connector cover.
-
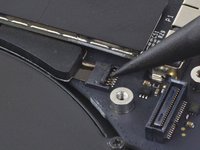
Use the flat end of a spudger to pry the left end of the I/O board cable up from its socket on the logic board.
-
-
-
Remove the right connector cover.
-
Use the flat end of a spudger to pry the right end of the I/O board cable up from its socket on the logic board.
-
-
-
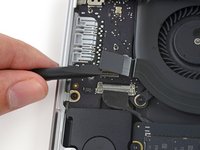
Peel the I/O board cable up from the adhesive securing it to the fan.
-
Remove the cable.
-
-
-
Use a T5 Torx driver to remove the following three screws securing the right fan to the logic board:
-
One 5.0 mm screw with a 2.0 mm long shoulder
-
One 4.0 mm screw with a wide head
-
One 4.4 mm screw
-
-
-
Use the tip of a spudger to flip up the retaining flap on the right fan ribbon cable ZIF socket.
-
-
-
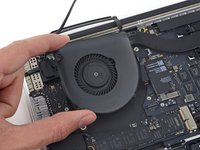
Lift the fan and push it gently towards the back edge of the MacBook to free the fan cable from its socket.
-
Remove the fan.
-


To reassemble your device, follow these instructions in reverse order.
crwdns2935221:0crwdne2935221:0
crwdns2935229:047crwdne2935229:0


crwdns2947412:07crwdne2947412:0
Great tutorial. I did not notice the screw length in the beginning. Thanks. :)
Strange noise came out of my mac. I found a screw on my right fan fell off and got stuck in the right fan.
James Bond - crwdns2934203:0crwdne2934203:0 crwdns2950251:0crwdne2950251:0
Complimenti davvero, una guida veramente ben fatta. Il mio mac ringrazia :)
Gianluca Bruno - crwdns2934203:0crwdne2934203:0 crwdns2950251:0crwdne2950251:0
completed my first mac repair ever, so excited.
Franklin Byaruhanga - crwdns2934203:0crwdne2934203:0 crwdns2950251:0crwdne2950251:0
I was hearing a strange buzzing / grinding noise coming from my right speaker. After ensuring it wasn’t the speakers, I realized it was the fan (would only start making the noise when the fans were kicking into high gear). I opened it up and found that one of the screws on the right fan wasn’t attached to the logic board: Step 14, top right screw (orange) attaches to a silver nut (?) which should be attached to the logic board. The adhesive that attaches the nut to the logic board had detached! Gotta find what type of adhesive I need to get for this, but putting this here for anyone with a similar problem.
Rachel - crwdns2934203:0crwdne2934203:0 crwdns2950251:0crwdne2950251:0
Thank you so much - I used this to access and clean (but not replace) the fan.
CCC - crwdns2934203:0crwdne2934203:0 crwdns2950251:0crwdne2950251:0