crwdns2933423:0crwdne2933423:0

crwdns2931315:0crwdnd2931315:0crwdne2931315:0

crwdns2942213:0crwdne2942213:0

  1. crwdns2935201:0crwdne2935201:0 crwdns2935203:0crwdne2935203:0

    : crwdns2935265:01crwdnd2935265:01crwdnd2935265:01crwdne2935265:0
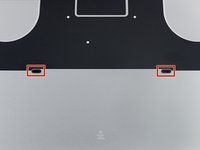
    • Remove the following P5 pentalobe screws securing the lower case to the MacBook Pro:

    • Eight 3.1 mm

    • Two 2.3 mm

  2. crwdns2935201:0crwdne2935201:0 crwdns2935203:0crwdne2935203:0

    : crwdns2935265:02crwdnd2935265:01crwdnd2935265:02crwdne2935265:0 : crwdns2935265:02crwdnd2935265:02crwdnd2935265:02crwdne2935265:0
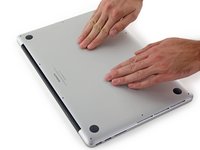
    • Lifting from the edge nearest the clutch cover, lift the lower case off the MacBook Pro.

  3. crwdns2935201:0crwdne2935201:0 crwdns2935203:0crwdne2935203:0

    : crwdns2935265:03crwdnd2935265:01crwdnd2935265:03crwdne2935265:0 : crwdns2935265:03crwdnd2935265:02crwdnd2935265:03crwdne2935265:0 : crwdns2935265:03crwdnd2935265:03crwdnd2935265:03crwdne2935265:0
    • The lower case has two plastic pegs (red) that fit into plastic clips in the upper case (orange).

    • During reassembly, gently push down the center of the lower case to reattach the case to its two plastic clips.

  4. crwdns2935201:0crwdne2935201:0 crwdns2935203:0crwdne2935203:0

    : crwdns2935265:04crwdnd2935265:01crwdnd2935265:01crwdne2935265:0
    • Peel back the sticker covering the battery connector.

  5. crwdns2935201:0crwdne2935201:0 crwdns2935203:0crwdne2935203:0

    : crwdns2935265:05crwdnd2935265:01crwdnd2935265:03crwdne2935265:0 : crwdns2935265:05crwdnd2935265:02crwdnd2935265:03crwdne2935265:0 : crwdns2935265:05crwdnd2935265:03crwdnd2935265:03crwdne2935265:0
    • Gently lift each side of the battery connector to pry the connector out of its socket on the logic board.

    • Bend the connector back toward the battery, ensuring that the battery connector doesn't accidentally make contact with the logic board.

  6. crwdns2935201:0crwdne2935201:0 crwdns2935203:0crwdne2935203:0

    : crwdns2935265:06crwdnd2935265:01crwdnd2935265:02crwdne2935265:0 : crwdns2935265:06crwdnd2935265:02crwdnd2935265:02crwdne2935265:0
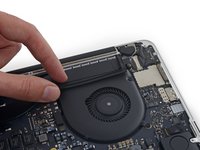
    • Peel the left rubber cover up off the fan and fold it out of the way.

  7. crwdns2935201:0crwdne2935201:0 crwdns2935203:0crwdne2935203:0

    : crwdns2935265:07crwdnd2935265:01crwdnd2935265:01crwdne2935265:0
    • Remove the following three screws securing the left fan to the logic board:

    • One 3.6 mm T5 Torx screw with a wide head

    • One 5.0 mm T5 Torx screw with a 2.0 mm long shoulder

    • One 4.4 mm T5 Torx screw

  8. crwdns2935201:0crwdne2935201:0 crwdns2935203:0crwdne2935203:0

    : crwdns2935265:08crwdnd2935265:01crwdnd2935265:02crwdne2935265:0 : crwdns2935265:08crwdnd2935265:02crwdnd2935265:02crwdne2935265:0
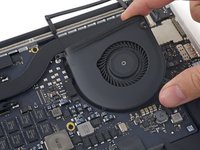
    • Use the tip of a spudger to flip up the retaining flap on the left fan ribbon cable ZIF socket.

    • Be sure you are prying up on the hinged retaining flap, not the socket itself.

  9. crwdns2935201:0crwdne2935201:0 crwdns2935203:0crwdne2935203:0

    : crwdns2935265:09crwdnd2935265:01crwdnd2935265:02crwdne2935265:0 : crwdns2935265:09crwdnd2935265:02crwdnd2935265:02crwdne2935265:0
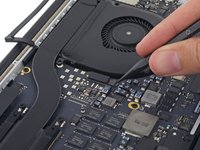
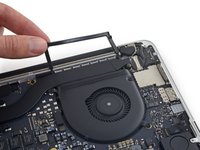
    • Lift the fan and push it gently towards the back edge of the MacBook to free the fan cable from its socket.

    • The fan cable may be adhered to the logic board—to avoid tearing the cable, gently peel it up while lifting the fan.

    • Remove the fan.

crwdns2935217:0crwdne2935217:0

crwdns2935229:047crwdne2935229:0

Andrew Optimus Goldheart

crwdns2935283:010/17/09crwdne2935283:0

502.855 crwdns2915208:0crwdne2915208:0

crwdns2935297:0407crwdne2935297:0

crwdns2915084:0crwdne2915084:0

iFixit crwdns2935289:0iFixitcrwdne2935289:0

Staff

crwdns2931471:0135crwdne2931471:0

crwdns2935297:016.817crwdne2935297:0

crwdns2944067:02crwdne2944067:0

First repair job. After 5 years of use my laptop was getting heated quicker than the oven and making that antique modem noises. With 2 screwdrivers and a plastic card to pry the connectors cleaned all the dust inside the case and the fans following the fan replacement guides without any trouble. Huge thanks to Andrew for this very detailed page! Btw, if you intent to reuse the fans, be careful with the connector cables. They are not flexible, they bent easily and might break.

Furkan Karagöz - crwdns2934203:0crwdne2934203:0

Thank you so much - I used this to access and clean (but not replace) the fan.

CCC - crwdns2934203:0crwdne2934203:0

crwdns2917038:0crwdne2917038:0

crwdns2936625:0crwdne2936625:0:

crwdns2936751:024crwdne2936751:0 5

crwdns2936753:07crwdne2936753:0 27

crwdns2936753:030crwdne2936753:0 158

crwdns2942667:0crwdne2942667:0 32,025