crwdns2915892:0crwdne2915892:0
Use this guide to replace a broken or noisy left fan in your MacBook Pro 15" Retina Display Early 2013. This is the guide to remove the fan on the left side of the computer when it is open and in use.
crwdns2942213:0crwdne2942213:0
-
-
Remove the following P5 pentalobe screws securing the lower case to the MacBook Pro:
-
Eight 3.0 mm
-
Two 2.3 mm
-
-
-
Lifting from the edge nearest the clutch cover, lift the lower case off the MacBook Pro.
-
Set the lower case aside.
-
-
-
Peel back the warning label covering the battery connector.
-
-
-
-
Using the flat end of a spudger, gently pry the battery connector straight up out of its socket on the logic board.
-
Bend the battery cables back and out of the way, ensuring that the battery connector doesn't accidentally make contact with the logic board.
-
-
-
Use the flat end of a spudger to lift the rubber heat sink cover up off the left fan.
-
-
-
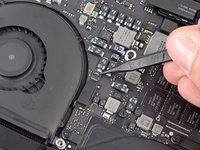
Remove the following three screws securing the left fan to the logic board:
-
One 4.4 mm T5 Torx screw with 2 mm collar
-
One 5.0 mm T5 Torx screw with 2 mm collar
-
One 3.9 mm T5 Wide Head Torx screw
-
-
-
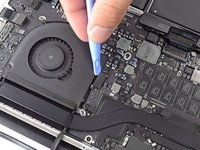
Use the tip of a spudger to flip up the retaining flap on the left fan ribbon cable ZIF socket.
-
Starting at the top of the cable, slide a plastic opening tool under the left fan cable to free it from the logic board.
-
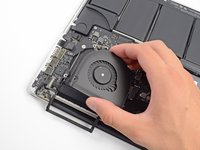
Lift the left fan out of the device.
-


To reassemble your device, follow these instructions in reverse order.
To reassemble your device, follow these instructions in reverse order.
crwdns2935221:0crwdne2935221:0
crwdns2935229:034crwdne2935229:0


crwdns2947412:02crwdne2947412:0
Regarding step 7 my experience was different than the procedure described. My fan ribbon cable was not glued down at all and the cable simply slid out of the socket towards the rear of the computer and the new one slid in.
awesome guide. i skipped steps 3-4. prior to placing the back cover on, i tilted the mac on its side and powered up to see if the fan worked, it did. powered down, screwed the cover back on and good to go. took about 20 minutes.