crwdns2915892:0crwdne2915892:0
Laptop take a tumble? Having trouble seeing through a jungle of cracks in your screen? Use this guide to replace your display assembly.
crwdns2942213:0crwdne2942213:0
-
-
Remove the following P5 pentalobe screws securing the lower case to the MacBook Pro:
-
Eight 3.0 mm
-
Two 2.3 mm
-
-
-
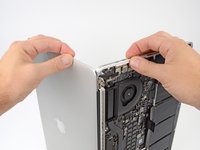
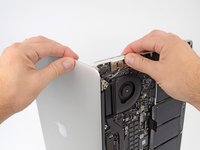
Lifting from the edge nearest the clutch cover, lift the lower case off the MacBook Pro.
-
Set the lower case aside.
-
-
-
Peel back the warning label covering the battery connector.
-
-
-
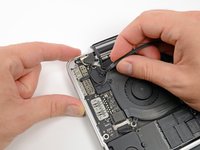
Using the flat end of a spudger, gently pry the battery connector straight up out of its socket on the logic board.
-
Bend the battery cables back and out of the way, ensuring that the battery connector doesn't accidentally make contact with the logic board.
-
-
crwdns2935267:0crwdne2935267:0Tweezers$4.99
-
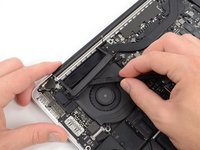
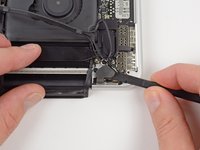
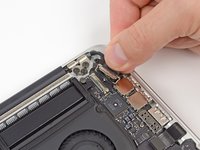
Use a spudger or tweezers to pry the three AirPort antenna cables straight up off of their sockets on the AirPort board.
-
-
-
-
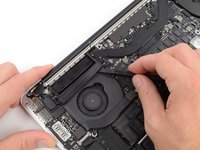
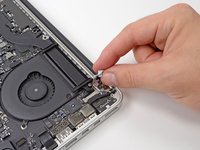
Use the tip of a spudger to push the camera cable's plug toward the fan and out of its socket on the logic board.
-
-
-
Insert the flat end of a spudger underneath the rubber heat sink cover on the right fan.
-
Slide the spudger underneath the length of the cover, releasing the adhesive.
-
Lift the cover and flip it back so that you can access the cables underneath.
-
-
-
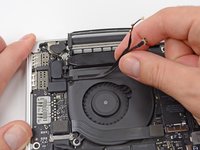
Use your fingers to pull the AirPort/Camera cables up off the fan.
-
Carefully de-route the cables from the plastic cable guide.
-
-
-
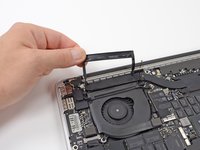
Use the flat end of a spudger to pry off the two rubber hinge covers, one from each end of the device.
-
-
-
Remove the two 3.1 mm T5 Torx screws securing the aluminum hinge covers to the upper case.
-
Remove the two aluminum hinge brackets from the MacBook Pro.
-
-
-
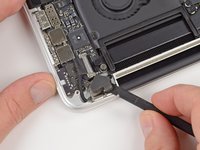
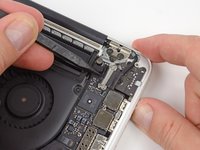
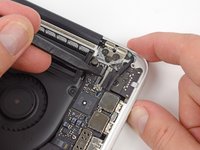
Use the tip of a spudger to pry the display data cable lock and rotate it toward the DC-In side of the computer.
-
Pull the display data cable straight out of its socket on the logic board.
-
-
-
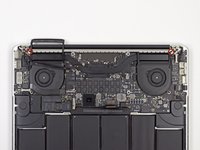
Remove four out of the six 5.3 mm T8 Torx screws securing the display to the upper case.
-
-
-
Open the MacBook Pro approximately 110 degrees, and place it sideways on the table, as shown.
-
While holding the display and upper case together with your left hand, remove the remaining T8 Torx screw from the lower (closer to the table) display bracket.
-
-
-
While holding the display and upper case together with your left hand, remove the remaining T8 Torx screw from the upper display bracket.
-
-
-
Grip both halves of the device, one in each hand.
-
Gently push forward on the bottom half of the device to detach it from the display assembly.
-
Carefully set each component aside, making sure to set down the lower half keyboard-side down.
-


To reassemble your device, follow these instructions in reverse order.
crwdns2935221:0crwdne2935221:0
crwdns2935229:082crwdne2935229:0


crwdns2947412:013crwdne2947412:0
Do yourself a favor and order the tools along with your display. I made the mistake thinking the bottom case was a standard torx and was surprised. The tools were not available in the local stores. I ended up ordering all the tools by clicking on the link where you goto order the display where it adds all of them to the cart. The tools are high quality and include the convenient finger tip end that allows the screw to be turned while keeping the screw steady and pointed in the correct angle. I am very happy with the tools and the display. I broke my screen when it dropped 2 feet from a chair to a carpeted floor and broke the bottom left corner 2 months after the retina first came out. It was fine except the screen was black till midway between the apple menu icon and the first pull down menu in apps until the display started to flicker lately and turn all white periodically.
Is the T8 Torx Screwdriver absolutely required or can I make do with just the T5 Torx driver?
One other comment on the re-assembly. You can keep the three hinge screws loose and run your fingers down the seams on the two sides and front to align the display before tightening.
You'll need a T4 as well to get the little brackets beside the display brackets... can't remove the screen with them on.
How about replacing only the lcd/screen, not the entire display - is there a guide for that? How difficult is it?