crwdns2933423:0crwdne2933423:0

MacBook Pro 15" Core 2 Duo Models A1226 and A1260 Dual Hard Drive Replacement

crwdns2862623:0crwdne2862623:0
crwdns2942641:0crwdne2942641:0

crwdns2942213:0crwdne2942213:0

  1. MacBook Pro 15" Core 2 Duo Models A1226 and A1260 Dual Hard Drive Replacement, Dual Hard Drive: crwdns2935265:01crwdnd2935265:01crwdnd2935265:02crwdne2935265:0 MacBook Pro 15" Core 2 Duo Models A1226 and A1260 Dual Hard Drive Replacement, Dual Hard Drive: crwdns2935265:01crwdnd2935265:02crwdnd2935265:02crwdne2935265:0
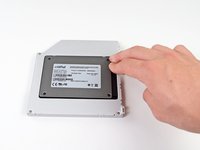
    • Remove the plastic spacer from the optical bay hard drive enclosure by pressing in on one of the clips on either side and lifting it up and out of the enclosure.

  2. MacBook Pro 15" Core 2 Duo Models A1226 and A1260 Dual Hard Drive Replacement: crwdns2935265:02crwdnd2935265:01crwdnd2935265:03crwdne2935265:0 MacBook Pro 15" Core 2 Duo Models A1226 and A1260 Dual Hard Drive Replacement: crwdns2935265:02crwdnd2935265:02crwdnd2935265:03crwdne2935265:0 MacBook Pro 15" Core 2 Duo Models A1226 and A1260 Dual Hard Drive Replacement: crwdns2935265:02crwdnd2935265:03crwdnd2935265:03crwdne2935265:0
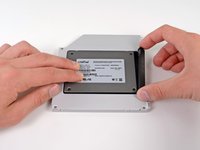
    • Make sure that the hard drive connectors are facing down before placing it into the enclosure.

    • Gently place the hard drive into the enclosure's hard drive slot.

  3. MacBook Pro 15" Core 2 Duo Models A1226 and A1260 Dual Hard Drive Replacement: crwdns2935265:03crwdnd2935265:01crwdnd2935265:02crwdne2935265:0 MacBook Pro 15" Core 2 Duo Models A1226 and A1260 Dual Hard Drive Replacement: crwdns2935265:03crwdnd2935265:02crwdnd2935265:02crwdne2935265:0
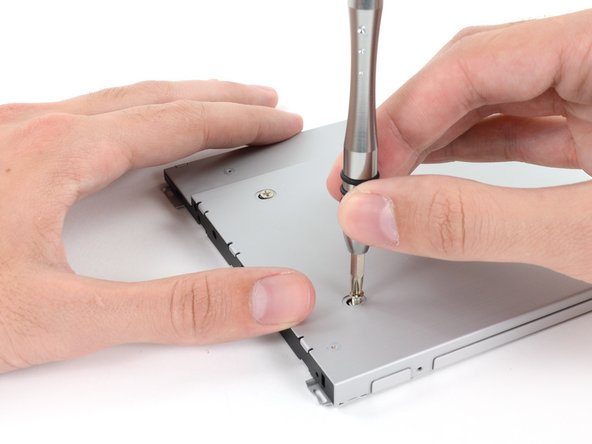
    • Once the hard drive is snug, reinsert the plastic spacer while holding the hard drive against the bottom of the enclosure.

  4. MacBook Pro 15" Core 2 Duo Models A1226 and A1260 Dual Hard Drive Replacement: crwdns2935265:04crwdnd2935265:01crwdnd2935265:02crwdne2935265:0 MacBook Pro 15" Core 2 Duo Models A1226 and A1260 Dual Hard Drive Replacement: crwdns2935265:04crwdnd2935265:02crwdnd2935265:02crwdne2935265:0
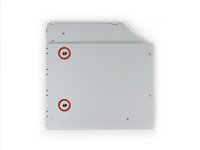
    • Use two Phillips #1 screws to secure the drive to its enclosure.

    • Transfer all brackets and the optical cables from the drive you're removing onto the new enclosure, and reverse the procedure to install the enclosure in your MacBook Pro.

crwdns2915888:0crwdne2915888:0

To reassemble your device, follow these instructions in reverse order.

Andrew Optimus Goldheart

crwdns2935283:010/17/09crwdne2935283:0

502,710 crwdns2915208:0crwdne2915208:0

crwdns2935297:0407crwdne2935297:0

crwdns2915084:0crwdne2915084:0

iFixit crwdns2935289:0iFixitcrwdne2935289:0

Staff

crwdns2931471:0135crwdne2931471:0

crwdns2935297:016,731crwdne2935297:0

crwdns2944067:00crwdne2944067:0

crwdns2917038:0crwdne2917038:0

crwdns2936625:0crwdne2936625:0:

crwdns2936751:024crwdne2936751:0 0

crwdns2936753:07crwdne2936753:0 0

crwdns2936753:030crwdne2936753:0 0

crwdns2942667:0crwdne2942667:0 76