crwdns2915892:0crwdne2915892:0
Use this guide to replace a broken trackpad.
crwdns2942213:0crwdne2942213:0
-
-
Remove the following ten screws:
-
Three 14.4 mm Phillips #00 screws
-
Three 3.5 mm Phillips #00 screws
-
Four 3.5 mm shouldered Phillips #00 screws
-
-
-
Use your fingers to pry the lower case away from the body of the MacBook near the vent.
-
Remove the lower case.
-
-
-
Use the edge of a spudger to pry the battery connector upwards from its socket on the logic board.
-
-
-
Bend the battery cable slightly away from its socket on the logic board so it does not accidentally connect itself while you work.
-
-
-
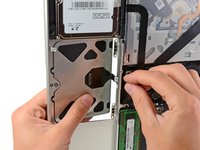
Remove the following two screws:
-
One 5.6 mm Tri-point screw
-
One 13 mm Tri-point screw
-
-
-
-
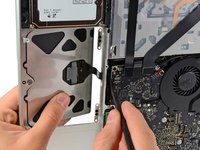
Carefully peel the battery warning label off the upper case between the battery and the optical drive.
-
-
-
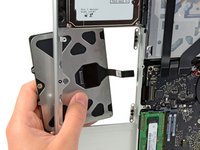
Use the attached plastic pull tab to remove the battery from the upper case.
-
Charge it to 100%, and then keep charging it for at least 2 more hours. Next, unplug and use it normally to drain the battery. When you see the low battery warning, save your work, and keep your laptop on until it goes to sleep due to low battery. Wait at least 5 hours, then charge your laptop uninterrupted to 100%.
-
If you notice any unusual behavior or problems after installing your new battery, you may need to reset your MacBook's SMC.
-
-
-
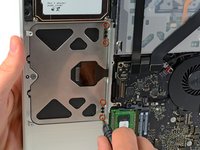
Use the flat end of a spudger to carefully pry the trackpad connector up from its socket on the logic board.
-
-
-
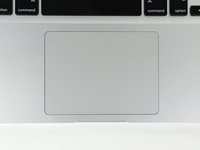
Open your MacBook Pro and set it on a table as shown.
-
-
-
While holding the edge of the trackpad closest to the logic board with one hand, remove the four 1.2 mm Phillips screws highlighted in red.
-
-
-
If necessary, carefully dislodge the edge of the trackpad closest to the keyboard from its recess in the upper case by pushing it away from the brackets attached to the upper case.
-
Carefully push the trackpad connector and cable down through the slot cut into the upper case.
-
It may be necessary to use a spudger to help get the trackpad connector past the edge of the logic board.
-
Once the cable has been completely pulled through its slot in the upper case, pull the trackpad away from the outer edge of the upper case and remove it from the machine.
-
-
-
To remove the flex cable from the old trackpad, first flip open the latch on the ZIF connector, opposite the cable. Then, apply a little heat from a hair dryer or iOpener to soften the adhesive securing the cable to the trackpad, and carefully peel off and remove the cable.
-
-
-
Next, reinstall the four 1.2 mm Phillips screws along the inner edge of the trackpad.
-
Check the alignment of the trackpad on the keyboard side of the upper case. Once you have centered the trackpad in the upper case, tighten the four Phillips screws all the way.
-


To reassemble your device, follow these instructions in reverse order.
To reassemble your device, follow these instructions in reverse order.
crwdns2935221:0crwdne2935221:0
crwdns2935229:0217crwdne2935229:0

crwdns2947412:012crwdne2947412:0
I have a sensitivity problem with my new just installed Trackpad. Click works fine but the trackpad doesn't detect fingers the way it used to. For example if u use the tip of the finger (not the nail obviously) the arrow doesn't move at all but it works if u use the "fingerprint" part of the finger (flatter part). Any suggestions?
You probably need to slightly loosen the screw in that little triangle shaped groove by the bottom center of the trackpad. That will lessen restriction on the pressure sensor's range of movement so that it can detect slight touches.
Easy to follow, excellent instructions and photos. Apple considers this repair too difficult for the end user. The only thing that is difficult about it is having the right tools. Other than that, just focus. It took me maybe 30 minutes with the trackpad centering being the most time-consuming problem.
Great directions and very useful site! No surprises for this installation. Thanks!
The hex screw towards the bottom of the trackpad adjusts the sensitivity and “click” of the trackpad. This might need adjusting after installation.