crwdns2933423:0crwdne2933423:0

MacBook Pro 13" Unibody Mid 2012 Fan Replacement

crwdns2942213:0crwdne2942213:0

  1. MacBook Pro 13" Unibody Mid 2012 Fan Replacement, Lower Case: crwdns2935265:01crwdnd2935265:01crwdnd2935265:01crwdne2935265:0
    • Remove the following ten screws:

    • Three 14.4 mm Phillips #00 screws

    • Three 3.5 mm Phillips #00 screws

    • Four 3.5 mm shouldered Phillips #00 screws

    • When replacing the small screws, align them perpendicular to the slight curvature of the case (they don't go straight down).

    How much weight can I save by removing the optical drive?

    gunes314 - crwdns2934203:0crwdne2934203:0

    You can save a lot of weight if lets say your installing a solid state drive or putting in a second hard drive but if you know that you use the CD/DVD disc drive a lot then you might just want to leave the drive alone.

    Marshall WahlstromHelgren -

    Tip: Use one of those weekday pill holders to have a cheep way to store screws you remove and each day of the week can be for different sizes or parts. It has been handy to have (much less expensive than the magnetic mat.

    Robert Wacker - crwdns2934203:0crwdne2934203:0

    Hello, where can I buy the screws I need in case I lose one of them?

    taylornya - crwdns2934203:0crwdne2934203:0

    I have one stripped screw... How opening without drill it?! Any suggestions please?

    rodrigosady - crwdns2934203:0crwdne2934203:0

    I also stripped a couple screws. I wasn’t able to open it up without drilling. After drilling the heads and removing the cover it was easy to hacksaw the tip and unscrew with a standard driver.

    Michael Wilkens -

    My top tip - make sure you buy good quality Phillips screwdrivers and a magnetic holder. Cheap screwdrivers won’t get the screws undone safely. Without a magnetic holder you have no chance of getting the tiny crews in and out safely.

    jeremyyoung - crwdns2934203:0crwdne2934203:0

    A good Phillips 00 is your friend here. Also, when reinserting the screws, gently start anticlockwise and you wil feel a click at the start of the thread. This tells you you’re in the right place and less likely to cross-thread through force in the wrong place.

    Iain Boyd - crwdns2934203:0crwdne2934203:0

    I feel like these are 000 screws. Amazon sales describe them as such and my 000 screwdriver fits better

    cam2000deluxe -

    Before ordering a new Trackpad remove the existing battery and try clicking the Trackpad. If it clicks OK with the battery out the source of problem is likely a swollen battery, which should to be replaced even if it still works to some degree. From the side of the battery you will likely see the soft part of the battery bulging beyond the hard case.

    Patrick Langvardt - crwdns2934203:0crwdne2934203:0

    That’s absolutely correct as I can testify. With the battery removed I also adjusted the T6 set screw that adjusts the sensitivity of the trackpad click, evidently someone had cranked mine down tighter than the factory setting.

    Gary Register -

    Le quatrième paragraphe dans les instructions en français n’est pas correct : ce ne sont pas les 2 petites vis, mais les 7 petites vis qui sont inclinées. Et les 3 grandes sont bien verticales.

    Degeorges - crwdns2934203:0crwdne2934203:0

    Bonjour ! Merci de votre observation. J’ai corrigé la traduction. iFixit étant un wiki, n’hésitez pas à modifiez si vous remarquez une erreur :) Encore merci de votre attention et à bientôt !

    Claire Miesch -

    Tip: if you have a magnetic screw mat or similar, lay the macbook over the mat to make sure it catches any screws that may decide to fall of and hide under your table

    Moritz - crwdns2934203:0crwdne2934203:0

    Funny, it's not her hands that are doing the close ups. :)

    Cinemated Man - crwdns2934203:0crwdne2934203:0

    What's the difference between the shouldered and non shouldered screws? They look exactly the same to me.

    MLNLRD - crwdns2934203:0crwdne2934203:0

  2. MacBook Pro 13" Unibody Mid 2012 Fan Replacement: crwdns2935265:02crwdnd2935265:01crwdnd2935265:02crwdne2935265:0 MacBook Pro 13" Unibody Mid 2012 Fan Replacement: crwdns2935265:02crwdnd2935265:02crwdnd2935265:02crwdne2935265:0
    • Use your fingers to pry the lower case away from the body of the MacBook near the vent.

    • Remove the lower case.

  3. MacBook Pro 13" Unibody Mid 2012 Fan Replacement, Battery Connection: crwdns2935265:03crwdnd2935265:01crwdnd2935265:02crwdne2935265:0 MacBook Pro 13" Unibody Mid 2012 Fan Replacement, Battery Connection: crwdns2935265:03crwdnd2935265:02crwdnd2935265:02crwdne2935265:0
    • Use the edge of a spudger to pry the battery connector upwards from its socket on the logic board.

    • It is useful to pry upward on both short sides of the connector to "walk" it out of its socket. Be careful with the corners of the connectors, they can be easily broken off.

    Is this step of removing the battery connector required?

    manodh - crwdns2934203:0crwdne2934203:0

    yes - as with disassembly of any electronic component you have to remove any power source. You don't want to accidentally turn the Mac on

    khull -

    Prying the battery connector off does not take much force. I did exactly what the guide suggested (walked it off back and forth) with the spudger without any problems. Just be very gentle, much like with anything inside laptops, they are very fragile and need to be worked with carefully. A+ instructions, battery replacement was a success.

    aekinaka - crwdns2934203:0crwdne2934203:0

    Be patient on disconnecting this one. It worked for me step by step, little by little.

    Phil Wagner - crwdns2934203:0crwdne2934203:0

    I used the nails of thumb and pointer finger simultaneously - worked pretty fine

    Reinhard Kaune - crwdns2934203:0crwdne2934203:0

    I whittled down ends of two wooden strips to use, along with my fingernails to start with. I used halves of a wooden clothespin, but popsicle sticks should work too.

    Mike Baker - crwdns2934203:0crwdne2934203:0

  4. MacBook Pro 13" Unibody Mid 2012 Fan Replacement: crwdns2935265:04crwdnd2935265:01crwdnd2935265:01crwdne2935265:0
    • Bend the battery cable slightly away from its socket on the logic board so it does not accidentally connect itself while you work.

    I put some tape between the connector and socket while working on the drive.

    Stephen Smith - crwdns2934203:0crwdne2934203:0

    That's a good tip

    Anrothan -

    Great tip, I did that too

    Ahmed Mahran -

    One other note: The screw heads fit flush with the curvature of the case -- which means that they aren't exactly horizontal. In other words, they aren't perpendicular to the table that the computer is resting on. Don't try to force them straight in vertically, because you'll risk cross-threading them. (nearly ruined one screw hole myself!)

    lelandjordon - crwdns2934203:0crwdne2934203:0

    On my MacBook Pro, the connector seems to be an integral part of the battery.

    Jerry South - crwdns2934203:0crwdne2934203:0

    I suspect it’s just like the special screwdriver required for seatbelts on cars – to discourage regular consumers from attempting repairs. Of course, this only encourages consumers to use the wrong tool to attempt to repairs

    colleenthompson - crwdns2934203:0crwdne2934203:0

    Dissambling my MacBookPro Premium Mid 2012 (i5-3210M 2.5Ghz) was easily, Careful with the screws, use screwdriver fitting exactly with the screws, you damage them very fast. Work very exactly, relaxed with time, consentration, good Tools and with feelings in your hands. Disconnect the Akku was easy if you take care, remove it to be safe, Two screws more, more space to work & haven`t to think about damaging someting. Apple use diffrent screws, you should have many difffrent scewdrivers. It is also good to clean everything inside, With time everything gets very dusty & dirty, don`t forget the sides and little fittings at the case. Use a pinsel, alcohol, soft peace stuff, it will look like new. If you have knowledge & experience, you can paint it in any colour or airbrushing for individualizing. You can also just polish it with a soft Politure (Sonax car Polish No1, NOT with wax or take an other light Politure you familiar & can do the job, A Laptop should serviced once a year, keeping it good working over years

    Stefan Lindner - crwdns2934203:0crwdne2934203:0

    First thing i do is open & cleanig everything inside,specially the cooling & fan, renew the thermal paste with an high quality product. Install the Nain System, clean up Bloatware and other unnecessary things, install standard software for daily use, additional change system components against better one (Edge to Firefox, Windows Media Player to VLC , an Office Suite and configuring everything for Data Protection, Privacy- & Indentety Protection, install Drivers from the component Manufactur (incedible effect, disable limitations, more functions, work better & faster, increasing performance, additional change the WiFi & Bluetooth Card to a better one a UMTS WWAN to an LTE Card, increase RAM with two Dual-Channel working SODIMMs, Use M2 or 2,5" SSD if no M2 Slot aviable) as System- and Software iDrive, a FAT32 formatted 32GB Partition to be safe of metaviruses comes with harmless downloads, and a big 2,5 HDD to store the user data. What does you guys think about this? Old Computer become a new life,

    Stefan Lindner - crwdns2934203:0crwdne2934203:0

    I livein Austria, near Vienna, if someone needs help or anything else, i would be glad to help. I always searching old or broken devices to bring them to new live. I also searching for spare parts, specilly a Bottom & Side Case and a 256GB or higher NGFF Storage Card for a Sony Vaio Tab 11 SVT1144HE (2014), some 14,1" Displays for a HP Probook 440G5 (2016), Elitebook MT 43 Mobile Thin Client, (2011), Dell Vostro 3460 (2012) Lenovo Thinkpad T440s (2014), and a Logic Board for an Lenovo Ideapad 330-15ARR (2017, damaged by Water i think) and a Logic Bord for an Alienware 17R4 with i7-6870HX & Nvidia 1080 (2018, CPU dead, maybe there is a repair Guide or workaround to bring it back to Life). I need always 8GB or 16GB DDR3 and DDR4 RAM Storage (perfectly two ident one for Dual-Channel use for Laptops, M2 SATA 6GB/s and NVMe PCIe SSDs 500GB or more and 2,5"SSD or HDD with 1TB or more and 3,5" HDD with 4GB or above. If you have some of this or other useful parts and doesn`t need them, please make me an offer, maybe

    2

    Stefan Lindner - crwdns2934203:0crwdne2934203:0

    an change something you need. This is not a Business what i do, it`s more a Hobby with challenging new Excercices.. Thats the best Point. Plase forgive me as a Newbie this very long Post in the wrong Section, but if you are start writing you cannot stop.... But now i have to come to an end and would be happy if someone wants to get in contact. My E-Mail is: udontknowme@gmx.at (the adress name is just a notice against Big Data and for Privacy Protection!

    Stefan Lindner - crwdns2934203:0crwdne2934203:0

  5. MacBook Pro 13" Unibody Mid 2012 Fan Replacement, Fan: crwdns2935265:05crwdnd2935265:01crwdnd2935265:03crwdne2935265:0 MacBook Pro 13" Unibody Mid 2012 Fan Replacement, Fan: crwdns2935265:05crwdnd2935265:02crwdnd2935265:03crwdne2935265:0 MacBook Pro 13" Unibody Mid 2012 Fan Replacement, Fan: crwdns2935265:05crwdnd2935265:03crwdnd2935265:03crwdne2935265:0
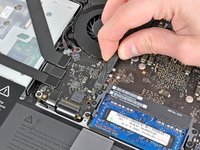
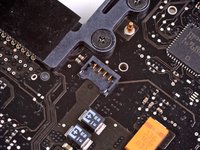
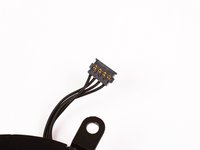
    • Use the edge of a spudger to gently pry the fan connector up and out of its socket on the logic board.

    • It is useful to twist the spudger axially from beneath the fan cable wires to release the connector.

    • The fan socket and the fan connector can be seen in the second and third pictures. Be careful not to break the plastic fan socket off the logic board as you use your spudger to lift the fan connector straight up and out of its socket. The layout of the logic board shown in the second picture may look slightly different than your machine but the fan socket is the same.

    I successfully soldered the fan connector back on for a friend. I used a small soldering iron (maybe 6-10 watts) and ground the tip down to a very fine point. Also used a magnifying light and very fine rosin core solder. I took my time and lined everything up and was careful not to heat any other junction unnecessarily.

    Scott Stanley - crwdns2934203:0crwdne2934203:0

    Yup. Be careful on this one. I was trying to gently pry up and popped it off the socket. Computer working fine after replacing magsafe board, but no fan for cooling…

    Thomas Carr - crwdns2934203:0crwdne2934203:0

    This one is really delicate, as pointed out.  Be careful if using the pointed end of a spudger NOT to dig down and under ….there’s a layer of plastic-y insulation that can be torn.  I accidentally gored it with the pointy end of a spudger and it was slightly ripped.  Fortunately, I was able to press it down and there was no problem when the cable was reinserted.

    Carolyn Ryan - crwdns2934203:0crwdne2934203:0

    For less than $16 I ordered a new fan from amazon. Fans eventually start making noise. If they fail, your system could expire from heat. Consider simply replacing your fan since this model is now about five years old. Here’s link:

    https://www.amazon.com/gp/product/B00FWP...

    airshack - crwdns2934203:0crwdne2934203:0

    I used a guitar pick and gently wiggled underneath to lift it up and out of the socket. no damage! woo hoo! on to step 7!

    jcundy2 - crwdns2934203:0crwdne2934203:0

    I simply skipped this step and left fan wire connected to logic board. Just unscrew screws from Step 6, put fan on the logic board and remove whole stuff togheter.

    paczor - crwdns2934203:0crwdne2934203:0

    Thanks, I did that too,,

    a lot easier

    Ahmed Mahran -

    sorry i dont understand what you did? could you please explain more detailed?

    Olivier -

    I would like to do the same thing too. I took the fan out of its socket but with the wire still attached to the logic board. How do you remove the wire from the fan and reattach the new fan to it?

    Can you please explain with a little bit more detail?

    Ifix2 -

    Yes, tricky. Insert the spudger just like in the photo. You won’t be able to dig it out out from any other side. Also, notice which side of the connector faces down into the socket: it is the side without the four shiny gold areas (again, just like in the photo).

    rmccord23 - crwdns2934203:0crwdne2934203:0

    I used a really thin, plastic spudger gently inserting from each side on mid-2012 and then very gently twisting the spudger. It worked fine without tearing or damaging anything. When reinstalling the connector, do not forget to twist it 180 degrees so that the open side of the connector is facing down to insert properly for seating.

    Gary Renick - crwdns2934203:0crwdne2934203:0

  6. MacBook Pro 13" Unibody Mid 2012 Fan Replacement: crwdns2935265:06crwdnd2935265:01crwdnd2935265:01crwdne2935265:0
    • Remove the following three screws securing the fan to the logic board:

    • One 7.2 mm T6 Torx screw

    • Two 5.3 mm T6 Torx screws

    I think so too, (maybe on a certain batch?) tried a T6 and its too big

    billytalentlovexo -

    I wasn’t able to open mine up. The heads looked like little triangles instead of hex torqx things. Is there a chart with the head shape of all the bits you can buy? I want to just get the one.

    Christopher Roode - crwdns2934203:0crwdne2934203:0

    They might be tri point

    Daniele Carminati -

    T5 for me, my MBP was manufactured in 2015.

    colleenthompson - crwdns2934203:0crwdne2934203:0

    When seating the fan, be aware that the cutout on the fan for the wire harness may not match up with the cutout on the board itself. Line the wires up to the board and then seat the fan in an incremental manner - gently pushing at each connecting hole. Then put the screws in without tightening at first. Once all of the screws are seated, then sequentially snug them up. Finally, push down gently on the fan and snug up each screw without over tightening. I found that the fan seats a tad further and I wanted to avoid future rattles. DO NOT OVERTIGHTEN THOUGH.

    Gary Renick - crwdns2934203:0crwdne2934203:0

  7. MacBook Pro 13" Unibody Mid 2012 Fan Replacement: crwdns2935265:07crwdnd2935265:01crwdnd2935265:01crwdne2935265:0
    • Lift the fan out of its recess in the logic board, minding its cable that may get caught.

    Note that, as per the photo, the fan goes in label side DOWN. Took me a few minutes to figure that out!

    colleenthompson - crwdns2934203:0crwdne2934203:0

    Before reinstalling the new fan and for novices like me, do not forget to have a can of compressed on hand to clear out years of dust, fine fibers, and maybe even a cat hair from the fins blowing outward. Do not shake the bottle and hold it upright, and use small squirts of air.

    Gary Renick - crwdns2934203:0crwdne2934203:0

crwdns2915888:0crwdne2915888:0

To reassemble your device, follow these instructions in reverse order.

crwdns2935229:0173crwdne2935229:0

Andrew Optimus Goldheart

crwdns2935283:010/17/09crwdne2935283:0

502.275 crwdns2915208:0crwdne2915208:0

crwdns2935297:0407crwdne2935297:0

crwdns2915084:0crwdne2915084:0

iFixit crwdns2935289:0iFixitcrwdne2935289:0

Staff

crwdns2931471:0136crwdne2931471:0

crwdns2935297:016.562crwdne2935297:0

crwdns2944067:07crwdne2944067:0

Repair done as presented. The fan connection was a little tricky to get out but apart from that non eventful. New fan working nicely.

Paul Lukabyo - crwdns2934203:0crwdne2934203:0

Hi! Thank you for very understandable and good guides!

After successfully changing the fan and battery in my Mac, the screen light changes from time to time, sometimes it is more yellow and sometimes it is more blue. Have I accidentally changed some cable, or what it is that could have happened?

Many thanks,

Maja

Maja - crwdns2934203:0crwdne2934203:0

You described the colors very well, and that leads me to believe that your display preferences in the System Preferences Control Panel may simply have switched to automatic. It changes the hues to what they think are easier on the eyes for day and night. Go to

“Apple Menu”

“System Preferences” (it’s also in the Dock by default)

“Displays”

“Night Shift”

and adjust it the way you like. BTW, if it seems to be happening at times other than Sunrise and Sunset, make sure the Time Zone is set for your local area and proper Daylight Savings (if applicable) or Standard Time.

Good Luck,

Beowulf

Beowulf Grendel -

my fan wont work with the back cover installed, i replaced, and again it doesnt stay working, if i tap the case sometimes it starts when using macs fan control full blast

A S - crwdns2934203:0crwdne2934203:0

Easier than I thought. Thanks. Red screw circles too close to orange (viewing on my iPhone) and fan connector orientation was tricky, but other than that it was a breeze.

Paul Rogati - crwdns2934203:0crwdne2934203:0

Excelente explicación, todo funciona perfecto ahora

Victor Leon - crwdns2934203:0crwdne2934203:0

crwdns2917038:0crwdne2917038:0

crwdns2936625:0crwdne2936625:0:

crwdns2936751:024crwdne2936751:0 11

crwdns2936753:07crwdne2936753:0 56

crwdns2936753:030crwdne2936753:0 269

crwdns2942667:0crwdne2942667:0 90,992