crwdns2915892:0crwdne2915892:0
Follow this guide to replace or upgrade the hard drive in your MacBook Prop 13" 2010.
Remember to copy all of your data from the old hard drive to the new hard drive if necessary.
crwdns2942213:0crwdne2942213:0
-
-
Remove the following 10 screws securing the lower case to the MacBook Pro 13" Unibody:
-
Seven 3 mm Phillips screws.
-
Three 13.5 mm Phillips screws.
-
-
-
Slightly lift the lower case and push it toward the rear of the computer to free the mounting tabs.
-
-
-
Use the flat end of a spudger to lift the battery connector up out of its socket on the logic board.
-
-
-
-
Remove two Phillips screws securing the hard drive bracket to the upper case.
-
-
-
Lift the the retaining bracket out of the upper case.
-
-
-
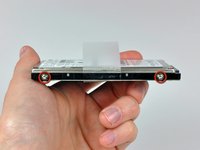
Lift the hard drive by its pull tab and pull it out of the chassis, minding the cable attaching it to the computer.
-
-
-
Remove the hard drive cable by pulling its connector straight away from the hard drive.
-
-
-
Remove the two T6 Torx screws from each side of the hard drive (four screws total).
-


To reassemble your device, follow these instructions in reverse order.
crwdns2935221:0crwdne2935221:0
crwdns2935229:0526crwdne2935229:0

crwdns2947412:015crwdne2947412:0
THANK YOU! I'm still on a high from repairing my husband's Macbook. It feels so nice to have two computers up and running again. You saved me nearly a grand, and made me realize how much I really did learn as a kid building PC towers with my dad.
Hi, I got the 1TB SSD Hybrid you have listed above. Regardless of what I try, my computer does not recognize it. It sees the 32GB flash drive I used for an install disk and it sees my USB external drive where I have the time machine backup. But it just can't see this drive. Is there any troubleshooting for this product? Thanks!
Hi Robbyglasco, Have you been able to fix the issue? I'm having the same problem :-)
lkaravis -
I know this is a long time after the event for both of you, but for others Im pretty sure that this will be that you haven't yet formatted the SSD in Disk Utility. Before you can reinstall from Time Machine you have to go into Disk Utility and format the SSD. You get to Disk Utility from the option screen after you have booted the computer with "Command and R" (cmd-R).
Thank you very much. This made the job much easier than it would have been if I had to figure it out for myself.
I replaced a 5 year old 320GB hard drive with a new 1TB hard drive. I first cloned the drive by attaching the new one via a USB dongle and running Carbon Copy Cloner. Then I booted the new drive via USB to confirm that it was properly cloned.
Then I followed the directions here. It took all of 15 minutes to do, because I knew exactly what to expect and had all the necessary tools on-hand. Your web site is an incredibly valuable resource. Thanks again.