crwdns2915892:0crwdne2915892:0
Replace the battery in your MacBook Pro 13" Unibody Mid 2010. If your battery is swollen, take appropriate precautions.
crwdns2942213:0crwdne2942213:0
-
-
Remove the following 10 screws securing the lower case to the MacBook Pro 13" Unibody:
-
Seven 3 mm Phillips screws.
-
Three 13.5 mm Phillips screws.
-
-
-
Slightly lift the lower case and push it toward the rear of the computer to free the mounting tabs.
In the introduction you should link fixers to this excellent doc: https://www.ifixit.com/Misc/HD_Software_...
It is really critical, super easy, and free(!) to clone your existing drive onto the new one you will install. I ran into one error, but SuperDuper! support replied immediately on how to fix it...Thanks ifixit and SuperDuper! (I ponied up the $28 for the software anyway, I was so impressed!)
Long story short: I drank the AppleKoolAid back in 1984 and have always left the guts of my machines up to Apple - until recently when I needed to swap the SATAs from my original MacDaddy (2009 13" MBPro that I killed in 2018 - coffee + blackout = OOOOPS) into a pristine 2009 MBPro from a Goodwill in North Carolina through eBay. I need the files from iCal and MacMail that can't be opened in my newer machines.
Well . . . I ain't never done nuttin' like that, before!
Enter Luke Miani on YouTube. He raves about you guys! So, I watched everything I could, read your site, bought the right tools and at the ripe old age of 72, I sat down, this morning and did the work. Now my original MacDaddy lives in MacDaddy2.0.
Am I allowed to cry?
Seriously, I can't thank you enough for your bitchen site and killer tools. I wish I'd'a been turned on to this shizzle 30+ years ago.
IFIXIT - IDIGIT!
HAHAHAHAHAHAHAHAHAHA.
That was a brilliant read.
Yes, I came across ifixit a few years ago. Totally helped me out on several occasions.
Glad your Mac repair journey worked out.
:)
Cary B -
-
-
-
-
Remove the following tri-point screws securing the battery to the upper case:
-
One 5.5 mm tri-point screw.
-
One 13.5 mm tri-point screw.
Mine does not have triwing screws.... They have 5 points but none of my torx stuff works? What is it? I have one of your sets of 20 or so pieces and nothing works.....
pentalobe. its an apple specific driver to keep you out. The bottoms of the airs use this as well. You can fid one on eBay
Where in the world can I find a tri-point screw bit?
Which size trilobe screw bit do I need to buy? (Just bought one and it is too big, %#*@ it.)
There's some tripoints out there that say it is a 0.6 or 0.8 bit. Which one is closer to the Y0 mentioned here? There's also Y2.0 and 3.0
My mid-2010 MBP uses the tri-wing as mentioned, which work well with a Y0 driver.
-
-
-
Use the flat end of a spudger to lift the battery connector up out of its socket on the logic board.
use two spudgers, one of each side of the connector.
I was able to use 1 spudger. Just wiggled a little on each of the 3 free sides of the connector, and kept going around until the connector freed up.
I used the nails of thumb and pointer finger simultaneously - worked pretty fine
-
-
-
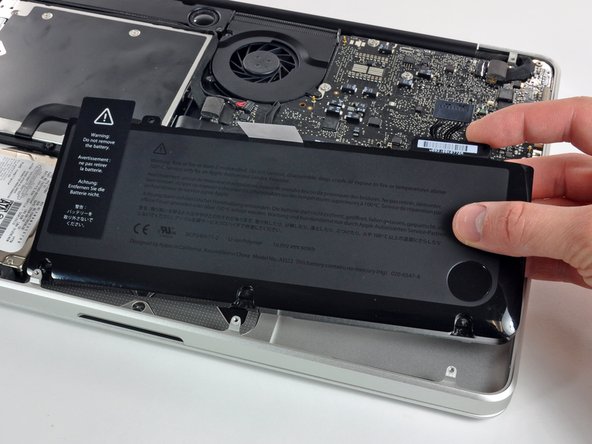
Lift the battery out of the upper case.
-
Charge it to 100%, and then keep charging it for at least 2 more hours. Next, unplug and use it normally to drain the battery. When you see the low battery warning, save your work, and keep your laptop on until it goes to sleep due to low battery. Wait at least 5 hours, then charge your laptop uninterrupted to 100%.
-
If you notice any unusual behavior or problems after installing your new battery, you may need to reset your MacBook's SMC.
Did everything correctly, but now the battery doesn't charge. Do I have to do something in particular to make it work now that's installed? Thanks
I am answering a 2 year old post but this is for those who may have the same or similar issue in the future.
When I was putting the battery connector back on that it didn't sit flat against the board before I put pressure on the top of the connecter to press it back into its socket. I then took time to examine the battery connector socket and saw it consisted of long thin vertical pins. I deduced that if the battery connector was not aligned correctly to the pins on the motherboard then it may be very easy to bend one or more of the pins in a way that they wouldn't mate up with the opposing female part on the connector. That sure would cause a battery charging issue. If you feel too much resistance when pressing the connector back into the socket then stop and make sure it is all aligned correctly. I know, not easy with the size, the black connector and black socket. A spudger can be used on the battery side of the connector to raise it to a level position prior to applying pressure to the top of it.
I too encountered the same problem. After resetting the SMC (http://support.apple.com/en-us/HT201295), it resolved the problem.
I put the battery in ok, then placed it on charge and tried to start it. It didn't like this at all, letting out evenly spaced unfamiliar beeps. I felt sure i had done something terrible. I held down the start button and turned it off. Half an hour later I turned it back on, upon which it sprung back to life, much to my relief. The battery needed to be charged before starting it seems.
Yes, you should charge your battery before using.
Cary B -
One important hint is missing: Don't tighten the two battery screws too much! I did, causing the new battery to press against the trackpad from below, thefore my trackpad wouldn't click well anymore. After opening the MacBook Pro again and loosening the two battery screws a bit, my trackpad is working well again.
-


To reassemble your device, follow these instructions in reverse order.
To reassemble your device, follow these instructions in reverse order.
crwdns2935221:0crwdne2935221:0
crwdns2935229:0692crwdne2935229:0

crwdns2947412:026crwdne2947412:0
You guys are awesome! My granddaughter spilled a whole coke on the Mac and it went fizz! After some weeks I took it to the Apple store where it was declared it dead. They offered me a refurbished machine for $800, but insteaed I came home, took the disk out and hooked it via a USB carrier to another Mac which proved that the disk had not been harmed. I put it back in the machine and booted up at which point it became obvious that the battery was dead. One pass at Google turned up IFixIt where I found the battery and the correct, goofy tri-point screwdriver. The battery arrived a bit ago and the Mac is up and running as if nothing happened . . . a tidy savings of $650!
Thanks so much1
This was a total life saver! A few weeks ago my house was hit by lightning and even though my computer wasn't plugged in (thank God!) my charger was completely fried. I ordered a new charger but my computer still wasn't working- Apple said my computer was done for. A friend said it was probably my battery and told me about ifixit.com. I was able to buy a new battery and change it myself (it was so easy!!!). Saved me from spending a bunch of $$ at the Apple store. I move out of the Country in a few weeks and didn't know what I was going to do without a computer. Thanks ifixit!!!
When I followed this exactly, I booted up my MacBook to see that my battery had an x through it with the no battery availible popping up when I scrolled over it. I (stupidly) left the computer on while I browsed for a solution. The whole time my charger showed a green light. Suddenly the computer turned off and hasn't been able to be turned back on since despite switching to another battery and another charger. The charger still shows a green light, which means the battery is either fully charged or installed incorrectly. I don't understand how it can be installed incorrectly when the only part to put it into the computer is the plug in. Please someone help me, I have no idea how to fix it and have made multiple forums on here asking for help, to no avail.
I think you are SOL. I had same problem a few days ago. I have attempted everything I could find from online resources. Bottom Line: ship it to an Apple authorized repair shop or an Apple Store. Battery replacement Cost is now only $130, which isn't much more than iFixIt cost.
gkofga -
Your connector or socket may have broken. Open the Mac and check if you missed something.
Don´t bother ordering a battery from anywhere other than iFixit. Their batteries are actually OEM parts and they include a warranty for 1 Year (most batteries from other places, like amazon, typically have 30, 90, 180 day warranties. After installing, make sure to FULLY charge the computer (don´t use it during the first charge!) to make sure your battery life is prolonged to its fullest lifespan.
iFixIt batteries do not work if you are running OS 10.11.2. Tried 2 iFixIt batteries and received guidance from iFixIt customer support.... Same result, it didn't work. Just spend a few dollars more and take it to an Apple Store.
So what was the reason given by Apple as to why the battery replacement did not work? I just replaced mine 2010 mbp, running 10.11.5 seemingly no issues.
Jack -
Great guide. When I saw how simple these instructions looked, I made up my mind: instead of leaving my MacBook Pro for a week at the local Apple Service Provider (why should they have to keep it so long?), I would change the battery myself at about a third of the cost. Working slowly and carefully, the whole thing took less than 10 minutes.
I would add just one thing: those 3 mm Phillips screws are really, really tiny. Do be careful where you put them down!
How long does battery keep off power? Also, further above are reports of issues with 10.11.2. I am on 10.11.4. Does it work? Thanks
I have a 2010 mbp running 10.11.5, just swapped in the battery yesterday, seems to run fine. system shows the battery info including age of battery and number of charge cycles (up to 2 now!).
Jack -
Just received my replacement battery today, and it was so so easy to put in - everything worked exactly how they described it would!! my battery is charging normally again and it says the battery condition is normal (before it said: replace now) and its charging well so far. This was one of the easiest cost effective things I've ever done. Save yourself time and money, and use this site to fix your battery.
Tip tope Anleitung. Teure Reparatur im Apple Store für meinen Opa gespart. Vielen lieben Dank. Diese Anleitung hat mir Mut gemacht und ich dachte schon, ich könnte unter Umständen mein MacBook Pro auf den Müll schmeissen. Vielen lieben Dank dem Autor. Ich bin begeistert.
Thank you fixit.com
I bought the three tools and battery on your web site.
Followed your straightforward instructions.
Now my computer works again.
Horrible apple company telling me a 2010 machine is too old to fix.
Is that their idea of recycling.
Is that how proud they are of their production, that I should have thrown a perfectly healthy seven year old laptop away.
REPAIR IS NOBLE !!!
OWC, also a reputable source of Mac stuff, sells a replacement battery and has a video showing how to remove the old one and install the new one (https://eshop.macsales.com/item/NewerTec...). At the beginning of the video the viewer is warned that the battery will have to be calibrated for best results, that the procedure will be demonstrated at the end of the video, and it should not be skipped. Basically, the procedure involves charging the battery until it is full, completely discharging it, then recharging it. I suspect the calibration might apply to the iFixit replacement battery as well.
Regarding that battery and a report that it doesn't work for OS X 10.11.2: What about later versions? I have 10.11.6.
Thanks.
The battery in my old MBP (2010) was swollen to the point of not being able to use the touchpad. I received my new battery from you today and replaced it. Works wonderfully! I’m sooooo happy I went this route and didn’t pay a local shop $200 for the battery and less than 10 minutes of labor! Thank you!!!
After nine years of faithful service suddenly last week my MacBook Pro 13’s battery wouldn’t charge. I strongly considered taking it to an authorized center, but instead after some research on the internet, bit the bullet, crossed my fingers and bought a new battery off of Amazon. Even after it arrived I was still hesitant to undertake the operation myself, but thanks to your fantastic tutorial the removal/install worked without a hitch. Thank you!
Great Fix! I did this in 2018, my MacBook battery life had dropped to 0, and I had to constantly keep the computer plugged in. Eventually it just shut off and even keeping it plugged in wouldn’t work. Did this change and now have a very functional battery 2+ years later. Source of the battery was iFixit.
Hi,
thank you for the tutorial!! I was wondering, whether you can recommend a retailer who sells MacBook Batteries. I am a bit worried, that I buy a battery that wrecks my laptop….
I've had the same experience with my replacement battery for the MBP 2010 13" as Matthew Freedman had with the one for the 15" model: Other than the original battery, the ifixit replacement wouldn't fall into place easily, I had to squeeze it in slightly. Also I had to drill open the left screw hole slightly, because it wouldn't align for about half a millimetre. (Just as Matthew's battery, but on the opposite side.)
"Not a good start!", I thought, because -- to quote a famous British automotive TV host -- "How hard can it be?" to get the outer dimensions of a battery correct?!
And lo and behold, after three months and 34 load cycles the battery is dead. And I mean completely dead. I've never seen that in a battery, but it's _completely_ flat. When I pull out the power cable, the laptop is off immediately. It won't go into hibernate or so, it's off.
So: How hard can it be to build reliable replacement batteries?!
Now let's see how the complaint process goes, either for a new battery or a complete refund.
My Macbook was to distorted track pad didn’t work and it wouldn’t completely close. I found out that the bulge was because of a defective battery. I went looking for a sudger at Home Depot and found this kit made by you people! (Precision Bit Set). It did not come with a spudger so I ended up using a cheap flat tweezer from the dollar store. My 7.1 Macbook was not exactly like the image, but because you gave those images I was able to figure out the rest. Mine had a warning label saying “don’t remove the battery” - turned out hidden under that label was another screw to make it even harder. But once I got that out. The battery came easily out. And I don’t need another one. I never used it without being plugged in anyway. And when I put it back together, the track pad worked perfectly. Thanks for saving me a lot of aggravation. I am in a little town where no one works on Macs. This is what I used to project lyric videos for church so it was a big deal to correct. Blessings in Yahshua’s Name
My Macbook was to distorted track pad didn’t work and it wouldn’t completely close. I found out that the bulge was because of a defective battery. I went looking for a sudger at Home Depot and found this kit made by you people! (Precision Bit Set). It did not come with a spudger so I ended up using a cheap flat tweezer from the dollar store. My 7.1 Macbook was not exactly like the image, but because you gave those images I was able to figure out the rest. Mine had a warning label saying “don’t remove the battery” - turned out hidden under that label was another screw to make it even harder. But once I got that out. The battery came easily out. And I don’t need another one. I never used it without being plugged in anyway. And when I put it back together, the track pad worked perfectly. Thanks for saving me a lot of aggravation. I am in a little town where no one works on Macs. This is what I used to project lyric videos for church so it was a big deal to correct. Blessings in Yahshua’s Name
I have a battery in a 2012 unibody MacBook Pro I want to swap it to my 2010, Would I have to calibrate it again?
My mid 2010 MBP suffered from a swollen battery, spotted by the trackpad lifting up. Replacement battery ordered from here and I followed the clear and easy instructions on this site. At first the computer said that the battery wasn't recharging. The fix was to reset the SMC. For removable battery MBPs like mine you power down, remove the battery, press the power button for five seconds and reinstall the battery. Hey presto, it is now charging the replacement battery! Great service, great guides and thanks to all the folks who leave additional tips here.
Was not able to replace the 13.5 mm tri-point screw for the new battery as it would not engage the threads. Should the plastic films covering the top and bottom of the new battery have been removed before installing? Also, it would be nice to know if the old battery should be run down to a 0% charge before starting the replacement procedure. Otherwise an easy and effective renewal for a functioning (if outdated) laptop.
Excellent instructions for replacing laptop battery. I wish I’d done it myself on previous occasions..
Compare the short screws carefully before reinstalling them. The shouldered screws go in the holes on the front edge.
David Kilbridge - crwdns2934203:0crwdne2934203:0
Before I started removing any screws I took a piece of paper and drew the bottom of the laptop and put a piece of double-sided tape in the spot where each screw goes. That way when I took out the screws, I could put them on the tape so I knew exactly which screw went in which spot. I did the same thing for dismantling the inside on another sheet of paper, then a third sheet for the screen after getting the front glass off.
mastover - crwdns2934203:0crwdne2934203:0
I use a similar technique: I print out the iFixit manual for the job, and Scotch-tape down the screws/brackets/cables I remove at each step next to the component descriptions. That way, when I'm reassembling, the bits are taped right next to the photo of where they came from.
adlerpe -
That's exactly what I do for all my repairs! It's the best way to keep track of all of the parts ' original location and to make sure that you don't miss any parts during reassembly.
joyitsjennie -
Great idea and one I use often
Thomas Overstreet -
Excellent idea! Thanks for sharing it here.
Laura Sharkey -
I used a 00 that fit but the screws were very tight so I used a tiny paintbrush with some wd40 on it and put it around the edges of the screws. Worked like a charm
valentinedhdh - crwdns2934203:0crwdne2934203:0
I use a magnetic mat and place the screws in order on that :)
Cary B - crwdns2934203:0crwdne2934203:0
How to tell all screws apart?
Spudgeboy - crwdns2934203:0crwdne2934203:0