crwdns2915892:0crwdne2915892:0
Follow this guide to replace a dead hard drive or upgrade your hard drive for more storage capacity.
crwdns2942213:0crwdne2942213:0
crwdns2936621:0crwdne2936621:0
-
-
-
Remove the following ten screws:
-
Three 14.4 mm Phillips #00 screws
-
Three 3.5 mm Phillips #00 screws
-
Four 3.5 mm shouldered Phillips #00 screws
 crwdns2952109:0crwdne2952109:0
-
-
-
Use your fingers to pry the lower case away from the body of the MacBook near the vent.
-
Remove the lower case.
-
-
-
-
-
Use the edge of a spudger to pry the battery connector upwards from its socket on the logic board.
-
-
-
-
Bend the battery cable slightly away from its socket on the logic board so it does not accidentally connect itself while you work.
-
-
-
-
-
Remove the two Phillips screws securing the hard drive bracket to the upper case.
-
-
-
Remove the hard drive bracket.
-
-
-
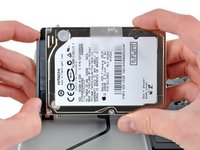
Use the attached pull tab to lift the hard drive out of the upper case.
-
-
-
Pull the hard drive cable away from the body of the hard drive.
-
Remove the hard drive.
-
-
-
-
-
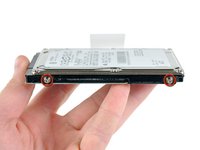
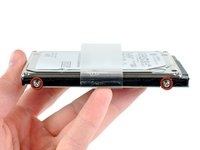
Remove the four 6.0 mm T6 Torx hard drive retaining posts from the sides of the hard drive.
-
Transfer the hard drive retaining posts to your new hard drive.
-
-




To reassemble your device, follow these instructions in reverse order.
crwdns2935221:0crwdne2935221:0
crwdns2935229:0274crwdne2935229:0

crwdns2947412:012crwdne2947412:0
Is there any specific order that's best for putting back the screws?
wtfjackiass - crwdns2934203:0crwdne2934203:0 crwdns2950251:0crwdne2950251:0
Start with the corners but after that it dose not matter
William Stadler - crwdns2934203:0crwdne2934203:0 crwdns2950251:0crwdne2950251:0
How do you install the Operating system once this has been done?
xdragoons - crwdns2934203:0crwdne2934203:0 crwdns2950251:0crwdne2950251:0
If the retaining screws in the HD are stuck, use a rubber band between the T6 bit and the screw for better grip. Works like a charm.
jonathan - crwdns2934203:0crwdne2934203:0 crwdns2950251:0crwdne2950251:0
