crwdns2915892:0crwdne2915892:0
Use this guide to replace a broken AirPort/Bluetooth board.
crwdns2942213:0crwdne2942213:0
-
-
Remove the following ten screws:
-
Three 14.4 mm Phillips #00 screws
-
Three 3.5 mm Phillips #00 screws
-
Four 3.5 mm shouldered Phillips #00 screws
-
-
-
Use your fingers to pry the lower case away from the body of the MacBook near the vent.
-
Remove the lower case.
-
-
-
Use the edge of a spudger to pry the battery connector upwards from its socket on the logic board.
-
-
-
Bend the battery cable slightly away from its socket on the logic board so it does not accidentally connect itself while you work.
-
-
-
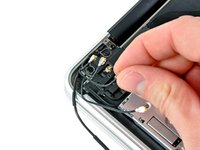
Use the flat end of a spudger to pry the AirPort/Bluetooth ribbon cable connector up from its socket on the logic board.
-
-
-
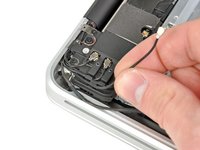
Carefully pull the camera cable out of its socket on the logic board.
-
-
-
-
Carefully move the AirPort/Bluetooth ribbon cable out of the way as you peel the camera cable off the adhesive securing it to the subwoofer and the AirPort/Bluetooth bracket.
-
De-route the camera cable out from under the retaining finger molded into the AirPort/Bluetooth bracket.
-
-
-
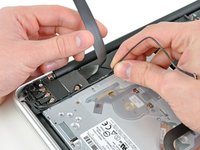
Use the tip of a spudger to pry the antenna connector closest to the logic board up from its socket on the AirPort/Bluetooth board.
-
De-route the antenna cable from under the finger molded into the AirPort/Bluetooth bracket.
-
-
-
Using the method described in the last step, disconnect the remaining three antenna connectors.
-
De-route their cables from the slots cut in the AirPort/Bluetooth bracket.
-
-
-
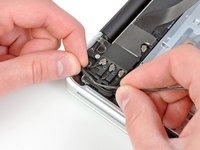
Remove the following five screws:
-
Two 10.3 mm Phillips screws
-
Two 3.1 mm Phillips screws
-
One 5 mm Phillips screw
-
-
-
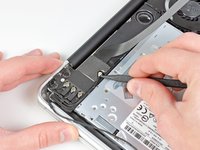
Pull the AirPort/Bluetooth assembly and the Subwoofer upward near the center of the side of the optical drive until they clear each other.
-
-
-
Remove the AirPort/Bluetooth assembly, minding the fragile antenna contact near the corner of the upper case.
-
-
-
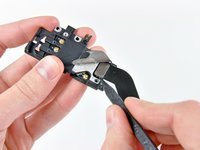
Peel back the piece of EMI tape covering the AirPort/Bluetooth cable connector.
-
-
-
Use the tip of a spudger to lift the AirPort/Bluetooth cable connector out of its socket on the AirPort/Bluetooth board.
-
Remove the AirPort/Bluetooth cable.
-
-
-
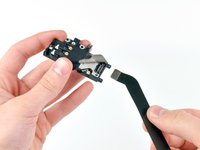
Continue peeling the EMI tape off the bottom of the AirPort/Bluetooth bracket and remove it from the assembly.
-
-
-
Remove the three 3 mm Phillips screws securing the AirPort/Bluetooth board to its bracket.
-
-
-
Remove the AirPort/Bluetooth board from its bracket.
-


To reassemble your device, follow these instructions in reverse order.
To reassemble your device, follow these instructions in reverse order.
crwdns2935221:0crwdne2935221:0
crwdns2935229:035crwdne2935229:0

crwdns2947412:02crwdne2947412:0
Hallo,
Ist das quasi Plug & Play oder muss man hier im Nachhinein noch etwas machen? Ich habe ein MacBook Pro Late 2011 und habe bereits Ventura oben (mit Open Core Legacy Patcher). Das Continuity Activation Tool läuft bei mir nämlich nicht unter Ventura. Das habe ich schon versucht.
Hallo David, ja, normalerweise ist das schon einfach Plug & Play. Aber: ich kann dir nicht sagen, ob das auch der Fall ist, wenn du eine offiziell nicht mehr unterstützte macOS Version gepatcht hast. Und wenn ich deine Frage richtig verstehe, willst du dein MacBook mit einer neueren Karte ausrüsten, damit Continuity funktioniert? Ob diese Karte überhaupt funktioniert, kann ich dir nicht beantworten.