crwdns2915892:0crwdne2915892:0
Use this guide to replace a blown subwoofer or right speaker.
crwdns2942213:0crwdne2942213:0
-
-
Remove the following ten screws:
-
Three 14.4 mm Phillips #00 screws
-
Three 3.5 mm Phillips #00 screws
-
Four 3.5 mm shouldered Phillips #00 screws
-
-
-
Use your fingers to pry the lower case away from the body of the MacBook near the vent.
-
Remove the lower case.
-
-
-
Use the edge of a spudger to pry the battery connector upwards from its socket on the logic board.
-
-
-
Bend the battery cable slightly away from its socket on the logic board so it does not accidentally connect itself while you work.
-
-
-
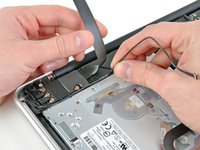
Use the flat end of a spudger to pry the AirPort/Bluetooth ribbon cable connector up from its socket on the logic board.
-
-
-
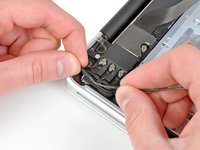
Carefully pull the camera cable out of its socket on the logic board.
-
-
-
-
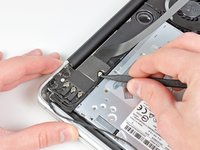
Carefully move the AirPort/Bluetooth ribbon cable out of the way as you peel the camera cable off the adhesive securing it to the subwoofer and the AirPort/Bluetooth bracket.
-
De-route the camera cable out from under the retaining finger molded into the AirPort/Bluetooth bracket.
-
-
-
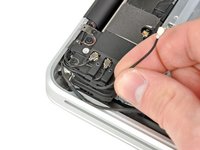
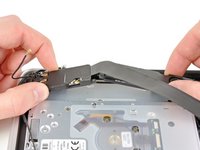
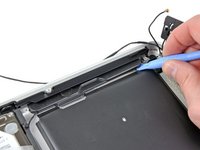
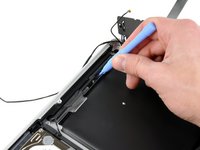
Use the tip of a spudger to pry the antenna connector closest to the logic board up from its socket on the AirPort/Bluetooth board.
-
De-route the antenna cable from under the finger molded into the AirPort/Bluetooth bracket.
-
-
-
Use a Phillips #00 screwdriver to remove the following five screws:
-
Two 10.3 mm screws
-
Two 3.1 mm screws
-
One 5 mm screw
-
-
-
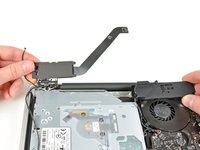
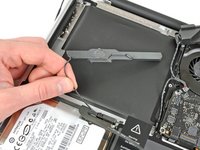
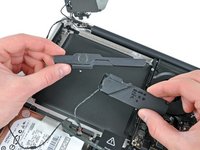
Pull the AirPort/Bluetooth assembly and the Subwoofer upward near the center of the side of the optical drive until they clear each other.
-
Move the AirPort/Bluetooth assembly and the subwoofer away from the top of the optical drive.
-
-
-
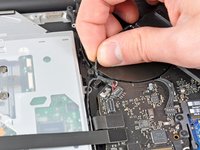
Pull the right speaker/subwoofer cable out from under the retaining finger near the side of the optical drive.
-
Pull the right speaker/subwoofer cable upward to disconnect it from the logic board.
-
-
-
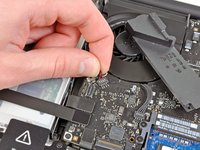
Use the flat end of a spudger to pry the hard drive cable connector up from its socket on the logic board.
-
Bend the hard drive cable away from the optical drive.
-
-
-
Use the flat end of a spudger to pry the optical drive connector up from its socket on the logic board.
-
-
-
Remove the three 2.7 mm Phillips screws securing the optical drive to the upper case.
-
-
-
Pull the optical drive upward from its edge closest to the display and remove it from the upper case.
-
-
-
Use a plastic opening tool or another thin prying object to carefully pry the right speaker up from the adhesive securing it to the upper case.
-
Pry up along the edge of the right speaker until it is separated from the upper case.
-
-
-
Pull the right speaker away from the optical drive opening.
-
-
-
Peel up the right speaker cable along the edge of the optical drive opening.
-
De-route the cable from the clips near the edge of the logic board.
-
Remove the right speaker/subwoofer assembly from the upper case.
-


To reassemble your device, follow these instructions in reverse order.
To reassemble your device, follow these instructions in reverse order.
crwdns2935221:0crwdne2935221:0
crwdns2935229:044crwdne2935229:0

crwdns2947412:06crwdne2947412:0
General - the reason you are reading this guide may well be that you blew you speakers after installing 'Boom' from the App Store.
All I can say is, don't install it a second time!
Others, be warned! If you use Boom, just use it at the lowest volume you can. Looks like they don't replace speakers.
Or better, don't install it at all.
Stuart.
i did it!! what i can say is the details of the step will bring no mistake even for a beginner to change the spare part!
thank IFIXIT!!
I intend to use this guide to actually modify the subwoffer portion of my old 2011 MBP- I’ve removed the ODD and have oh so much more room inside now for a much better acoustic chamber and potentially small amplifier! Stay tuned :)
Completed! Things to watch out for.
- Make sure you take note of how the cables are organised in their holders and along the chassis. Once you take them out it’s hard to get them to align back to the factory setting.
- The speaker attached to the antenna assembly has a slot that it falls into which puts the whole unit down lower. I had it sitting in a position that seemed right, but a little bit high. I gave it a slight wiggle and it fell into place, which also brings the antenna cables down lower and away from the case cover.
- The glue on the speaker was hard to release. Had to use a hair dryer & heat up the speaker. Def try & find a very thin spudger or this part is complicated. There seems to be less system wires to damage on the end closer to the hard drive. The antenna wire is too close to the other.
- The screws for the optical drive are tiny and can be pretty hard to drop into place once the drive is in position. I used a bit of blu tac on the end of a screwdriver to lower them down before tightening.
Awesome, comprehensive step-by-step guide, with perfectly detailed illustrations, too. Thank you!