crwdns2933423:0crwdne2933423:0

MacBook Pro 13" Unibody Early 2011 RAM Replacement

crwdns2942213:0crwdne2942213:0

  1. MacBook Pro 13" Unibody Early 2011 RAM Replacement, Lower Case: crwdns2935265:01crwdnd2935265:01crwdnd2935265:01crwdne2935265:0
    • Remove the following ten screws:

    • Three 14.4 mm Phillips #00 screws

    • Three 3.5 mm Phillips #00 screws

    • Four 3.5 mm shouldered Phillips #00 screws

    • When replacing the small screws, align them perpendicular to the slight curvature of the case (they don't go straight down).

    How much weight can I save by removing the optical drive?

    gunes314 - crwdns2934203:0crwdne2934203:0

    You can save a lot of weight if lets say your installing a solid state drive or putting in a second hard drive but if you know that you use the CD/DVD disc drive a lot then you might just want to leave the drive alone.

    Marshall WahlstromHelgren -

    Tip: Use one of those weekday pill holders to have a cheep way to store screws you remove and each day of the week can be for different sizes or parts. It has been handy to have (much less expensive than the magnetic mat.

    Robert Wacker - crwdns2934203:0crwdne2934203:0

    Hello, where can I buy the screws I need in case I lose one of them?

    taylornya - crwdns2934203:0crwdne2934203:0

    I have one stripped screw... How opening without drill it?! Any suggestions please?

    rodrigosady - crwdns2934203:0crwdne2934203:0

    I also stripped a couple screws. I wasn’t able to open it up without drilling. After drilling the heads and removing the cover it was easy to hacksaw the tip and unscrew with a standard driver.

    Michael Wilkens -

    My top tip - make sure you buy good quality Phillips screwdrivers and a magnetic holder. Cheap screwdrivers won’t get the screws undone safely. Without a magnetic holder you have no chance of getting the tiny crews in and out safely.

    jeremyyoung - crwdns2934203:0crwdne2934203:0

    A good Phillips 00 is your friend here. Also, when reinserting the screws, gently start anticlockwise and you wil feel a click at the start of the thread. This tells you you’re in the right place and less likely to cross-thread through force in the wrong place.

    Iain Boyd - crwdns2934203:0crwdne2934203:0

    I feel like these are 000 screws. Amazon sales describe them as such and my 000 screwdriver fits better

    cam2000deluxe -

    Before ordering a new Trackpad remove the existing battery and try clicking the Trackpad. If it clicks OK with the battery out the source of problem is likely a swollen battery, which should to be replaced even if it still works to some degree. From the side of the battery you will likely see the soft part of the battery bulging beyond the hard case.

    Patrick Langvardt - crwdns2934203:0crwdne2934203:0

    That’s absolutely correct as I can testify. With the battery removed I also adjusted the T6 set screw that adjusts the sensitivity of the trackpad click, evidently someone had cranked mine down tighter than the factory setting.

    Gary Register -

    Le quatrième paragraphe dans les instructions en français n’est pas correct : ce ne sont pas les 2 petites vis, mais les 7 petites vis qui sont inclinées. Et les 3 grandes sont bien verticales.

    Degeorges - crwdns2934203:0crwdne2934203:0

    Bonjour ! Merci de votre observation. J’ai corrigé la traduction. iFixit étant un wiki, n’hésitez pas à modifiez si vous remarquez une erreur :) Encore merci de votre attention et à bientôt !

    Claire Miesch -

    Tip: if you have a magnetic screw mat or similar, lay the macbook over the mat to make sure it catches any screws that may decide to fall of and hide under your table

    Moritz - crwdns2934203:0crwdne2934203:0

    Funny, it's not her hands that are doing the close ups. :)

    Cinemated Man - crwdns2934203:0crwdne2934203:0

    What's the difference between the shouldered and non shouldered screws? They look exactly the same to me.

    MLNLRD - crwdns2934203:0crwdne2934203:0

  2. MacBook Pro 13" Unibody Early 2011 RAM Replacement: crwdns2935265:02crwdnd2935265:01crwdnd2935265:02crwdne2935265:0 MacBook Pro 13" Unibody Early 2011 RAM Replacement: crwdns2935265:02crwdnd2935265:02crwdnd2935265:02crwdne2935265:0
    • Use your fingers to pry the lower case away from the body of the MacBook near the vent.

    • Remove the lower case.

  3. MacBook Pro 13" Unibody Early 2011 RAM Replacement, Battery Connection: crwdns2935265:03crwdnd2935265:01crwdnd2935265:02crwdne2935265:0 MacBook Pro 13" Unibody Early 2011 RAM Replacement, Battery Connection: crwdns2935265:03crwdnd2935265:02crwdnd2935265:02crwdne2935265:0
    • Use the edge of a spudger to pry the battery connector upwards from its socket on the logic board.

    • It is useful to pry upward on both short sides of the connector to "walk" it out of its socket. Be careful with the corners of the connectors, they can be easily broken off.

    Is this step of removing the battery connector required?

    manodh - crwdns2934203:0crwdne2934203:0

    yes - as with disassembly of any electronic component you have to remove any power source. You don't want to accidentally turn the Mac on

    khull -

    Prying the battery connector off does not take much force. I did exactly what the guide suggested (walked it off back and forth) with the spudger without any problems. Just be very gentle, much like with anything inside laptops, they are very fragile and need to be worked with carefully. A+ instructions, battery replacement was a success.

    aekinaka - crwdns2934203:0crwdne2934203:0

    Be patient on disconnecting this one. It worked for me step by step, little by little.

    Phil Wagner - crwdns2934203:0crwdne2934203:0

    I used the nails of thumb and pointer finger simultaneously - worked pretty fine

    Reinhard Kaune - crwdns2934203:0crwdne2934203:0

    I whittled down ends of two wooden strips to use, along with my fingernails to start with. I used halves of a wooden clothespin, but popsicle sticks should work too.

    Mike Baker - crwdns2934203:0crwdne2934203:0

  4. MacBook Pro 13" Unibody Early 2011 RAM Replacement: crwdns2935265:04crwdnd2935265:01crwdnd2935265:01crwdne2935265:0
    • Bend the battery cable slightly away from its socket on the logic board so it does not accidentally connect itself while you work.

    I put some tape between the connector and socket while working on the drive.

    Stephen Smith - crwdns2934203:0crwdne2934203:0

    That's a good tip

    Anrothan -

    Great tip, I did that too

    Ahmed Mahran -

    One other note: The screw heads fit flush with the curvature of the case -- which means that they aren't exactly horizontal. In other words, they aren't perpendicular to the table that the computer is resting on. Don't try to force them straight in vertically, because you'll risk cross-threading them. (nearly ruined one screw hole myself!)

    lelandjordon - crwdns2934203:0crwdne2934203:0

    On my MacBook Pro, the connector seems to be an integral part of the battery.

    Jerry South - crwdns2934203:0crwdne2934203:0

    I suspect it’s just like the special screwdriver required for seatbelts on cars – to discourage regular consumers from attempting repairs. Of course, this only encourages consumers to use the wrong tool to attempt to repairs

    colleenthompson - crwdns2934203:0crwdne2934203:0

    Dissambling my MacBookPro Premium Mid 2012 (i5-3210M 2.5Ghz) was easily, Careful with the screws, use screwdriver fitting exactly with the screws, you damage them very fast. Work very exactly, relaxed with time, consentration, good Tools and with feelings in your hands. Disconnect the Akku was easy if you take care, remove it to be safe, Two screws more, more space to work & haven`t to think about damaging someting. Apple use diffrent screws, you should have many difffrent scewdrivers. It is also good to clean everything inside, With time everything gets very dusty & dirty, don`t forget the sides and little fittings at the case. Use a pinsel, alcohol, soft peace stuff, it will look like new. If you have knowledge & experience, you can paint it in any colour or airbrushing for individualizing. You can also just polish it with a soft Politure (Sonax car Polish No1, NOT with wax or take an other light Politure you familiar & can do the job, A Laptop should serviced once a year, keeping it good working over years

    Stefan Lindner - crwdns2934203:0crwdne2934203:0

    First thing i do is open & cleanig everything inside,specially the cooling & fan, renew the thermal paste with an high quality product. Install the Nain System, clean up Bloatware and other unnecessary things, install standard software for daily use, additional change system components against better one (Edge to Firefox, Windows Media Player to VLC , an Office Suite and configuring everything for Data Protection, Privacy- & Indentety Protection, install Drivers from the component Manufactur (incedible effect, disable limitations, more functions, work better & faster, increasing performance, additional change the WiFi & Bluetooth Card to a better one a UMTS WWAN to an LTE Card, increase RAM with two Dual-Channel working SODIMMs, Use M2 or 2,5" SSD if no M2 Slot aviable) as System- and Software iDrive, a FAT32 formatted 32GB Partition to be safe of metaviruses comes with harmless downloads, and a big 2,5 HDD to store the user data. What does you guys think about this? Old Computer become a new life,

    Stefan Lindner - crwdns2934203:0crwdne2934203:0

    I livein Austria, near Vienna, if someone needs help or anything else, i would be glad to help. I always searching old or broken devices to bring them to new live. I also searching for spare parts, specilly a Bottom & Side Case and a 256GB or higher NGFF Storage Card for a Sony Vaio Tab 11 SVT1144HE (2014), some 14,1" Displays for a HP Probook 440G5 (2016), Elitebook MT 43 Mobile Thin Client, (2011), Dell Vostro 3460 (2012) Lenovo Thinkpad T440s (2014), and a Logic Board for an Lenovo Ideapad 330-15ARR (2017, damaged by Water i think) and a Logic Bord for an Alienware 17R4 with i7-6870HX & Nvidia 1080 (2018, CPU dead, maybe there is a repair Guide or workaround to bring it back to Life). I need always 8GB or 16GB DDR3 and DDR4 RAM Storage (perfectly two ident one for Dual-Channel use for Laptops, M2 SATA 6GB/s and NVMe PCIe SSDs 500GB or more and 2,5"SSD or HDD with 1TB or more and 3,5" HDD with 4GB or above. If you have some of this or other useful parts and doesn`t need them, please make me an offer, maybe

    2

    Stefan Lindner - crwdns2934203:0crwdne2934203:0

    an change something you need. This is not a Business what i do, it`s more a Hobby with challenging new Excercices.. Thats the best Point. Plase forgive me as a Newbie this very long Post in the wrong Section, but if you are start writing you cannot stop.... But now i have to come to an end and would be happy if someone wants to get in contact. My E-Mail is: udontknowme@gmx.at (the adress name is just a notice against Big Data and for Privacy Protection!

    Stefan Lindner - crwdns2934203:0crwdne2934203:0

  5. MacBook Pro 13" Unibody Early 2011 RAM Replacement, RAM: crwdns2935265:05crwdnd2935265:01crwdnd2935265:02crwdne2935265:0 MacBook Pro 13" Unibody Early 2011 RAM Replacement, RAM: crwdns2935265:05crwdnd2935265:02crwdnd2935265:02crwdne2935265:0
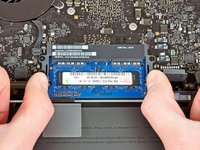
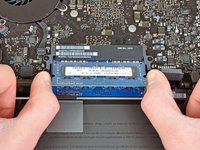
    • Pull the two RAM retaining arms away from the center of the RAM chip.

    • The RAM chip should "pop" up slightly from its socket.

  6. MacBook Pro 13" Unibody Early 2011 RAM Replacement: crwdns2935265:06crwdnd2935265:01crwdnd2935265:01crwdne2935265:0
    • Pull the RAM stick out of its socket.

    • Repeat this process to remove the second RAM chip.

    After replacing the RAM my macbook did not start anymore. Only if I take out one Ram it works. Does anyone knows why.

    joelcroese - crwdns2934203:0crwdne2934203:0

    Hello Joelcroese, have you a issue about your problem, because i have actually this problem ? ... Thanks for your feed back.

    Remy Duprat -

    Make sure both your RAM chips are running at the same speed - don't know about the Macbook but it will cause other machines to not recognize the RAM at all or only pick up one stick -

    melindaruth -

    Is the channel configuration of your ram sticks correct? Mac needs 9-9-9-24 channel configuration. Something like Corsair Mac Memory or the kit that iFixit provides are in the correct channel configuration.

    Seji the veggie - crwdns2934203:0crwdne2934203:0

    Just to point out:

    1. Do not press again the locker.

    2. Changed the bottom RAM first.

    3. Put nicely, gently to the slot. Cue for you. You must see the label of the manufacture.

    4. Close everything.

    5. Switch the Mac and check "Finder>About my Mac" show the correct RAM.

    Jay Nandu - crwdns2934203:0crwdne2934203:0

    Thank you, Phillip! I have now (just recently) used FOUR of your guides—1) HARD-DRIVE replacement, 2) hard-drive CABLE replacement, 3) BATTERY replacement, and 4) RAM upgrade installation—to successfully refurbish my daughter’s late-2011, 13.3-inch MacBook Pro and, thereby, hopefully, add a few more years to its useful life. Thanks, again!

    Sincerely,

    Garrick de Demeter

    gdedemet - crwdns2934203:0crwdne2934203:0

    Does the MacBook Pro 13“ (mid 2012) accept a bundle of 2x 8GB RAM to make it run with 16GB? Because the Apple Support page says „maximum 8GB“. Does that only mean the standard configuration, or does it mean the mainboard can only handle 8GB (2x4GB) not 16 GB (2x 8GB)?

    christian.p.anderson - crwdns2934203:0crwdne2934203:0

    Do you have an answer for this? I have 8GB originally and would love to upgrade.

    Hans-Christian Weinhold -

crwdns2915888:0crwdne2915888:0

To reassemble your device, follow these instructions in reverse order.

crwdns2935229:0350crwdne2935229:0

crwdns2944067:011crwdne2944067:0

What kind of ram should I buy? DDR2 or DDR3?

Jason Moon - crwdns2934203:0crwdne2934203:0

It takes only DDR-3 RAM.

oakdragon12 -

Is a 8gb early 2011 macbook pro maxed out, or can I upgrade to 16?

I'm asking because I read in http://www.crucial.com/store/mpartspecs.... that it can actually take 16gb. Thanks!

C Eyzag - crwdns2934203:0crwdne2934203:0

Yup! I upgraded to a 16 GB DDR3 Corsair mac memory kit from Newegg and it works like a charm. I got this kit: https://www.newegg.com/Product/Product.a...

screenshots below:

http://i.imgur.com/IqEbFES.jpg

http://i.imgur.com/a2azyuV.jpg

Drew Dittmann -

Question - my MBP currently has 4GB RAM. Is there a 2nd RAM slot that will allow me to increase my RAM by adding 4GB or 8GB. Or do I need to replace the current 4GB with a new 8GB module?

Steve K - crwdns2934203:0crwdne2934203:0

Your MBP will have two chip slots that are stacked on top of each other. When you remove the top chip, you'll see the second chip sitting below it. It is best practice to replace both chips with the same amount of memory. So your current computer should have 2 - 2gb chips, so if you want 8gb total, you would install 2 - 4gb chips. Or for 16gb total, 2 - 8 gb chips.

Drew Davis -

Thanks for the straightforward and excellent guide!

Melissa Smith - crwdns2934203:0crwdne2934203:0

I followed instructions & pushed power button. My screen is dark & computer is beeping at me. Suggestions on what I did wrong?

mjsinkc - crwdns2934203:0crwdne2934203:0

if its a black screen and 3 beeps it sounds like your RAM did not get seated all the way. I would take them out and reinstall them.

Matthew -

Officially, the memory speed of a early 2011 MBP is 1333MHz (cas latency 9) because the that’s the CPU:s highest supported memory speed. Memory voltage is 1.5V.

And, officially, the max memory is 8GB (2x4GB).

So, if you would follow that, the best you could do would be 2x4GB 1333MHz.

It will however work perfectly fine with 16GB (2x8GB).

It is also possible to run 1600MHz (a.k.a. PC3-12800) memory, even though that’s not officially supported.

The thing is, most 1600MHz modules run at CL11, which will mostly negate any gains from the higher frequency. So, what do you do?

You go for 2x8GB 1600MHz CL9. Nowadays, these can be found, even the DDR3L type, at decent prices.

Suggestions? Kingston HX316LS9IBK2/16 or G.Skill F3-1600C9D-16GRSL, which is just that: 2x8GB 1600MHz CL9 DDR3L. Works perfect in a early 2011 MBP.

This will have a performance gain: My benchmarks showed a +25% increase in memory bandwidth with 2x8GB 1600MHz CL9 over the stock 2x2GB 1333MHz CL9. Kinda cool :)

Rick Lind - crwdns2934203:0crwdne2934203:0

There is an issue with the MPB of my daughter. Even new RAM modules cause an error. A module in the second of the soccets immediatly makes the computer stop. With only one module in the front, least after a few min, the MBP stopps working. It gives a sound and the screen starts to flicker.

Anybody out there with an idea? TIA

Jochen Buthe - crwdns2934203:0crwdne2934203:0

crwdns2917038:0crwdne2917038:0

crwdns2936625:0crwdne2936625:0:

crwdns2936751:024crwdne2936751:0 14

crwdns2936753:07crwdne2936753:0 65

crwdns2936753:030crwdne2936753:0 286

crwdns2942667:0crwdne2942667:0 313,155