crwdns2933423:0crwdne2933423:0

MacBook Pro 13" Unibody Early 2011 Hard Drive Replacement

crwdns2942213:0crwdne2942213:0

crwdns2936621:0crwdne2936621:0

  1. MacBook Pro 13" Unibody Early 2011 Hard Drive Replacement, Lower Case: crwdns2935265:01crwdnd2935265:01crwdnd2935265:01crwdne2935265:0
    • Remove the following ten screws:

    • Three 14.4 mm Phillips #00 screws

    • Three 3.5 mm Phillips #00 screws

    • Four 3.5 mm shouldered Phillips #00 screws

    • When replacing the small screws, align them perpendicular to the slight curvature of the case (they don't go straight down).

  2. MacBook Pro 13" Unibody Early 2011 Hard Drive Replacement: crwdns2935265:02crwdnd2935265:01crwdnd2935265:02crwdne2935265:0 MacBook Pro 13" Unibody Early 2011 Hard Drive Replacement: crwdns2935265:02crwdnd2935265:02crwdnd2935265:02crwdne2935265:0
    • Use your fingers to pry the lower case away from the body of the MacBook near the vent.

    • Remove the lower case.

  3. MacBook Pro 13" Unibody Early 2011 Hard Drive Replacement, Battery Connection: crwdns2935265:03crwdnd2935265:01crwdnd2935265:02crwdne2935265:0 MacBook Pro 13" Unibody Early 2011 Hard Drive Replacement, Battery Connection: crwdns2935265:03crwdnd2935265:02crwdnd2935265:02crwdne2935265:0
    • Use the edge of a spudger to pry the battery connector upwards from its socket on the logic board.

    • It is useful to pry upward on both short sides of the connector to "walk" it out of its socket. Be careful with the corners of the connectors, they can be easily broken off.

  4. MacBook Pro 13" Unibody Early 2011 Hard Drive Replacement: crwdns2935265:04crwdnd2935265:01crwdnd2935265:01crwdne2935265:0
    • Bend the battery cable slightly away from its socket on the logic board so it does not accidentally connect itself while you work.

  5. MacBook Pro 13" Unibody Early 2011 Hard Drive Replacement, Hard Drive: crwdns2935265:05crwdnd2935265:01crwdnd2935265:01crwdne2935265:0
    • Remove the two Phillips screws securing the hard drive bracket to the upper case.

    • These screws will remain attached to the hard drive bracket.

  6. MacBook Pro 13" Unibody Early 2011 Hard Drive Replacement: crwdns2935265:06crwdnd2935265:01crwdnd2935265:01crwdne2935265:0
    • Remove the hard drive bracket.

    • The hard drive bracket may be firmly seated against the upper case.

  7. MacBook Pro 13" Unibody Early 2011 Hard Drive Replacement: crwdns2935265:07crwdnd2935265:01crwdnd2935265:01crwdne2935265:0
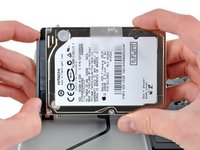
    • Use the attached pull tab to lift the hard drive out of the upper case.

    • Don't try to completely remove the hard drive just yet. It is still attached to the hard drive cable.

  8. MacBook Pro 13" Unibody Early 2011 Hard Drive Replacement: crwdns2935265:08crwdnd2935265:01crwdnd2935265:02crwdne2935265:0 MacBook Pro 13" Unibody Early 2011 Hard Drive Replacement: crwdns2935265:08crwdnd2935265:02crwdnd2935265:02crwdne2935265:0
    • Pull the hard drive cable away from the body of the hard drive.

    • Remove the hard drive.

  9. MacBook Pro 13" Unibody Early 2011 Hard Drive Replacement, Hard Drive: crwdns2935265:09crwdnd2935265:01crwdnd2935265:02crwdne2935265:0 MacBook Pro 13" Unibody Early 2011 Hard Drive Replacement, Hard Drive: crwdns2935265:09crwdnd2935265:02crwdnd2935265:02crwdne2935265:0
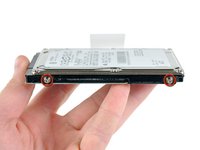
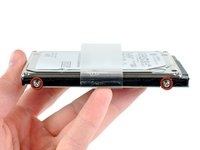
    • Remove the four 6.0 mm T6 Torx hard drive retaining posts from the sides of the hard drive.

    • Transfer the hard drive retaining posts to your new hard drive.

    • If desired, transfer the pull tab over to your new drive.

    • If you are installing a new hard drive, we have an OS X install guide to get you up and running.

    • If you upgraded your EFI Firmware ROM you can also perform an internet recovery.

crwdns2915888:0crwdne2915888:0

To reassemble your device, follow these instructions in reverse order.

crwdns2935229:0438crwdne2935229:0

crwdns2944067:032crwdne2944067:0

Under updated firmware, macbook pro unibody models will not recognize many third-party hard drives. See this discussion: https://discussions.apple.com/message/15...

Ewan Robinson - crwdns2934203:0crwdne2934203:0

Awesome guide! Swapped my 320GB hard drive for an 1TB hard drive. Took five mins thanks to iFixit!

Chris - crwdns2934203:0crwdne2934203:0

hey, do you use SATA 3 for you’re MacBook Pro A1278? is it work good? no problems?

dimdimisra -

dimdimisra, you use the built in cable that comes in it, because of the proprietary mortherboard connector, you can’t use a regular SATA 3 cable

ryan sparling -

I feel you should be pointing out a couple of things about the chassis screws that are not obvious to the inexperienced

- the 6 screws that are not along the hinge edge of the body (4 yellow & 2 of the orange) are not perpendicular to the flat surface; they go in at an angle such that their heads are flat in the curve in which they sit. Attempting to hold the screwdriver upright in these heads could lead to damage to the screws, stripping out the "cross"

- attempting to insert these screws "straight" when reassembling will lead to cross-threading and stripping the screw threads

Christopher Bedford - crwdns2934203:0crwdne2934203:0

crwdns2917038:0crwdne2917038:0

crwdns2936625:0crwdne2936625:0:

crwdns2936751:024crwdne2936751:0 25

crwdns2936753:07crwdne2936753:0 177

crwdns2936753:030crwdne2936753:0 732

crwdns2942667:0crwdne2942667:0 679,089